 Boats For Sale:


73 Skier Restoration |
Post Reply 
|
Page 123 26> |
| Author | |
Keeganino 
Grand Poobah 

Joined: October-27-2009 Location: North Carolina Status: Offline Points: 2063 |
 Post Options Post Options
") Thanks(0) Thanks(0)
 Quote Reply Quote Reply
 Topic: 73 Skier Restoration Topic: 73 Skier RestorationPosted: January-11-2010 at 1:21pm |
|
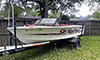
I started the topic plastic windshield and got so much help and I am sure that I will have the shiniest windshield on the block, but I am now the proud owner of a project boat. How bout these floors? Cry Cry Cry! A couple of hours work yesterday revealed what I did not want to see. The main stringers seem ok but based on everything I have read on here, there is no way they are dry. But I am still in denial... they are fine right? Not sure what to do since I do not have a garage or shop to work in. Should I start grinding out what I know is wet and rotten? The secondary starboard stringer was actually frozen yesterday when I was pulling chunks of it out. Is there such thing as a stringer repair job or is it all or nothing on the floor? Is there something I can do to get by a couple more seasons till I can get a shop to do it right or will that ruin the boat completely? It's all fun and games till your floors a rotted out!


   [/QUOTE] [/QUOTE]
|
|
|
"working on these old boats may not be cost effective but as it shows its what it brings into your life that matters" -Roger
1973 Skier |
|
 |
|
|
SNobsessed
Grand Poobah
Joined: October-21-2007 Location: IA Status: Offline Points: 7102 |
Post Options
Thanks(0)
Quote Reply
Posted: January-11-2010 at 9:03pm |
|
Keegan - The most important factor for you to consider is safety. You don't want the engine to come loose during operation!
So check your motor mounts to see if the screws still hold torque; you might even want to grind the glass away near the motor mounts or drill a hole in the stringers to see if that wood is rotted (my guess is that it will be). If they don't hold torque, it is unsafe to run the boat, IMO. The removable panel in back could be easily replaced. If your main stringers are rotted, they need to be replaced. Trying to do a partial repair is just wasting time, effort, & money in the long run. I know this isn't what you wanted to hear. Maybe you can put up a ridge pole above your boat & have a big tarp to create a workspace so you can get this project done before summer. |
|
|
“Beer is proof that God loves us and wants us to be happy.”
Ben Franklin |
|
|
|
|
uk1979
Platinum Member 
Joined: June-13-2007 Location: United Kingdom Status: Offline Points: 1410 |
Post Options
Thanks(0)
Quote Reply
Posted: January-11-2010 at 9:52pm |
|
Chris is right it looks like its time for the rebuild.
|
|
|
Lets have a go
56 Starflite 77 SN 78 SN 80 BFN |
|
|
|
|
8122pbrainard
Grand Poobah

Joined: September-14-2006 Location: Three Lakes Wi. Status: Offline Points: 41040 |
Post Options
Thanks(0)
Quote Reply
Posted: January-11-2010 at 10:31pm |
|
Keegan,
Have you checked the engine/prop shaft/strut alignment? You do have a stringer rot problem!!!! |
|
|
|
|
Keeganino
Grand Poobah
Joined: October-27-2009 Location: North Carolina Status: Offline Points: 2063 |
Post Options
Thanks(0)
Quote Reply
Posted: January-11-2010 at 11:21pm |
|
Snobsessed- Like knowing your woman has been running around on you I just had to hear it straight. I have not tested the engine mounts yet but that one stringer is mud and there is plenty more where that came from so I am not real optimistic.
UK- You are a scientist! I have read a lot about your amazing glass work and foam tests. Pbrain- I have no idea how to check that, but I ran her several times in October and November with no noises or performance issues that I could notice, and I have been driving her for years. I was not really taking it easy on her either. Got up to 49 mph on the gps to test how accurate the old airguide speedo is. Pretty darn accurate! Now for upcoming business- I need some info about tenting off and if you could please point me to the best threads on grinding and removal technics. Also about blocking the boat up for the work. I have a friend with a shop who can pull and store the engine, but not enough room for me to work in. I just finished remodeling the house. Why not rebuild a boat? All input is welcomed and appreciated. If I am going to do it I might as well do it right and back to original. Found some interesting contraband in the bow! It was ooooooooooooooold! |
|
|
|
|
storm34
Grand Poobah

Joined: November-03-2008 Location: Dexter Iowa Status: Offline Points: 4492 |
Post Options
Thanks(0)
Quote Reply
Posted: January-12-2010 at 2:14am |
|
Do a search for stringer rebuilds and make sure to do an advanced search and look back atleast a year. I'm on the phone now so I can't help ya anymore till I get infront of a comp. Great looking boat tho!!! Looking forward to seeing the progress!
|
|
|
|
|
Cslaten33
Senior Member 
Joined: December-21-2009 Location: Tulsa, OK Status: Offline Points: 150 |
Post Options
Thanks(0)
Quote Reply
Posted: January-12-2010 at 4:57am |
|
Hey man that is what my floor looked like, so I just grabbed a dye grinder and a cutting wheel and took off around the out side of the floor on my boat. It took several hours of hard to get the floor out. I personaly thought the saturated foam was the biggest pain in the ass. Good luck.
Clark Slaten |
|
|
Thanks Clark Slaten
|
|
|
|
|
WakeSlayer
Grand Poobah

Joined: March-15-2006 Location: United States Status: Offline Points: 2138 |
Post Options
Thanks(0)
Quote Reply
Posted: January-12-2010 at 12:59pm |
|
What sort of contraband? Was it rotted?
|
|
|
Mike N
1968 Mustang |
|
|
|
|
Keeganino
Grand Poobah
Joined: October-27-2009 Location: North Carolina Status: Offline Points: 2063 |
Post Options
Thanks(0)
Quote Reply
Posted: January-12-2010 at 1:13pm |
|
It was weird what I found. There was a tiny bit of green remnants but then there were hundreds of baggies all with the corners cut out. I mean hundreds! All bagged inside bags insides bags and very dry. Green was not their main thing. I was hoping to find something cool in the boat like a diamond ring. I am just glad we have never been boarded and searched. There was enough evidence left in there to go to jail for trafficking! Maybe there is a vacuum sealed bag full of cash under the floor. I can dream right!
|
|
|
|
|
storm34
Grand Poobah
Joined: November-03-2008 Location: Dexter Iowa Status: Offline Points: 4492 |
Post Options
Thanks(0)
Quote Reply
Posted: January-12-2010 at 2:12pm |
|
Haha...thats an interesting find there! I don't think I've heard anything like that before, your boat is from the 70's tho!
|
|
|
|
|
8122pbrainard
Grand Poobah
Joined: September-14-2006 Location: Three Lakes Wi. Status: Offline Points: 41040 |
Post Options
Thanks(0)
Quote Reply
Posted: January-12-2010 at 4:06pm |
|
Lots of interesting things have been found in the bilge and foam. Seems like the CC factory didn't have any garbage service and it all went out with the new boats!
|
|
|
|
|
TRBenj
Grand Poobah

Joined: June-29-2005 Location: NWCT Status: Offline Points: 21109 |
Post Options
Thanks(0)
Quote Reply
Posted: January-12-2010 at 5:07pm |
|
Keegan, do a search on here- a member named JDiggs created a drawing for Ski Tique stringers which would be the same for your Skier (same hull). We're using them as a guide on our '71 and they should be helpful in putting together your material list, at the very least.
You need to do some reading on here to determine a few things before you buy your materials... foam vs. no foam, stringer and floor material, etc. There are several ways to do it. I wouldnt bother supporting the hull with anything more than the trailer. Ive gutted a Ski Tique and our '71 and havent bothered- the 16' boats have small, thick hulls and really dont flex much at all. |
|
|
|
|
Keeganino
Grand Poobah
Joined: October-27-2009 Location: North Carolina Status: Offline Points: 2063 |
Post Options
Thanks(0)
Quote Reply
Posted: January-12-2010 at 5:43pm |
Great info thank you! Foam foam foam. What kind and what do you think about it? I would like to build a cooler into the floor behind each seat. Fill it with beer foam 
Seriously though I have so much to learn before I even think about making my first cuts. Threads are great and key info is hidden all through them but... A book would be great. Any recommendations? You answered step 1- That I can work on it on the trailer. Step 2 is where it all gets dicey! Thanks for pointing me at those stringer drawings. You rock! |
|
|
|
|
TRBenj
Grand Poobah
Joined: June-29-2005 Location: NWCT Status: Offline Points: 21109 |
Post Options
Thanks(0)
Quote Reply
Posted: January-12-2010 at 6:14pm |
I think you'll find more than enough info here on the forums to answer any question that you have. Search, search, search- and read, read, read! Here are some big hitters on stringer/floor jobs. My apologies to anyone I forgot. In no particular order: Buffalo's '88 Barefoot Nautique Skibum's '87 Ski Nautique rebuild (and his website) aka's '83 SN Wakeslayer's '68 Stang Joe in NY's all composite 60mph Nautique rebuild The Grinch's '79 BFN UK79's '78SN Hasbeenskier has also done a beautiful job restoring 2 '81's with composites... a SN and a BFN. He has numerous threads on each, so do some clicking and read those too. |
|
|
|
|
Bremsen
Senior Member
Joined: June-26-2005 Location: United States Status: Offline Points: 171 |
Post Options
Thanks(0)
Quote Reply
Posted: January-12-2010 at 6:17pm |
|
Keeganino,
Bill made a great site that is about as close to a book as you'll find on the subject Bill's Boatworks *edit-TR beat me to it. |
|
|
|
|
WakeSlayer
Grand Poobah
Joined: March-15-2006 Location: United States Status: Offline Points: 2138 |
Post Options
Thanks(0)
Quote Reply
Posted: January-12-2010 at 7:15pm |
|
Bill's rebuild page is a great read. His ability to inject some humor into things that are simply not funny, is second to none.
|
|
|
Mike N
1968 Mustang |
|
|
|
|
Keeganino
Grand Poobah
Joined: October-27-2009 Location: North Carolina Status: Offline Points: 2063 |
Post Options
Thanks(0)
Quote Reply
Posted: January-12-2010 at 8:05pm |
This is exactly what I was looking for. Nice website. 
|
|
|
|
|
Keeganino
Grand Poobah
Joined: October-27-2009 Location: North Carolina Status: Offline Points: 2063 |
Post Options
Thanks(0)
Quote Reply
Posted: January-18-2010 at 7:10pm |
|
Here is an update. It was 60 here today so I got out there and did some poking around. Here is what I have found- STRINGER PUDDIN'! YUM YUM! I can almost taste the resin now and I am starting to itch. Starboard side is the worst, with rot all along the stringers. The transmission mounts would not tighten, they just spun in place. There was major rot under the driver seat. Notice the screwdriver that is poked all the way through the stringer. I wish I would have done all of this back in October, and was halfway through the re-build. I had fantasies of running her for the summer but now I am hoping I can get her rebuilt before it gets cold again.
See any potential water entry points here? 
Sorry I already ate this bowl of Stringer Pudding 
I don't think that is supposed to go there. 
Yummy puddin 
Crack Kills! 
She did not keep her motor clean 
Stringer Pudding for everybody! 
I have been following a few different threads on here about stringer repairs and am working out my own details right now, like how to pay for all this, where to do the work, and how long it will take me. Other than that I am more than convinced that she will not see the water again till she is shining like new. |
|
|
|
|
TRBenj
Grand Poobah
Joined: June-29-2005 Location: NWCT Status: Offline Points: 21109 |
Post Options
Thanks(0)
Quote Reply
Posted: January-18-2010 at 7:34pm |
Keegan, the number I have heard estimated is about 200 hours for a complete stringer and floor job. Keep posting the pictures- it will be a good reference for many of us going forward! We'll be picking up where we left off on our Skier come springtime. |
|
|
|
|
Keeganino
Grand Poobah
Joined: October-27-2009 Location: North Carolina Status: Offline Points: 2063 |
Post Options
Thanks(0)
Quote Reply
Posted: January-18-2010 at 8:05pm |
|
200 hours Five 40 hour weeks of work. It sounds so easy...

|
|
|
|
|
Keeganino
Grand Poobah
Joined: October-27-2009 Location: North Carolina Status: Offline Points: 2063 |
Post Options
Thanks(0)
Quote Reply
Posted: January-19-2010 at 1:53pm |
|
Today I am going to start at the rear of the boat and begin taking it apart. Am thinking of starting with the fuel tank and working my way forward. Want to remove all the hardware down to the structure before I get started. Any suggestions before I get out there this afternoon?
|
|
|
|
|
Keeganino
Grand Poobah
Joined: October-27-2009 Location: North Carolina Status: Offline Points: 2063 |
Post Options
Thanks(0)
Quote Reply
Posted: January-19-2010 at 11:26pm |
|
I can see that this may take me a bit longer than some of you because of my all around lack of experience. This is my first boat and I am about to rebuild it from scratch. My wife will tell you I am a glutton for impossible tasks. I go out there today and I figure I will start taking it apart from the rear to the front. Seems logical right… Get all the fuel out of the tank and get the tank out so I can get the platform off.
I took off the hardware above deck and then removed the fuel line from the filter, leaving it attached to the tank. Notice in the pictures this is the original fuel line. It says 1973 on it. Then I siphoned the gas out into a 2 gallon container one at a time till it was empty. (Now I wish I had taken her out one last time and run some seafoam through the tank before she goes into restoration. Neat trick I used was to cover the escape valves and blow into the tank so I did not have to suck any gas. The gas went into the minivan. After the tank was drained I started disconnecting the wires going to the tank and blower. What is the window above the gas tank for? I can see why you might need to get in there, but what is the light for, and why would you need to see down there on a regular basis? All that is down there are some wires and the top of the gas tank. Another big problem area. As you can see in the pictures there is wood rot under that glass hatch and all of the snaps pulled out by hand. There is wood up unda there and it is wasted. Do I have to take the top off to fix this? I will be following the standard of pilot drilling, CPESing, and 5200ing all screws when I get to the putback. Did not actually get the tank out today but It is ready to come out. The bolts will be hard to get to with my paws but looks straight forward enough. The supports under the tank are wrapped in what appears to be the same fabric as the seats are. White vinyl… Why would they do that? It seems like that would just be a place for moisture to lurk. There are some pieces stuck to the floor that look like they could be remnants of the original vinyl floor. Basket weave pattern, but the color is wasted. Almost black. Will try to photograph that once I get the tank out. See what ya’ll have to say about it. I have been reading reading reading. So much to learn about the putback, but I am ready for the demo. Before getting started 
Removed all of the hardware above 
More wood rot. Not where I expected to find it. 
Draining the tank and the original fuel line from 1973! 
|
|
|
|
|
TRBenj
Grand Poobah
Joined: June-29-2005 Location: NWCT Status: Offline Points: 21109 |
Post Options
Thanks(0)
Quote Reply
Posted: January-19-2010 at 11:43pm |
That glass window is the "site window" for the gas tank. Early boats didnt have an electronic fuel gauge at the dash- instead, they had a mechanical one right on the top of the tank. The wires you see would have connected a light that allows you to see the mechanical gauge while looking through the site hole (which turned on with the dash lights). This is how my Inca Gold Skier is set up- the electronic gauge must have been optional! CC is famous for using whatever scraps of material for miscellaneous fastening on the boat- people have found gas tank, wiring harness and muffler supports all have wrapped in carpet or vinyl remnants. Cost savings at its finest! |
|
|
|
|
storm34
Grand Poobah
Joined: November-03-2008 Location: Dexter Iowa Status: Offline Points: 4492 |
Post Options
Thanks(0)
Quote Reply
Posted: January-19-2010 at 11:48pm |
|
Keegan, our 74 Skier had the same glass plate and was used to check the fuel level. Made it pretty tough to tell during the daytime.
Good luck on your rebuild! You'll be more proud of her when its all said and done! Keep us up to date! |
|
|
|
|
Keeganino
Grand Poobah
Joined: October-27-2009 Location: North Carolina Status: Offline Points: 2063 |
Post Options
Thanks(0)
Quote Reply
Posted: January-19-2010 at 11:56pm |
I am getting ready to send off to correct craft to get the born date and am hoping they can give me some info on the options it was equipped with as well as the color numbers for the gelcoat. I know that the waterline stripe and the seats were an optional upgrade. The seats are opposite the boat. White seats with red piping. I am going to have those done back to original. Cool to know about the sight window. Maybe I can put the lite behind a CC logo and have it showing through the window. Anybody else done anything with this legacy window? |
|
|
|
|
uk1979
Platinum Member
Joined: June-13-2007 Location: United Kingdom Status: Offline Points: 1410 |
Post Options
Thanks(0)
Quote Reply
Posted: January-19-2010 at 11:57pm |
|
Keegan you will soon have it back together with all the info on the site, it may take some time but its all there.
Good luck. |
|
|
Lets have a go
56 Starflite 77 SN 78 SN 80 BFN |
|
|
|
|
Keeganino
Grand Poobah
Joined: October-27-2009 Location: North Carolina Status: Offline Points: 2063 |
Post Options
Thanks(0)
Quote Reply
Posted: January-20-2010 at 12:09am |
I figure I will not ever have to pay anybody to work on her either. I will be the master of my own domain! Ok I am only grasshopper right now, but I will be master when I am done! |
|
|
|
|
Keeganino
Grand Poobah
Joined: October-27-2009 Location: North Carolina Status: Offline Points: 2063 |
Post Options
Thanks(0)
Quote Reply
Posted: January-20-2010 at 12:16am |
Thanks Roger! Your work is amazing and I am following your info closely. Glad I just have a skier and not a BF for my first project! I used to live in Leeds. Where abouts are you? |
|
|
|
|
8122pbrainard
Grand Poobah
Joined: September-14-2006 Location: Three Lakes Wi. Status: Offline Points: 41040 |
Post Options
Thanks(0)
Quote Reply
Posted: January-20-2010 at 8:38am |
|
Keegan,
I don't believe you mentioned if you have the original mechanical gauge in the tank. Is it still there? You mentioned hoses. That feature was actually a upgrade for a boat. Before the site glass/mechanical gauge you would have to "stick" the tanks. (literally put something like a yardstick down through the tank fill) |
|
|
|
|
Keeganino
Grand Poobah
Joined: October-27-2009 Location: North Carolina Status: Offline Points: 2063 |
Post Options
Thanks(0)
Quote Reply
Posted: January-20-2010 at 12:31pm |
There is no mechanical gauge on the tank. It looks like the electronic gauge went in the hole where the mechanical one came out. This boat definitely came with a few of the options, so maybe it came that way? Hoping to get the tank out today before it starts raining again. |
|
|
|
|
Post Reply
|
Page 123 26> |
 Tweet
Tweet
|
| Forum Jump | Forum Permissions You cannot post new topics in this forum You cannot reply to topics in this forum You cannot delete your posts in this forum You cannot edit your posts in this forum You cannot create polls in this forum You cannot vote in polls in this forum |


 Topic Options
 TRBenj wrote: