Boats For Sale:


73 Skier Restoration |
Post Reply 
|
Page <1 1314151617 26> |
| Author | |
Keeganino 
Grand Poobah 

Joined: October-27-2009 Location: North Carolina Status: Offline Points: 2063 |
 Post Options Post Options
") Thanks(0) Thanks(0)
 Quote Reply Quote Reply
 Posted: March-25-2010 at 5:51pm Posted: March-25-2010 at 5:51pm |
|
Guess I will just have to sit on the gunnel then
 Another classy move I love! Another classy move I love!
|
|
|
"working on these old boats may not be cost effective but as it shows its what it brings into your life that matters" -Roger
1973 Skier |
|
 |
|
|
8122pbrainard
Grand Poobah

Joined: September-14-2006 Location: Three Lakes Wi. Status: Offline Points: 41040 |
Post Options
Thanks(0)
Quote Reply
Posted: March-25-2010 at 6:09pm |
|
Keegan,
When the time comes to bolt the repaired seat tubs back on the bases, I have a suggestion. I don't know if the factory ever did it (probably not) but the bolted areas are real high stress points. I'd use SS fender washers with thin rubber between them and the glass on the top side as well as rubber between the glass and the frames on the bottom side. The fiberglass tub will not have a nice smooth flat surface and the rubber will take up the irregularities. |
|
|
|
|
TRBenj
Grand Poobah

Joined: June-29-2005 Location: NWCT Status: Offline Points: 21129 |
Post Options
Thanks(0)
Quote Reply
Posted: March-25-2010 at 6:12pm |
Pete, like I mentioned above, the factory sandwiched the bottom of the glass bucket with 3/8" or 1/2" ply (on both sides). The bottom of the bucket shouldnt see much stress. |
|
|
|
|
skicat
Platinum Member 

Joined: May-18-2006 Location: Duluth, GA Status: Offline Points: 1128 |
Post Options
Thanks(0)
Quote Reply
Posted: March-25-2010 at 6:43pm |
|
Mine had the plywood like Tim mentioned. While I have them apart I did add some glass to the corners & high stress areas to be sure. I think the high stress areas are where the bottom meets the back.
|
|
|
|
|
Keeganino
Grand Poobah
Joined: October-27-2009 Location: North Carolina Status: Offline Points: 2063 |
Post Options
Thanks(0)
Quote Reply
Posted: March-25-2010 at 6:43pm |
|
Tim is correct. It is sandwiched between plywood. I have already cut those and am waiting till I drill the holes to cpes them. Just got finished grooving out all the cracks. Will post pics tonight if I have time.
|
|
|
"working on these old boats may not be cost effective but as it shows its what it brings into your life that matters" -Roger
1973 Skier |
|
|
|
|
TRBenj
Grand Poobah
Joined: June-29-2005 Location: NWCT Status: Offline Points: 21129 |
Post Options
Thanks(0)
Quote Reply
Posted: March-25-2010 at 6:47pm |
|
Keegan, dont just groove out the cracks with a dremel- make sure you bring them down to 0 thickness and taper them up over a larger distance (at least 1/2").
|
|
|
|
|
Keeganino
Grand Poobah
Joined: October-27-2009 Location: North Carolina Status: Offline Points: 2063 |
Post Options
Thanks(0)
Quote Reply
Posted: March-30-2010 at 2:20pm |
|
I got Tim's message a little late but I recovered nicely. This thing is solid as a rock now. Pretty sure I can get at least another 37 years out of it.
Lined out ready to be grooved 
Grooved out with a dremel. I did read Tim's message right after I had done this and went back and tried to feather out the groove further but the glass just kept breaking off. 
So what I did was to put 2 thin layers of cloth on the inside of the seat. Once that cured I used the grinder and ground from the outside through to the new glass I had just put in. This gave me a wide channel to fill. 
Another view from the outside ground to the new glass on the inside with wide channel. 
Another view. This allowed me to make these points super strong.
Before sanding away the excess, but close to the final product. Good thing I got 10 gallons of epoxy! 
|
|
|
"working on these old boats may not be cost effective but as it shows its what it brings into your life that matters" -Roger
1973 Skier |
|
|
|
|
Keeganino
Grand Poobah
Joined: October-27-2009 Location: North Carolina Status: Offline Points: 2063 |
Post Options
Thanks(0)
Quote Reply
Posted: March-31-2010 at 2:30am |
|
Here it is all finished. I basically wrapped the entire seat. After doing the bottom and sides with epoxy to fix the cracks, the back felt really flimbsy so I went ahead and wrapped he inside of the seatback. It is stiff now. I figure if I am paying all that money to get the seats redone, I don't want to worry about whether the shells are going to crack.
These shells have been a learning process for me. I got to use the epoxy and get a feel for the pot life and how thick to lay it down to wet out the cloth. I got to use the cabosil to thicken a batch that I used to fill the holes previously drilled through the seat bottoms. This area was repaired 
|
|
|
"working on these old boats may not be cost effective but as it shows its what it brings into your life that matters" -Roger
1973 Skier |
|
|
|
|
Keeganino
Grand Poobah
Joined: October-27-2009 Location: North Carolina Status: Offline Points: 2063 |
Post Options
Thanks(0)
Quote Reply
Posted: April-02-2010 at 7:45pm |
|
I am trying to figure out the final details of notching my stringers and the floor layout before I get going putting it back together.
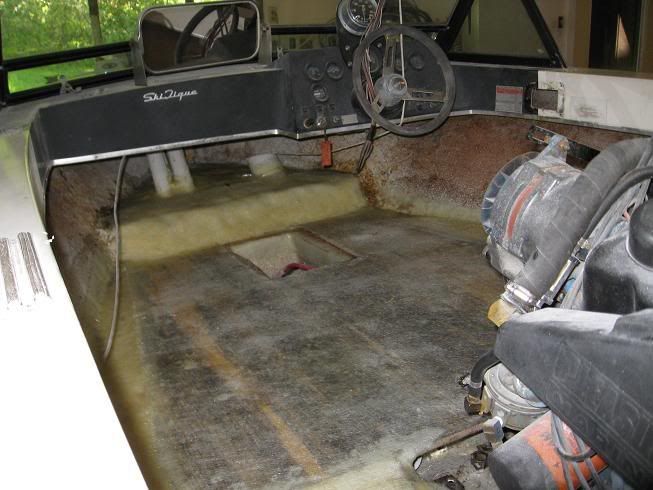
Please help! 1. How much space is there between the bucket seat brackets? I am trying to figure out how to house the 2 batteries and build a way so that I can get to them. The PO put the battery box under the spotter seat, but there is a huge space in the bilge in front of the pylon that was covered by a metal plate. In a nutshell, can I fit a battery lengthwise in between the buckets? Where are the batteries in other Skiers? 2. Any ideas on the removable piece of plywood behind the doghouse? Part of me says to just glass it all in and if I ever have an issue back there just cut it back out. I have a round hatch that was in there before I could put back in so I can access the log. 3. What do I do about the plywood floor around the engine mounts? Should I just cut the ply out around the mounts? I don't see that being very easy to glass around if I do it that way. Any ideas? |
|
|
"working on these old boats may not be cost effective but as it shows its what it brings into your life that matters" -Roger
1973 Skier |
|
|
|
|
storm34
Grand Poobah

Joined: November-03-2008 Location: Dexter Iowa Status: Offline Points: 4492 |
Post Options
Thanks(0)
Quote Reply
Posted: April-02-2010 at 7:59pm |
|
1. My Ski Tique has the battery between the seats but up under the dash more. I'll see if I can get a pic in a few min. You should be able to build a battery box inbetween the stringers and do so deep enough to hide it with a cap.
My skier (1st gen.-Mustang hull) will have the battery beneath the bow. I'd like to have the space to build some sort of cupholder/glove box to sit inbetween the seats or push up under the bow. 2. I would leave the ply loose so you can check your alignment and get to your shaft log and mufflers. Covering it permanently would mean you have to tear it all apart to access everything. 3. I cut my Skier's floor in sections so I can remove it during the winter months, so mine may be a little different. I cut the ply around the mounts, just give em nice rounded edges. |
|
|
|
|
storm34
Grand Poobah
Joined: November-03-2008 Location: Dexter Iowa Status: Offline Points: 4492 |
Post Options
Thanks(0)
Quote Reply
Posted: April-02-2010 at 8:02pm |
|
By the way... Haven't stopped in for a while...looking GREAT!
|
|
|
|
|
WakeSlayer
Grand Poobah

Joined: March-15-2006 Location: United States Status: Offline Points: 2138 |
Post Options
Thanks(0)
Quote Reply
Posted: April-02-2010 at 8:18pm |
|
Keegan,
Here is a pic of my battery box install. There should be plenty of room there for you. Even for two batteries if you think that is necessary. 

I have a couple pieces of wood adhered to the hull for the battery box to sit on. It straps down to the box through the bottom. The cables run into the side of the cable run, and out to the motor. Rather than using wooden crossmembers across the bilge in back, I used aluminum L stock and screwed them to the inside of the stringers to hold the centerboard up. Without question you want to have open access back there in case of a problem. If I were to do it again, and I actually am, I would make the access board stretch to the secondaries so you have full access to the exhaust, not just the bilge. 

For the motor mounts, yes, you need to notch out the ply. You can kinda see in this pic. 
|
|
|
Mike N
1968 Mustang |
|
|
|
|
storm34
Grand Poobah
Joined: November-03-2008 Location: Dexter Iowa Status: Offline Points: 4492 |
Post Options
Thanks(0)
Quote Reply
Posted: April-02-2010 at 8:27pm |
|
Mike, are you ever worried about your blower getting wet in the bilge?
|
|
|
|
|
WakeSlayer
Grand Poobah
Joined: March-15-2006 Location: United States Status: Offline Points: 2138 |
Post Options
Thanks(0)
Quote Reply
Posted: April-02-2010 at 8:32pm |
|
Nope.
|
|
|
Mike N
1968 Mustang |
|
|
|
|
Keeganino
Grand Poobah
Joined: October-27-2009 Location: North Carolina Status: Offline Points: 2063 |
Post Options
Thanks(0)
Quote Reply
Posted: April-02-2010 at 8:51pm |
|
Thanks guys that helps a lot. Mike- what is that you are using for the trim on the floor to cover the seam where the removable plywood is in the back? I saw aluminum trim on Godafather's skier, I think. I am using the Nautolex vinyl from Gary's upholstery. Going with "Shark" on the floor and "Black" on the walls and painting the bilge white. Where do I get the trim? I will need black, white or aluminum.
I am adding the xtra battery because the seat heaters draw 5 amps a piece and a PO cut a hole in the dash for a stereo head unit. Since I can't fix the dash I am going to add a nice system. Already have a 1200 watt amp and 2 Pioneer 12's from my younger years sitting in the attic that I am going to put up under the bow and will probably put 6.5's in the kickplate. May build some removable pods with 6x9's in the back to round it out depending on how much resin I have left. I know it is not stock but what else am I going to do about a freakin 10x4" hole in the dash? The guy even drilled a hole through the top to fit a little rubber antenna that sits on the dash!!!!!!!!!!! |
|
|
"working on these old boats may not be cost effective but as it shows its what it brings into your life that matters" -Roger
1973 Skier |
|
|
|
|
WakeSlayer
Grand Poobah
Joined: March-15-2006 Location: United States Status: Offline Points: 2138 |
Post Options
Thanks(0)
Quote Reply
Posted: April-03-2010 at 2:49pm |
|
That trim is what they used on later model Nautiques. I ordered from CC.
|
|
|
Mike N
1968 Mustang |
|
|
|
|
srbranum
Senior Member 

Joined: March-06-2010 Location: Huntsville, Al Status: Offline Points: 369 |
Post Options
Thanks(0)
Quote Reply
Posted: April-03-2010 at 4:17pm |
Hey dude. Hope you don't mind me asking but what are you calling the "air box" or am I missing something? Thanks. scott |
|
|
I have to keep her running 'cause I can't afford a new one
|
|
|
|
|
bkhallpass
Grand Poobah

Joined: March-29-2005 Location: United States Status: Offline Points: 4723 |
Post Options
Thanks(0)
Quote Reply
Posted: April-03-2010 at 4:40pm |
|
He is referring to the hump in the floor under the nose of the boat. Some people have cut them out as one piece and fiberglassed the piece back in. BKH
|
|
|
Livin' the Dream
|
|
|
|
|
Keeganino
Grand Poobah
Joined: October-27-2009 Location: North Carolina Status: Offline Points: 2063 |
Post Options
Thanks(0)
Quote Reply
Posted: April-03-2010 at 6:05pm |
|
Mike
Where does your battery box drain to, or does it? Are both of those bulkheads water tight from the bilge? Thanks Keegan |
|
|
"working on these old boats may not be cost effective but as it shows its what it brings into your life that matters" -Roger
1973 Skier |
|
|
|
|
WakeSlayer
Grand Poobah
Joined: March-15-2006 Location: United States Status: Offline Points: 2138 |
Post Options
Thanks(0)
Quote Reply
Posted: April-03-2010 at 8:41pm |
|
I don't have a drain in it. It is just a plastic marine box set in there. Both bulkheads are watertight from the bilge. The second void has noodles and a little time capsule in it.
|
|
|
Mike N
1968 Mustang |
|
|
|
|
TRBenj
Grand Poobah
Joined: June-29-2005 Location: NWCT Status: Offline Points: 21129 |
Post Options
Thanks(0)
Quote Reply
Posted: April-05-2010 at 1:11pm |
Keegan, a few comments: 1. There is enough room to fit a battery between the seats, but remember that you'll be stepping on the lid if you put it there. I would highly recommend putting it all the way forward, up against the kick plate (like I did in my Tique, pictured above). This keeps it within reach, but out of the way of foot traffic. I doubt you would need 2 batteries unless you plan to run accessories for long periods of time with the motor off, but if you choose to do so, I sould consider turning the batt box sideways and making it twice as wide in that same location. In case youre curious, the original configuration would have put the battery under the driver's seat (at least thats how my '71 Skier is). 2. I would HIGLY recommend you leave that floor panel removable in the rear. I cant think of a single advantage of glassing it in. That "access" port is really best left for inspecting the packing... trying to get wrenches in there and actually adjusting it is a much bigger PITA. Leaving the panel there for maintenance purposes- exhaust hoses, shaft packing, etc just makes sense. Glass the side floors into the pockets and put a panel in that spans the mains and covers everything. You will barely notice the seam in the floor. 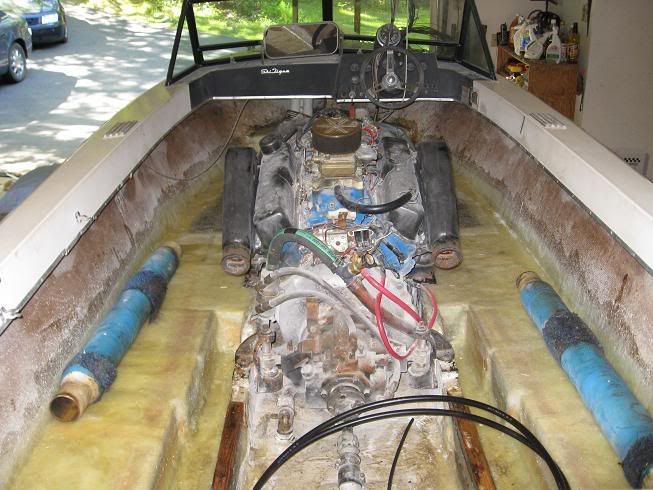
3. Yes, you will need to notch the ply floor around the front motor mounts. I figure I will attach a backer to the stringer for the floor to seal to. Cut the notch big enough (1" all around) so that you can fillet the edges before glassing the floor down. Oh, and I thought you were going to go with an original style floor covering... why are you asking about the newer style carpet trim? If you want to stay original, I would consider putting a second (~3/8") floor layer on over the glassed floor. This layer can be vinyl wrapped around the edges, just like it was originally. |
|
|
|
|
Keeganino
Grand Poobah
Joined: October-27-2009 Location: North Carolina Status: Offline Points: 2063 |
Post Options
Thanks(0)
Quote Reply
Posted: April-05-2010 at 2:26pm |
|
Thanks Tim
Here is what I am thinking at this point (and I am tired of thinking) Keep the floor removable in the back just the way it was. I am going with the vinyl flooring and was not sure if I needed the trim to cover the seam. It makes sense to wrap the vinyl around the edges and just set it in place. The floor in the back was removable before but the carpet just went all the way across so that the carpet had to be pulled up to get in there. No seams visible. I have thought about doing that with the vinyl too. Removable but at a price? If the seam is not that noticeable wrapping makes a lot more sense. Would that just be a pressure fit, or would I have to put some screws through the vinyl to hold down the hatch? Mine was screwed down before under the carpet. As for the batteries. I am putting a serious stereo system in with subs and at least one amp, and with the heated seats I think I may be pushing the limits of one battery. We are not on a big lake and do not have far to cruise for recharging. Like I said before a PO cut the dash out for a head unit so why not get something positive out of the act of vandalism to my dash. Everything else will be hidden up front of the kick plate, except the speakers I mount in the kickplate itself. After hours of playing around with different configurations I think I am going to mount them in front of the bulkhead sideways as Tim has suggested. They will basically fill the entire space between the bulkhead and kickplate. The subs will sit flush with the top of the floor up front and the amp will be slightly raised to keep it from getting wet if somehow water did get all the way up there. |
|
|
"working on these old boats may not be cost effective but as it shows its what it brings into your life that matters" -Roger
1973 Skier |
|
|
|
|
TRBenj
Grand Poobah
Joined: June-29-2005 Location: NWCT Status: Offline Points: 21129 |
Post Options
Thanks(0)
Quote Reply
Posted: April-05-2010 at 3:07pm |
|
No need to secure the rear panel... none of our later model (78-03) boats had theirs secured. Im not sure what distance yours originally spanned, but it was right in that timeframe that CC went from spanning the mains only to spanning the mains AND exhaust cavities. I strongly urge you to do the latter in case you ever need to service that hose.
Im not sure if youre following me on the floor. It should be 5/8" or so ply, bedded down and glassed in- top and bottom, taped to the walls and bilge. If trying to keep it looking original, I would put another layer of 1/4" or 3/8" ply on top of that, which has been wrapped in vinyl. The factory put a 1/2" ply floor on top of the glassed floor. I may have to retract my idea on setting the battery box/boxes sideways. I dont think you'll be able to mount them that way and still be able to sneak the vent and conduit tubing by them. I barely fit everything through the narrow way on the Tique. 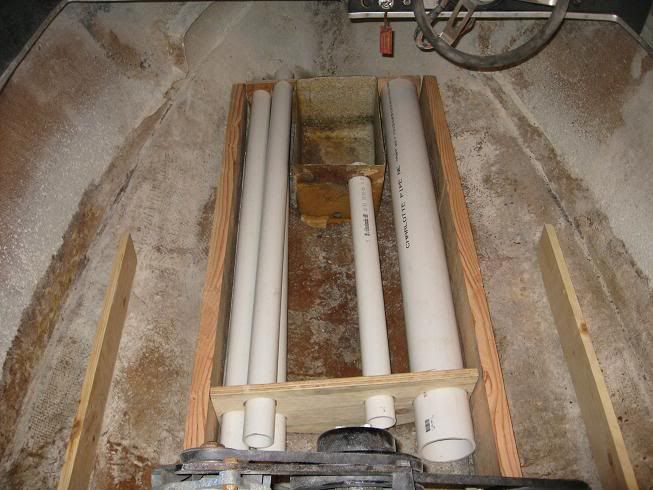
Im also not sure youre following me on the need for 2 batteries... do you spend a lot of time running the stereo with the engine off? If so, then they may be justified. If not, then 2 batteries arent needed. The alt provides all power to the boat (and recharges the battery) when the engine is running. If youre sitting for long periods of time with the stereo on, then there would be an advantage to adding a 2nd battery (isolated from starting battery) that is capable of powering it. |
|
|
|
|
Keeganino
Grand Poobah
Joined: October-27-2009 Location: North Carolina Status: Offline Points: 2063 |
Post Options
Thanks(0)
Quote Reply
Posted: April-05-2010 at 5:41pm |
My hatch spans to the exhaust channel and I will put it back that way. For the floor- that is what I was going to use- 3/4 ply glassed top and bottom and taped to walls and bilge, bedded onto stringers, with 2 layers up front from the pylon mount forward. For strength and will make it easy to make a pressure fitted hatch for the battery box. I was planning on gluing down the vinyl right to the glass floor. My floor is already going to sit high and adding another layer seems like a waste of time. Interesting to know that is how they did that though. Yes we do a lot of chillin and listening to music. We have run the battery dead before with the dinky stereo that was in there running the XM reciever and 2 little speakers. So we basically stopped using the stereo for fear of being stranded. Like I said- with that big ugly hole in my dash I need to derive some satisfaction from it or else it is just going to piss me off that somebody would do that. Why do you have 3 smaller tubes on the air hose side? |
|
|
"working on these old boats may not be cost effective but as it shows its what it brings into your life that matters" -Roger
1973 Skier |
|
|
|
|
TRBenj
Grand Poobah
Joined: June-29-2005 Location: NWCT Status: Offline Points: 21129 |
Post Options
Thanks(0)
Quote Reply
Posted: April-05-2010 at 6:10pm |
|
Gotcha. A 2nd battery does make sense in your case then.
The 3 (2.5" PVC) air vents on the left run up to the front and eventually connect to the hoses running down from the air scoop. The tube on the right houses the steering and control cables, bilge pump hose, wiring harness, etc. 3/4" on the floor is probably overkill, not that theres anything wrong with that. Another 1/4" on top of that certainly wouldnt hurt anything though. Even then you'd only be 1/2" taller than the original configuration (with the 1/2" ply over the glass floor). I think it would be the easiest way to make the vinyl floor look finished- otherwise you will need some trim along the edges. Keep in mind that the floor with a few layers of glass wont be pefectly smooth, and the imperfections that carpet would hide will telegraph through the vinyl. The edge where its taped to the wall will also be filleted so it wont be fun installing that trim either. I dont think the newer style of trim would look right if you decide to go that route though- you can find some aluminum stuff from Mcmaster that would look better and cost a bit less as well. Be sure to seal each screw that holds it down. When you say your panel will run TO the exhaust cavities, you mean OVER the cavities, I hope. My Skier only runs from main to main and the hose is not serviceable- PITA! |
|
|
|
|
WakeSlayer
Grand Poobah
Joined: March-15-2006 Location: United States Status: Offline Points: 2138 |
Post Options
Thanks(0)
Quote Reply
Posted: April-05-2010 at 6:18pm |
|
I have run a single battery in three of my last 4 boats, amp, stereo, etc. Plenty of float time with just music playing. I would suspect you have a parasitic load somewhere, or a crappy battery. Just a thought.
|
|
|
Mike N
1968 Mustang |
|
|
|
|
Keeganino
Grand Poobah
Joined: October-27-2009 Location: North Carolina Status: Offline Points: 2063 |
Post Options
Thanks(0)
Quote Reply
Posted: April-05-2010 at 9:20pm |
|
Mike- could be you are right. This is the only CC I have ever been around so I don't know any different. The extra battery fits well and I now have a plan for the installation.
Here it is 
Tim- Sorry I was not clear, my hatch spans all the way across the exhaust channels and stops just short of the secondaries. I am listening on the 1/4" floor wrapped, how do I attach it to the floor underneath? Bed it in epoxy? My idea was a trick I learned cutting stryofoam under layer that goes on houses before you put the siding up. You overlap the piece that covers the wall and the piece that covers the floor and cut the line as straight as you can along joint. What you are left with is a line that perfectly lines up along both pieces. Here is a short video. It might not work as on the vinyl as well as with the insulation, but its an idea. |
|
|
"working on these old boats may not be cost effective but as it shows its what it brings into your life that matters" -Roger
1973 Skier |
|
|
|
|
8122pbrainard
Grand Poobah
Joined: September-14-2006 Location: Three Lakes Wi. Status: Offline Points: 41040 |
Post Options
Thanks(0)
Quote Reply
Posted: April-05-2010 at 10:02pm |
|
Keegan,
If you are going to put the original vinyl down on the floor,  then The joint between the removable ply and the fixed ply gets the aluminum "T" molding. then The joint between the removable ply and the fixed ply gets the aluminum "T" molding.
|
|
|
|
|
Keeganino
Grand Poobah
Joined: October-27-2009 Location: North Carolina Status: Offline Points: 2063 |
Post Options
Thanks(0)
Quote Reply
Posted: April-05-2010 at 10:12pm |
|
Thanks Pete. I thought that I had seen that on one of the skiers with the original floor and was not sure what it was called. Is it available anywhere you know of?
|
|
|
"working on these old boats may not be cost effective but as it shows its what it brings into your life that matters" -Roger
1973 Skier |
|
|
|
|
Keeganino
Grand Poobah
Joined: October-27-2009 Location: North Carolina Status: Offline Points: 2063 |
Post Options
Thanks(0)
Quote Reply
Posted: April-05-2010 at 11:08pm |
|
"working on these old boats may not be cost effective but as it shows its what it brings into your life that matters" -Roger
1973 Skier |
|
|
|
|
Post Reply
|
Page <1 1314151617 26> |
 Tweet
Tweet
|
| Forum Jump | Forum Permissions You cannot post new topics in this forum You cannot reply to topics in this forum You cannot delete your posts in this forum You cannot edit your posts in this forum You cannot create polls in this forum You cannot vote in polls in this forum |


 Topic Options
 8122pbrainard wrote: