 Boats For Sale:


Plan B: Rust Mitigation on Ram-Lin |
Post Reply 
|
Page 123 4> |
| Author | |
Tide 
Newbie 
Joined: July-27-2011 Location: Georgia Status: Offline Points: 33 |
 Post Options Post Options
") Thanks(0) Thanks(0)
 Quote Reply Quote Reply
 Topic: Plan B: Rust Mitigation on Ram-Lin Topic: Plan B: Rust Mitigation on Ram-LinPosted: July-28-2011 at 7:55pm |
|
No problem! The job you did on your trailer is incredible.
|
|
 |
|
|
dmiracle
Senior Member 

Joined: July-22-2008 Location: Johns Creek, GA Status: Offline Points: 300 |
Post Options
Thanks(0)
Quote Reply
Posted: July-28-2011 at 5:16pm |
|
Sorry man, brain cramp.
I was thinking the normal plywood size was 8x10 instead of the standard 4x8. You are correct, the area is just over 9ft long. Sorry for the confusion. I'm removing my earlier post to get rid of bad info on the site. |
|
|
Doug
|
|
|
|
|
Tide
Newbie
Joined: July-27-2011 Location: Georgia Status: Offline Points: 33 |
Post Options
Thanks(0)
Quote Reply
Posted: July-28-2011 at 1:35pm |
|
The plywood and carpeted section on my 95 Ramlin trailer is a little over 9ft. Long and less than 2ft. Wide so unless I'm missing something a 4 x 10 sheet will be enough unless I mess up on my cuts. Maybe the step on your Ramlin is a different length. The guy in the earlier post said he used 1/8 thick so that is what I'm going with.
|
|
|
|
|
dmiracle
Senior Member
Joined: July-22-2008 Location: Johns Creek, GA Status: Offline Points: 300 |
Post Options
Thanks(0)
Quote Reply
Posted: July-28-2011 at 12:29pm |
|
deleted.
|
|
|
Doug
|
|
|
|
|
Tide
Newbie
Joined: July-27-2011 Location: Georgia Status: Offline Points: 33 |
Post Options
Thanks(0)
Quote Reply
Posted: July-27-2011 at 6:58pm |
|
I'm looking at doing the diamond plate on my 95 trailer. Yours looks great. What thickness did you use on the diamond plate. I was looking at using 3/16 but I'm not sure if that's overkill. I was quoted $361.00 for a 4 x 10 sheet.
|
|
|
|
|
dmiracle
Senior Member
Joined: July-22-2008 Location: Johns Creek, GA Status: Offline Points: 300 |
Post Options
Thanks(0)
Quote Reply
Posted: October-03-2010 at 5:08pm |
|
Sean,
Thanks for the compliment. I had the fenders custom made from Ram-Lin. The came already painted and with new carpet covered interior wood sides. I did not have to use any POR-15 and and therefore not familiar with the product. Many others on here have though and I'm sure will chime in with an answer. Good luck with your project! |
|
|
Doug
|
|
|
|
|
Sephmu
Senior Member
Joined: September-11-2009 Location: Jax Beach, Fl Status: Offline Points: 169 |
Post Options
Thanks(0)
Quote Reply
Posted: October-02-2010 at 4:43pm |
|
Doug, Looks great buddy,
Couple of quick questions, 1) How on Earth did you get the fenders to look so good?! 2) Just bought new Galvanized fenders, and am ordering some POR-15, Is the "metal ready" product necessary on the new metal fenders to make the Por-15 stick?? |
|
|
|
|
dmiracle
Senior Member
Joined: July-22-2008 Location: Johns Creek, GA Status: Offline Points: 300 |
Post Options
Thanks(0)
Quote Reply
Posted: September-13-2010 at 12:17pm |
|
When I purchased my boat from the previous owner, it came with very meticulous/detailed notes regarding every maintenance item ever performed. Below are the notes I wrote for the file regarding the trailer restoration. Perhaps this might help someone else considering a similar project.
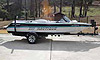
1993 Correct Craft / Ski Nautique Trailer Restoration Project- Summer 2010 Step 1 – Tear Down •*Original wooden step sides and carpet had already been removed by P.O.. •Removed and discarded original carpet from bunk boards. •Removed original bunk boards, inspected for rot, removed all old staples. Boards in great condition. •Removed and discarded all original trailer lights. •Removed and discarded all original wiring and clips. •Removed and discarded original plastic trailer guides/sleeves. •Removed steel trailer guides. •Removed and discarded original fenders. •Removed and discarded original actuator and damaged front hydraulic brake line. Step 2 – Rust Mitigation / Re-Paint •Ground off all rusty spots on trailer which was primarily existent under the bunk boards at lag bolt attachment spots, and the framework support underneath the carpeted step sides. Some rust areas at tongue as well. •Re-painted all ground areas by priming and painting with Rustoleum primer and paint. •Primed and painted new actuator. •Primed and painted bow stop frame. •Removed all old bumper stickers using heat/torch approach and removed glue residue with “Goof Off”. •Waxed entire trailer with McGuires automotive wax. •Applied new “Ski Nautique” decals to side of trailer as existed on original trailer of this year. Step 3 – Bunk Boards •Drilled 2 new holes into trailer channel frame for lag bolt connections of bunk boards. These were the two single front holes for each bunk board which were rusted beyond use. •Drilled and countersunk new holes into bunk boards to line up with new holes. •Reattached bunk boards. •Re-carpeted bunk boards with new, OEM black carpet from Ram-Lin. Installed using original method of attaching double layer of carpet strip on top of boards to give extra protection and “rounded” look. Step 4 – Fenders •Removed wheels. •Installed new OEM custom order fenders from Ram-Lin. •Attached new carpeted fender side protectors. •Applied new anti-slip tread material to top of fenders. Step 5 – Brake Assembly •Installed new Dico 60 actuator. •Installed new front hydraulic brake line (connects to actuator). •Replaced entire drum brake system with brand new, TITAN PREMIER™ Marine Brake assembly featuring the Galphorite™ corrosion-resistant finish. •Adjusted brakes by tightening adjustment wheel until drum would not turn, then backed off wheel 11 clicks. •Added new brake fluid, bled hydraulic braking system. •Hydraulic brakes tested and functioning properly. Step 6 – Lights / Wiring •Installed all new OEM lights from Peterson Mfg. (4 amber side markers, 2 red side markers, 2 red tail lights, 1 3-light center marker, license plate frame and light). •Rewired trailer with new, 25 foot 4-way split harness. All connections soldered together and double wrapped with electrical tape and properly ground. •All wiring re-connected to trailer with OEM clips and zip ties at fenders. •All lights tested and functioning properly. Step 7 – Carpeted Step Sides •Measured and fabricated, 2 new side step panels using ¾” marine grade Douglas Fir. •Sanded all edges and corners, aligned and drilled attachment holes. •Applied 4 coats of Rustoleum marine spar varnish to wood step sides panels for waterproof protection. •Attached new OEM black carpet to step panels from Ram-Lin. •Attached step side panels to trailer frame. Step 8 – Trailer Guides •Created 2 new plastic trailer guide covers from 2” PVC piping and caps. •Installed new trailer guide pads. •Re-attached trailer guides to trailer frame. Step 9 – Hub Assembly / Bearings •Removed and inspected hubs and bearings. Right side seal was blown and had leaked grease into hub and drum brakes. •Cleaned both hubs. •Replaced all bearings, races, and seals. •Repacked bearings with Lucas brand X-tra heavy duty grease. •Reinstalled hubs. Cranked down daisy nut while rotating hub to seat bearings, then backed off until hair amount of play in hub. Locked daisy nut. Step 10 - Tires •Installed new Goodyear Marathon tires – 225 X 75 R15 •Cleaned out rust from rims and reinstalled wheels to trailer |
|
|
Doug
|
|
|
|
|
seacamper
Platinum Member 

Joined: June-24-2010 Location: Florida Status: Offline Points: 1056 |
Post Options
Thanks(0)
Quote Reply
Posted: September-12-2010 at 7:55pm |
|
Are you going to hide that beauty by putting a boat on it? Can you just put the boat on blocks so you can look at the trailer all winter? Thats a real nice job!
Tom |
|
|
1980 Ski Nautique Boat Bar
1988 Mastercraft Tristar Open Bow 1988 Mastercraft Tristar Closed Bow 1969 Seacamper Houseboat 1986 Harris Pontoon 2004 Seadoo GTX SC + Flydive Xboard 1999 Adventurecraft |
|
|
|
|
dmiracle
Senior Member
Joined: July-22-2008 Location: Johns Creek, GA Status: Offline Points: 300 |
Post Options
Thanks(0)
Quote Reply
Posted: September-12-2010 at 6:02pm |
|
Guys, really appreciate the positive comments, especially from such talented craftsmen as yourselves.
You guys should know that I lurk here alot and your skills, knowledge, and most importantly, steadfast commitment to original restoration had an impact on me throughout this project. In a very strange way, I found myself feeling obligated to do this the right way, knowing I had to answer to the experts here. I gotta believe others feel held to some higher standard as well because of this group. Keep it up guys, it's really an invaluable source of research. Tim - My trailer never had pin stripes. My boat's a 92' and the original owner upgraded to the 93' trailer for some reason. Not sure if other 93's came without stripes or if mine is unique in that regard. I prefer it without though. |
|
|
Doug
|
|
|
|
|
TRBenj
Grand Poobah 

Joined: June-29-2005 Location: NWCT Status: Offline Points: 21127 |
Post Options
Thanks(0)
Quote Reply
Posted: September-12-2010 at 10:44am |
Those dont look half bad! Im not sure if '93 were different, but I have the file to recreate the 89-92 trailer decal if youre interested. Have a few of those made up and add some pinstripes, and your trailer will look better than it did from the factory! |
|
|
|
|
8122pbrainard
Grand Poobah

Joined: September-14-2006 Location: Three Lakes Wi. Status: Offline Points: 41040 |
Post Options
Thanks(0)
Quote Reply
Posted: September-12-2010 at 9:28am |
|
Doug,
Fantastic job! 
|
|
|
|
|
dmiracle
Senior Member
Joined: July-22-2008 Location: Johns Creek, GA Status: Offline Points: 300 |
Post Options
Thanks(0)
Quote Reply
Posted: September-12-2010 at 2:05am |
|
Marty,
Thanks for your comments. Here is a close up of the SN sticker on the side. I purchased them here: http://www.decalmax.com/full.php?decal_id=693 Very expensive @ $30 each side but I searched everywhere for these to no avail. They are very good quality vinyl stickers. I do not have the other stickers you reference. 
|
|
|
Doug
|
|
|
|
|
Donald80SN
Grand Poobah
Joined: January-12-2009 Location: Denver, NC Status: Offline Points: 3889 |
Post Options
Thanks(0)
Quote Reply
Posted: September-12-2010 at 1:28am |
|
Very Nice Job.
|
|
|
|
|
MartyMabe
Grand Poobah
Joined: February-21-2006 Location: High Point,NC Status: Offline Points: 3974 |
Post Options
Thanks(0)
Quote Reply
Posted: September-12-2010 at 1:23am |
|
Do you have the 'fender 'decals to put back? The lug nut decals for the wheels? The Ski Nautique decal on the side, close up pic, or where did it come from?
Still a great job!!!!  
|
|
|
|
|
dmiracle
Senior Member
Joined: July-22-2008 Location: Johns Creek, GA Status: Offline Points: 300 |
Post Options
Thanks(0)
Quote Reply
Posted: September-12-2010 at 12:52am |
|
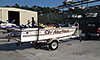
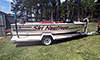
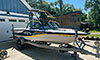
These pictures are long overdue. In short, I ripped everything down to the frame, ground away all rust and re-primed and paointed, then replaced everything on this 1993 trailer with all OEM parts.
Lights, wiring, tires, fenders (re-fabricated by Ram-Lin), carpet, brakes, repacked hubs with new bearings and races, actuator, turnbuckle, fabricated new wooden steps sides from 3/4 doug fir with 5 coats spar varnish. Could not have done this without this site and all the fantastic info and support. Apologies for not getting many shots of the "before" condition however the other pictures in this thread pretty much sum it up. I'm very pleased with how this tunred out and can now sleep good at night knowing my mint condition 92SN has a worthy cradle for her winter's nap.               
|
|
|
Doug
|
|
|
|
|
dmiracle
Senior Member
Joined: July-22-2008 Location: Johns Creek, GA Status: Offline Points: 300 |
Post Options
Thanks(0)
Quote Reply
Posted: August-26-2010 at 5:56pm |
|
Thanks brutha.
|
|
|
Doug
|
|
|
|
|
MartyMabe
Grand Poobah
Joined: February-21-2006 Location: High Point,NC Status: Offline Points: 3974 |
Post Options
Thanks(0)
Quote Reply
Posted: August-26-2010 at 5:11pm |
|
Port side inside rail on the tongue. Silver Foil decal, that had the VIN # typed into or printed on. So it faded within 2 years probably, but with a flourescent light in hand, held at a certain angle ,your #'s, or at least mine, just popped right out. Luckily ,my bill of sale had the VIN # on it.
My decal had Correct Craft stamped on it. I couldn't make out if that yellom NMMA part was on it. I hope she can figure it out, and get me another one. EDIT: # was at the bottom of that decal, towards the middle |
|
|
|
|
dmiracle
Senior Member
Joined: July-22-2008 Location: Johns Creek, GA Status: Offline Points: 300 |
Post Options
Thanks(0)
Quote Reply
Posted: August-26-2010 at 12:06pm |
|
That would be cool Marty.
They told me the same thing about my trailer (1993 also). My experience with the folks at Ram-Lin was top notch. Where is the VIN # located on these trailers? Hopefully I didn't grind it off. 
|
|
|
Doug
|
|
|
|
|
MartyMabe
Grand Poobah
Joined: February-21-2006 Location: High Point,NC Status: Offline Points: 3974 |
Post Options
Thanks(0)
Quote Reply
Posted: August-26-2010 at 2:31am |
|
Hey guys, I'm waiting to hear back from Ramlin about a 'NEW' NMMA Spec decal with all info weights, and VIN #. I've been corresponding with Heather Hutchins and she's seeing what she can do about making me another one.
She said my CC Trailer was made by CC and they (Ramlin) didn't start taking them over until late 1995, early 1996. 
|
|
|
|
|
dmiracle
Senior Member
Joined: July-22-2008 Location: Johns Creek, GA Status: Offline Points: 300 |
Post Options
Thanks(0)
Quote Reply
Posted: August-26-2010 at 12:37am |
|
jhiestand,
I fully understand. Ironically, just wrapped up the full restoration of mine this evening as well. Pictures to follow tomorrow evening. I'm beat and celebrating with a cold one (or three). |
|
|
Doug
|
|
|
|
|
seacamper
Platinum Member
Joined: June-24-2010 Location: Florida Status: Offline Points: 1056 |
Post Options
Thanks(0)
Quote Reply
Posted: August-26-2010 at 12:31am |
|
Looks great!
|
|
|
1980 Ski Nautique Boat Bar
1988 Mastercraft Tristar Open Bow 1988 Mastercraft Tristar Closed Bow 1969 Seacamper Houseboat 1986 Harris Pontoon 2004 Seadoo GTX SC + Flydive Xboard 1999 Adventurecraft |
|
|
|
|
jhiestand
Newbie

Joined: September-19-2009 Status: Offline Points: 28 |
Post Options
Thanks(0)
Quote Reply
Posted: August-25-2010 at 11:28pm |
|
This project took me WAAY longer than I anticipated, especially getting the new bunk wood secured. Not only was the wood stubborn (had to soak it overnight) but I had to drill quite a few new holes. If I ever have to do this again I'm afraid I'll have to resort to the bolt-thru method.
Also made the mistake of pulling the carpeted insides off the fenders. TONS of rust there, so more grinding, POR15 and paint. It's now all complete, and spruced it all up with LED lights all around. Hopefully this'll get me along for quite a while! 
Not a great shot of the finished product, but general idea. The prop guard still isn't on, but otherwise everything's intact. 
|
|
|
|
|
seacamper
Platinum Member
Joined: June-24-2010 Location: Florida Status: Offline Points: 1056 |
Post Options
Thanks(0)
Quote Reply
Posted: August-14-2010 at 9:33pm |
|
Update with pics?
|
|
|
1980 Ski Nautique Boat Bar
1988 Mastercraft Tristar Open Bow 1988 Mastercraft Tristar Closed Bow 1969 Seacamper Houseboat 1986 Harris Pontoon 2004 Seadoo GTX SC + Flydive Xboard 1999 Adventurecraft |
|
|
|
|
jhiestand
Newbie
Joined: September-19-2009 Status: Offline Points: 28 |
Post Options
Thanks(0)
Quote Reply
Posted: August-11-2010 at 9:34am |
|
Actually I got the gray POR, as I intend to paint red over it. I guess I'll see how far the pint gets me. I'm still undecided about the carpet, but that's a few days off so I can still mull it around.

|
|
|
|
|
M3Fan
Grand Poobah

Joined: October-22-2005 Location: United States Status: Offline Points: 3185 |
Post Options
Thanks(0)
Quote Reply
Posted: August-11-2010 at 1:02am |
|
That certainly looks familiar. I bought a quart of POR-15 (50.00!) and hardly used any of it, relatively. I only put it on the rusted areas of the frame and side fairings, etc., basically wherever there was rust. The rest of the trailer got plain ol' spray paint. I'd say my trailer was worse than yours, so you'll probably be fine with a pint of POR-15. The stuff is THICK and coats very well.
|
|
|
2000 SN GT40 w/99 Graphics/Gel
2016 SN 200 OB 5.3L DI https://forum.fifteenoff.com |
|
|
|
|
MartyMabe
Grand Poobah
Joined: February-21-2006 Location: High Point,NC Status: Offline Points: 3974 |
Post Options
Thanks(0)
Quote Reply
Posted: August-11-2010 at 1:01am |
|
That POR-15 goes a long way. Did you get black or the red POR-15? If Red, you could do the other pint, scuff the whole trailer and use it. If ya got black, a pint should be plenty.Just mainly doing the top rails anyway,right?
Some guys here say I shouldn't have 'wrapped' the carpet under.They said,lag bolt bunks down then staple both sides, but I layed the carpet down, then lag-bolted,then pulled the carpet over tight and only stapled to the inside of the bunks. Take a heat gun or hair dryer to your Nautique Decals, get a razor blade under it and pull them off and take 'em to your local Fast Signs or other place and get ya some made. |
|
|
|
|
jhiestand
Newbie
Joined: September-19-2009 Status: Offline Points: 28 |
Post Options
Thanks(0)
Quote Reply
Posted: August-10-2010 at 11:18pm |
|
You guys spurred me into tackling the rust on my Ramlin. Altho, I guess I'm doing it backwards as I did the carpeted steps last summer.
The big issue was getting the boat off the trailer. I sucked it up and propped it up on blocks. Might try and rub out where it contacts the bunks. Anyway, ordered some POR 15 from the recommendations on this thread. Now that I've gotten the bunks off and taken an initial whack at grinding off the rust I'm pretty certain the PINT of POR 15 isn't going to be near enough! Will another pint get me there, or am I going to need a quart? The wood was actually in better condition than I thought it would be, even though I already have 14' pieces of yellow pine waiting for me at the lumber yard. I'll probably replace the wood anyway, for good measure. A couple of the lag bolts broke loose and will need new holes drilled. I figure I'll replace the whole lot of them. My other concern is how to attach the bunk carpet. I know I'd like the appearance of the "factory staple-under-then-flap-over technique" but I don't think mine actually came that way, plus it seems I end up replacing the carpet every other year and that would be a pain. Any opinions on this? 

|
|
|
|
|
M3Fan
Grand Poobah
Joined: October-22-2005 Location: United States Status: Offline Points: 3185 |
Post Options
Thanks(0)
Quote Reply
Posted: July-26-2010 at 7:10pm |
I've made the carpeted step and fender replacement a "Phase 2" project- thanks for the tip. |
|
|
2000 SN GT40 w/99 Graphics/Gel
2016 SN 200 OB 5.3L DI https://forum.fifteenoff.com |
|
|
|
|
NAUTIQUEjunky
Senior Member

Joined: July-17-2010 Location: Henderson NC Status: Offline Points: 210 |
Post Options
Thanks(0)
Quote Reply
Posted: July-26-2010 at 4:06pm |
|
M3fan, If you havent redone the carpet on your the sides of your trailer, try 3/4 plywood with Rino Coat applied to them. It looks nice and wont hold water like the carpet does.. Most auto part stores carry the Herculiner which is bascily the same thing..
|
|
|
|
|
Post Reply
|
Page 123 4> |
 Tweet
Tweet
|
| Forum Jump | Forum Permissions You cannot post new topics in this forum You cannot reply to topics in this forum You cannot delete your posts in this forum You cannot edit your posts in this forum You cannot create polls in this forum You cannot vote in polls in this forum |


 Topic Options
 dmiracle wrote: