 Boats For Sale:


86 SN rebuild |
Post Reply 
|
Page 123 11> |
| Author | |
Ranger 
Senior Member 
Joined: August-23-2010 Location: San Diego Status: Offline Points: 151 |
 Post Options Post Options
") Thanks(0) Thanks(0)
 Quote Reply Quote Reply
 Topic: 86 SN rebuild Topic: 86 SN rebuildPosted: September-10-2010 at 4:45pm |
|
Here we go. I was going to wait until winter, but since the fuel filter fell off due to rot, I thought It might be a sign from above that I better start sooner than later. So, the boat is gutted and the floor will be cut out this weekend.
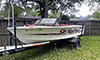
A little background: I'm really a fisherman and a hunter, but have been around boats for most of my life. I have rebuilt a few, but all of them were for chasing something offshore. But I have a 9 year old son and although he is my fishing partner and baseball buddy, he has been watching all of the ski and wakeboard boats go by at the river. I finally started pulling him around in my Ranger, but it's time that I get a real ski boat. So I started looking for a project that we could build together. This is it. It will be something that he ends up with, so we will be building allot more than just a boat. I found this Ski Nautique a little North from where we live and thought that it was perfect for the task at hand. We used it once and it was everything that I thought it should be. So, I started doing my research and although I haven't fully decided on the materials, I should be elbow deep into wet foam within 48 hours. I appreciate this forum and the people who have made it great. Hopefully this will be a build that everyone will enjoy. I'll try to keep you posted with pictures as I go. Jeff |
|
 |
|
|
BuffaloBFN
Grand Poobah 

Joined: June-24-2007 Location: Gainesville,GA Status: Offline Points: 6094 |
Post Options
Thanks(0)
Quote Reply
Posted: September-10-2010 at 4:55pm |
|
I'm almost speechless after that intro...very cool!
|
|
|
|
|
Hollywood
Moderator Group 

Joined: February-04-2004 Location: Twin Lakes, WI Status: Offline Points: 13510 |
Post Options
Thanks(0)
Quote Reply
Posted: September-10-2010 at 5:30pm |
|
It sure was refreshing to read a post as well written as that! This will be a great thread.
|
|
|
|
|
robrich
Newbie 

Joined: June-08-2010 Location: Spring Hill Fl Status: Offline Points: 19 |
Post Options
Thanks(0)
Quote Reply
Posted: September-10-2010 at 6:14pm |
|
I am looking forward to following the thread.
|
|
|
|
|
|
|
|
charger496
Senior Member
Joined: August-06-2010 Location: atlanta, ga Status: Offline Points: 157 |
Post Options
Thanks(0)
Quote Reply
Posted: September-10-2010 at 6:23pm |
|
Showoff.
|
|
|
|
|
Ranger
Senior Member
Joined: August-23-2010 Location: San Diego Status: Offline Points: 151 |
Post Options
Thanks(0)
Quote Reply
Posted: September-10-2010 at 6:35pm |
|
Thanks Guys, I appreciate the welcome and humor!
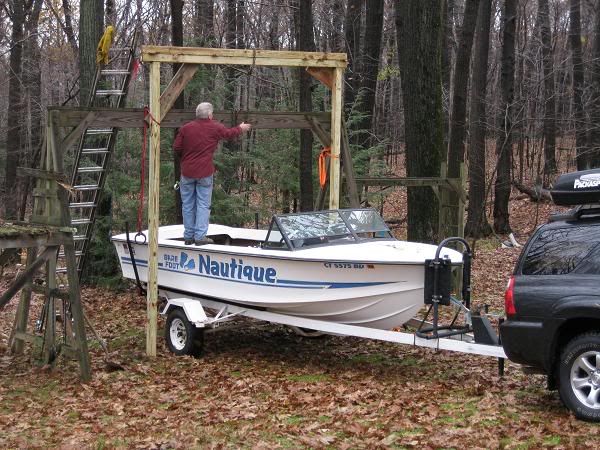
I'll post some pict's later but I pulled the engine last night. What a pain. The hoist I rented was junk and it barely made it over the gunnels. I took one of the tires off, dropped the trailer to the ground, and then cranked the bow down as low as it would go. Since the tranny didn't clear. I had to lift the rear of the engine while my wife pulled on hoist. it was close, but it's out. I'm not renting another piece of junk. I'll either buy one or build one before the motor goes back in. I haven't checked into it, but what is the best way to upload photos? Jeff |
|
|
|
|
BuffaloBFN
Grand Poobah
Joined: June-24-2007 Location: Gainesville,GA Status: Offline Points: 6094 |
Post Options
Thanks(0)
Quote Reply
Posted: September-10-2010 at 6:59pm |
|
Photobucket.com works for me. There's a tutorial thread here on the site.
|
|
|
|
|
Ranger
Senior Member
Joined: August-23-2010 Location: San Diego Status: Offline Points: 151 |
Post Options
Thanks(0)
Quote Reply
Posted: September-10-2010 at 7:10pm |
|
Ok, I need to give this a shot, so lets see how this come out.


Not really much to see, but I want to make sure that this works out alright. Jeff |
|
|
|
|
TRBenj
Grand Poobah

Joined: June-29-2005 Location: NWCT Status: Offline Points: 21109 |
Post Options
Thanks(0)
Quote Reply
Posted: September-10-2010 at 7:24pm |
|
Probably too late now, but had you removed the carb and flame arrestor, then tightened the chains, you would have cleared at least another 6-8".
|
|
|
|
|
Ranger
Senior Member
Joined: August-23-2010 Location: San Diego Status: Offline Points: 151 |
Post Options
Thanks(0)
Quote Reply
Posted: September-10-2010 at 7:41pm |
|
Yes, I thought of that while I was staring at it in the air. In fact, I was going to drop it back down and do just that, but the bottle jack on the picker wasn't cooperating. I was getting a little nervous with that thing in the air knowing that the pile of junk holding it could go at any moment.
Once I had it over the rail, I finally got the picker to lower enough that I could get the engine on its stand. But it was a crap shoot. I almost went and grabbed my tractor to lift it off of the picker. Jeff |
|
|
|
|
8122pbrainard
Grand Poobah

Joined: September-14-2006 Location: Three Lakes Wi. Status: Offline Points: 41040 |
Post Options
Thanks(0)
Quote Reply
Posted: September-10-2010 at 7:53pm |
|
Jeff,
It's great to hear that you will be getting your son to help out. I wish I had done more of the same. Get him a flat bar and let him go after some of that old wet foam!! |
|
|
|
|
TRBenj
Grand Poobah
Joined: June-29-2005 Location: NWCT Status: Offline Points: 21109 |
Post Options
Thanks(0)
Quote Reply
Posted: September-10-2010 at 8:04pm |
|
Its actually pretty amazing how high you need to lift the engine to get it out of one of these boats while on the trailer. Even the tall swing set we used on my Skier wasnt tall enough for our BFN... we had to go taller.
As far as the father/son project goes, that is pretty cool. Dad and I are doing the BFN together as well. |
|
|
|
|
Ranger
Senior Member
Joined: August-23-2010 Location: San Diego Status: Offline Points: 151 |
Post Options
Thanks(0)
Quote Reply
Posted: September-10-2010 at 8:36pm |
|
I love doing these kinds of projects, but having your young boy there too makes it all that much better. I just need to persuade the wife that 8:00 is too early of a bedtime for him. We can this done a lot faster if he goes to bed at 9:00.
Jeff |
|
|
|
|
Waterdog
Grand Poobah

Joined: April-27-2006 Location: United States Status: Offline Points: 2020 |
Post Options
Thanks(0)
Quote Reply
Posted: September-10-2010 at 11:40pm |
|
Glad you got it out ok, I did'nt want to scare ya about pulling the cherry picker back and "swinging" the motor over the gunnel.It was kinda exciting on mine too. I felt every little pebble under those steel wheels...
|
|
|
|
|
gun-driver
Grand Poobah
Joined: July-18-2008 Location: Pittsburgh, Pa Status: Offline Points: 4112 |
Post Options
Thanks(0)
Quote Reply
Posted: September-11-2010 at 6:12am |
|
These make good engine hoist's

And yes it's great when the little one's get involved. 

It's going to be a long road to the finish, but you will have a deep understanding of all aspects of your boat inside and out when your done. You will really enjoy it when your done. |
|
|
|
|
Ranger
Senior Member
Joined: August-23-2010 Location: San Diego Status: Offline Points: 151 |
Post Options
Thanks(0)
Quote Reply
Posted: September-11-2010 at 1:57pm |
|
I have a 790 deere with a front end loader, but it didn't have the reach. I was slightly short. Now that I think about it, I might want to look at a fork lift extension for the bucket. It would add a few feet to the reach and it would be a ton easier to put the engine back in.
Thanks for the idea. Sometimes I need a little nudge! Jeff |
|
|
|
|
Swatkinz
Platinum Member

Joined: December-03-2003 Location: Lexington, SC Status: Offline Points: 1307 |
Post Options
Thanks(0)
Quote Reply
Posted: September-11-2010 at 2:05pm |
|
When I was 10 or 11 my dad bought an old glassmaster closed bow "ski" boat and we did a light rehab on it. Was one of the coolest projects ever for dad and son and I'll never forget it. My dad turned us both on to inboards a couple of years later and we did some refurbishing but that "project" boat is one I'll always remember. Lots of good QT with the old man. A few years later he did the same with a pontoon, but this one he did mostly with my sister. Good times!
Sorry for the threadjack! Looks like you are off to a good start. Good luck with the rebuild |
|
|
Steve
2011 Sport/Air 200 Excalibur 343 2017 Boatmate Tandem Axle Trailer Former CC owner (77, 80, 95, 88, all SNs) Former Malibu owner (07, 09) |
|
|
|
|
Ranger
Senior Member
Joined: August-23-2010 Location: San Diego Status: Offline Points: 151 |
Post Options
Thanks(0)
Quote Reply
Posted: September-11-2010 at 6:44pm |
|
I can sure appreciate your experiences with your father, mine with very similar. I think it's why I spend so my time with my boy as well. I started him fishing when he was three and I think I have only fished a couple of times without him since. We are avid fishermen who were on the water at least 30 weekends a year. He has developed to be a better fisherman than most adults. He only uses bait caster gear and can flip, overhand and sidearm cast with amazing accuracy. He truly is an outdoorsman.
On another note, we are in the house taken a much needed break. The deck is cut out and the majority of the foam is in the dumpster. I'll post some pictures later today. Oh and if you didn’t know, we both hate foam. My boy is tired and my back hurts. Jeff |
|
|
|
|
Keeganino
Grand Poobah

Joined: October-27-2009 Location: North Carolina Status: Offline Points: 2063 |
Post Options
Thanks(0)
Quote Reply
Posted: September-11-2010 at 6:58pm |
|
Jeff
Awesome stuff! Nothing like a good family project and spending time together. My 9 year old helped out a little bit with my rebuild and has decided he does not want to wetsand for a living! I felt a huge sense of accomplishment once the foam was out. There are so many aspects to a rebuild I cant count how many times I thought I was on the home stretch of the project. Well worth all the time I put into it. Knowing that it is done right by your own hands is priceless. My biggest hang ups were the couple of things I paid to have done. I was gonna say you have all fall and winter to get er done but being in San Diego you don't get much weather that rules out boating. I love it out there! Good Luck and welcome to the community! Keegan |
|
|
"working on these old boats may not be cost effective but as it shows its what it brings into your life that matters" -Roger
1973 Skier |
|
|
|
|
Ranger
Senior Member
Joined: August-23-2010 Location: San Diego Status: Offline Points: 151 |
Post Options
Thanks(0)
Quote Reply
Posted: September-11-2010 at 11:36pm |
|
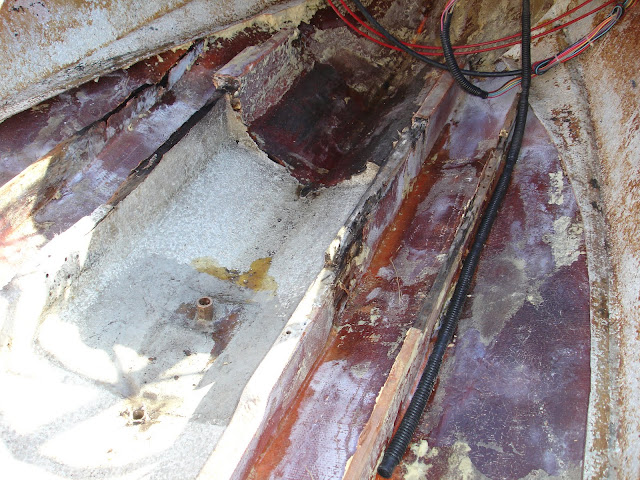
Ok, our first full day is done. I think we moved along pretty well, the hull is virtually foam free. I had a lot of rot on all stringers forward of the cradle. Of course standing water was where it wasn't supposed to be. I'm glad to be past this point. My boy hung in there all day, except when I was cutting the deck. I made him go inside to stay away from the dust.
Afterward, he and I used shovels and claw hammers to get the foam out of the boat and into the dumpster. Once I finished, I flushed the hull clean with a hose. One thing I noticed is that these hulls do not drain water well. Some water just can't get past the pylon cup without raising the bow extremely high. Has anyone tried to glass the forward hull high enough that water finds its way back? I want this hull to drain, so I need to look into options. On other hurtle I had, was the exhaust outlet tubes. I think someone used 5200 on them and they aren't budging. I'm going to gel coat the hull, but still don't want to rip the transom apart trying to get these things out. If anyone have any suggestion, I'm all ears. Here are a couple of photos My boy, hard at work! 

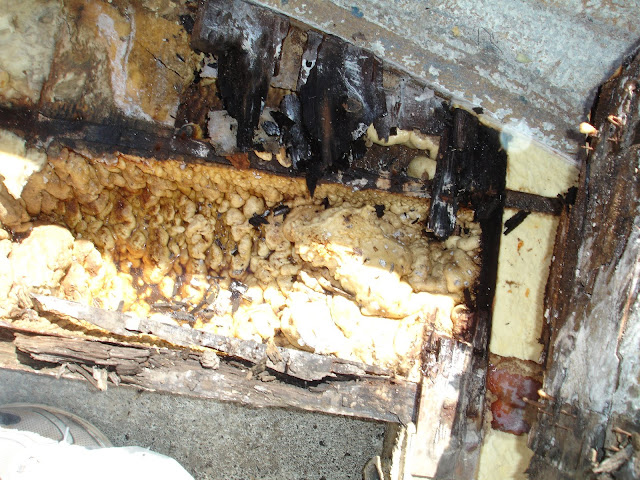


Tomorrow, it looks like we will start to build a few stands. Thanks again the the warm welcome. Jeff |
|
|
|
|
Keeganino
Grand Poobah
Joined: October-27-2009 Location: North Carolina Status: Offline Points: 2063 |
Post Options
Thanks(0)
Quote Reply
Posted: September-11-2010 at 11:51pm |
|
Great first day there guys! My exhaust tips had color matched silicone as a sealant but I did not have much trouble removing them after the screws were out. You will want to replace all the wood around the exhaust ports, lift ring mount and rudder mount while you are in there.
Here is my transom with all new wood except the rudder mount. 
|
|
|
"working on these old boats may not be cost effective but as it shows its what it brings into your life that matters" -Roger
1973 Skier |
|
|
|
|
Ranger
Senior Member
Joined: August-23-2010 Location: San Diego Status: Offline Points: 151 |
Post Options
Thanks(0)
Quote Reply
Posted: September-12-2010 at 12:00am |
|
I need to take a good hard look at all of the wood mounts on the transom. At first glance, they all appear to be extremely solid. But I'm not the type to skimp, so I will probably rip those out too.
Jeff |
|
|
|
|
SNobsessed
Grand Poobah
Joined: October-21-2007 Location: IA Status: Offline Points: 7102 |
Post Options
Thanks(0)
Quote Reply
Posted: September-12-2010 at 12:18am |
|
Jeff - Pete Brainerd had a way to rig a 'hot wire' to cut thru the 5200. I think it used a battery & weld wire. Pete will surely comment soon.
|
|
|
“Beer is proof that God loves us and wants us to be happy.”
Ben Franklin |
|
|
|
|
gun-driver
Grand Poobah
Joined: July-18-2008 Location: Pittsburgh, Pa Status: Offline Points: 4112 |
Post Options
Thanks(0)
Quote Reply
Posted: September-12-2010 at 12:30am |
I did. I filled the bottom like a trough, I even took out the piece of ply they had in to screw the bilge pump to and found water under it after being torn apart for a year. I took the drain plug out and re-glassed the whole bottom then so the drain would be the lowest point. It works well. 


|
|
|
|
|
Ranger
Senior Member
Joined: August-23-2010 Location: San Diego Status: Offline Points: 151 |
Post Options
Thanks(0)
Quote Reply
Posted: September-12-2010 at 12:35am |
|
I like that a lot. Looks really nice. What did you use to fill it with?
|
|
|
|
|
8122pbrainard
Grand Poobah
Joined: September-14-2006 Location: Three Lakes Wi. Status: Offline Points: 41040 |
Post Options
Thanks(0)
Quote Reply
Posted: September-12-2010 at 9:50am |
|
Jeff,
The exhaust through hulls can be stubborn even without 5200. First get a hot air gun on them and warm them up to the point of being uncomfortable to to touch. This temp (about 180 to 200) should not damage the gel/glass and is far from the point of discoloring the chrome on the fittings. Then see if you can tap a sharpened putty knife in and all around the flange to shear the sealant. If this doesn't work, then you can try the hot wire that Chris mentioned. The basic crude hot wire is a piece of stainless .030" welding wire about 18" long strung between two pieces of wood used for handles. Then connected to a 12V battery with jumper cables. The wire is then used in a sawing fashion to cut the sealant. Since this home made hot wire is basic without a variable voltage power supply and the charge level of the battery will vary, some experimenting with the wire length will be needed. If the wire burns up quickly, add 6" of wire length and try it again. |
|
|
|
|
Ranger
Senior Member
Joined: August-23-2010 Location: San Diego Status: Offline Points: 151 |
Post Options
Thanks(0)
Quote Reply
Posted: September-12-2010 at 12:59pm |
|
Great advice, I'll give it a try.
Jeff |
|
|
|
|
gun-driver
Grand Poobah
Joined: July-18-2008 Location: Pittsburgh, Pa Status: Offline Points: 4112 |
Post Options
Thanks(0)
Quote Reply
Posted: September-12-2010 at 3:03pm |
|
I used the epoxy resin mixed with Aerosil-Cabosil and 1/32" Milled Fiber
to very thick paste. I formed it in with a wide putty knife, then I laid cloth and using non-thickened epoxy kneaded the cloth into the paste and across the whole bottom and up 2" on the main stringers essentially tying everything together. This was one of the last steps I did before the final sand and paint. |
|
|
|
|
Ranger
Senior Member
Joined: August-23-2010 Location: San Diego Status: Offline Points: 151 |
Post Options
Thanks(0)
Quote Reply
Posted: September-12-2010 at 4:12pm |
|
Ok, I have another question. I have decided that Epoxy will be my best bet, so I am pretty sure that I will head in that direction. I'm familar with the layup process of vinylester, but not with epoxy.
What would any of you suggest as a layup schedule? I need to get my materials on order fairly soon, so I will need to get a good understanding of the process. Thanks, |
|
|
|
|
8122pbrainard
Grand Poobah
Joined: September-14-2006 Location: Three Lakes Wi. Status: Offline Points: 41040 |
Post Options
Thanks(0)
Quote Reply
Posted: September-12-2010 at 7:38pm |
Jeff, The layup is the same with any resin. Most will go with a 2" then 4" then 6" tape at the stringer to hull. Then a couple layers of cloth over the top and a extra layer at the engine. The biaxial is popular but I'm more inclined to just use regular cloth. |
|
|
|
|
Post Reply
|
Page 123 11> |
 Tweet
Tweet
|
| Forum Jump | Forum Permissions You cannot post new topics in this forum You cannot reply to topics in this forum You cannot delete your posts in this forum You cannot edit your posts in this forum You cannot create polls in this forum You cannot vote in polls in this forum |


 Topic Options
 Ranger wrote: