 Boats For Sale:


86 SN rebuild |
Post Reply 
|
Page <1 678910 11> |
| Author | |
Ranger 
Senior Member 
Joined: August-23-2010 Location: San Diego Status: Offline Points: 151 |
 Post Options Post Options
") Thanks(0) Thanks(0)
 Quote Reply Quote Reply
 Posted: January-18-2011 at 1:22pm Posted: January-18-2011 at 1:22pm |
|
Thanks Keegan,
I'm going to pull the other side and get the remaining stringers bed before I do any glassing. But I'll take your advice and cover the gunnels with plastic. I'm hoping to pull both the port main and port secondary this weekend. I'm thinking that I will build a temporary table inside the boat so that I don't have to go in and out of the hull. I'm also intending on completing each stringers layup at one time. It might be more than I can chew, but it would be nice to get all the layups down while it's still green. Jeff |
|
 |
|
|
TRBenj
Grand Poobah 

Joined: June-29-2005 Location: NWCT Status: Offline Points: 21109 |
Post Options
Thanks(0)
Quote Reply
Posted: January-18-2011 at 1:41pm |
|
Both the plastic and a work area in/near the boat so youre not constantly in and out are great ideas.

Getting all the glass on each stringer in one shot is definitely recommended. If you can do all your cutting beforehand, its very doable. The only think that would make sense to wait on is the cap- that part is a PITA so having all the side glass set up already is to your advantage. |
|
|
|
|
Ranger
Senior Member
Joined: August-23-2010 Location: San Diego Status: Offline Points: 151 |
Post Options
Thanks(0)
Quote Reply
Posted: January-18-2011 at 4:25pm |
|
I'm using biax for the final wrap. Since it might be a pain, I was thinking of doing my 2, 4, and 8 inch tapes at once. Then the next day doing the final biax layer. That way, I can let the resin get a little tacky so that it stays were I put it.
Is that what you are talking about TRBenj? Jeff |
|
|
|
|
TRBenj
Grand Poobah
Joined: June-29-2005 Location: NWCT Status: Offline Points: 21109 |
Post Options
Thanks(0)
Quote Reply
Posted: January-18-2011 at 6:18pm |
|
Not exactly. I would do all the glass that bonds the stringer to the hull in one shot if you can (shown below in red). That includes all mat, cloth, biax, etc. This way you get a chemical bond between the layers, not just a mechanical one. Once that dries, cap the top of the stringer (shown in blue).

Have you decided on a glass layup for the stringers yet? I would recommend 2/2/4/4/8/8/biax, then capped in biax for the mains. |
|
|
|
|
Ranger
Senior Member
Joined: August-23-2010 Location: San Diego Status: Offline Points: 151 |
Post Options
Thanks(0)
Quote Reply
Posted: January-18-2011 at 6:24pm |
|
I think we are on the same page. I have decided that I would do a 2/2, 4/4, 8/8 then wrap in biax. I didn't plan on going over the mains again with biax however.
What I was thinking was that I would do the 2/2, 4/4 and 8/8. Let it cure for a night, then do 1 layer of biax over the top. If I can get the layer of biax over the top and have it stay put, I would prefer to get it finished at the same time. From the info that I have gathered, the biax is fairly stiff and unless the resin is a little tacky, it will lift from the corners. Are you suggesting that I do two layers of biax? Jeff |
|
|
|
|
TRBenj
Grand Poobah
Joined: June-29-2005 Location: NWCT Status: Offline Points: 21109 |
Post Options
Thanks(0)
Quote Reply
Posted: January-18-2011 at 6:41pm |
|
The biax is nice because it adds strength in directions the cloth tape does not have much (45 degree from the cloth layer, plus the omnidirectional strength of the mat layer), and it also builds up quite a bit of thickness (and soaks up quite a bit of resin). I used one layer of 12" biax tape over the last layer of 8" cloth (stringer to hull) as well as capped the tops of the mains with it.
|
|
|
|
|
Ranger
Senior Member
Joined: August-23-2010 Location: San Diego Status: Offline Points: 151 |
Post Options
Thanks(0)
Quote Reply
Posted: January-18-2011 at 7:10pm |
|
Thanks TRBenj, I appreciate the help.
Jeff |
|
|
|
|
Keeganino
Grand Poobah

Joined: October-27-2009 Location: North Carolina Status: Offline Points: 2063 |
Post Options
Thanks(0)
Quote Reply
Posted: January-18-2011 at 7:47pm |
Me too. I also double capped from the pylon to the tranny mounts too just for fun. If it is warm enough and your resin is setting up fast you can do a stringer all in one day. |
|
|
"working on these old boats may not be cost effective but as it shows its what it brings into your life that matters" -Roger
1973 Skier |
|
|
|
|
Ranger
Senior Member
Joined: August-23-2010 Location: San Diego Status: Offline Points: 151 |
Post Options
Thanks(0)
Quote Reply
Posted: January-18-2011 at 11:40pm |
|
Well, it turns out that I had an opportunity to do a little work this evening, so I pulled both the port main and secondary. Both of them were completely rotten and came out in pieces. What a mess.
Something to note is that all of the stringers were delaminated, wet and rotten. But the deck was solid for the most part. Here are the pictures. 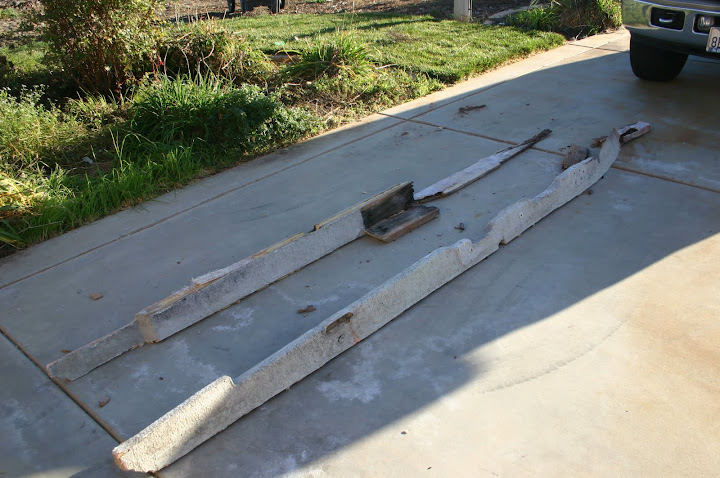
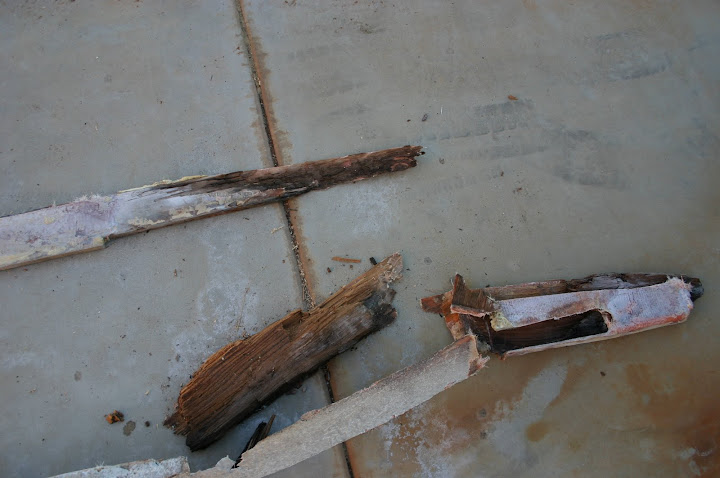
Hopefully, I can get the hull ground this weekend and the main stringer scribed in. That's the plan anyway. Jeff |
|
|
|
|
Ranger
Senior Member
Joined: August-23-2010 Location: San Diego Status: Offline Points: 151 |
Post Options
Thanks(0)
Quote Reply
Posted: January-30-2011 at 1:17pm |
|
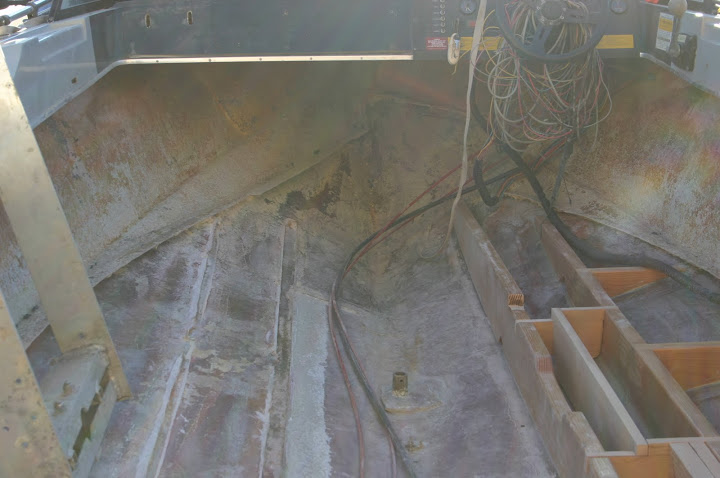
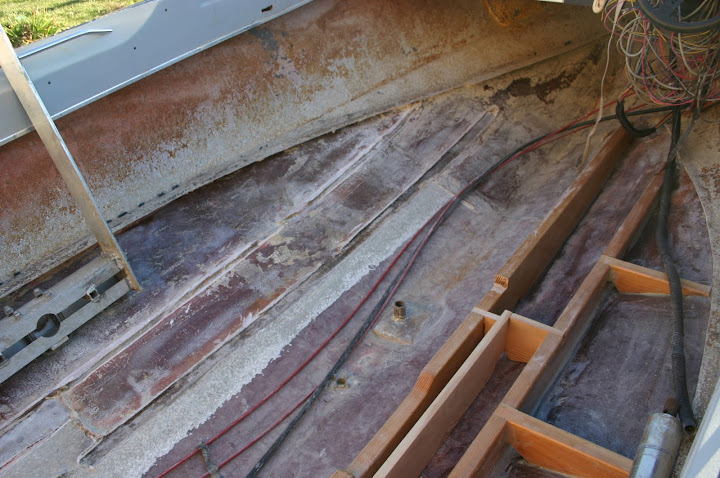
Update: We are still moving along. The hull is ground and ready for the port main and secondary. The main is virtually finished and I will try to get the secondary scribed in later today.
Something to note is when I puller the rudder log piece, there was a nice puddle of water under it. It looked solid and I even considered leaving it. Glad I didn't. Lot's of dry glass in this area as well. I'll post pictures as soon as I have something interesting to show. I sure went through my share of sanding disk's. I even went through a couple of backing plate's. But it sure feels good to have the grinding done. On the stringer portion anyway. Jeff |
|
|
|
|
Keeganino
Grand Poobah
Joined: October-27-2009 Location: North Carolina Status: Offline Points: 2063 |
Post Options
Thanks(0)
Quote Reply
Posted: January-30-2011 at 7:41pm |
|
Nothing like the grind! Looking good Jeff. It is amazing how EVERY piece of wood in these boats are wet. Not worth the worry to even consider leaving any of it in there.
|
|
|
"working on these old boats may not be cost effective but as it shows its what it brings into your life that matters" -Roger
1973 Skier |
|
|
|
|
Ranger
Senior Member
Joined: August-23-2010 Location: San Diego Status: Offline Points: 151 |
Post Options
Thanks(0)
Quote Reply
Posted: February-12-2011 at 12:55pm |
|
Update:
We're still motoring along. The port main is bedded and the port secondary is almost finished. Everything is running alone pretty smooth. We're almost to the point the we can start glassing in the stringers. Jeff |
|
|
|
|
Ranger
Senior Member
Joined: August-23-2010 Location: San Diego Status: Offline Points: 151 |
Post Options
Thanks(0)
Quote Reply
Posted: February-15-2011 at 2:30am |
|
I finally have all four stringers in and bedded. What a great feeling to have this part done. I'm planning on getting all of the filets finished within the next week. I still have all of the blocking to do on the port side, but that shouldn't be too much of an issue.
We can't wait to get the stringers completely glassed in. Once glassed in, I should be fine to drop back on the trailer and move in and out of the garage. Here are the pict's 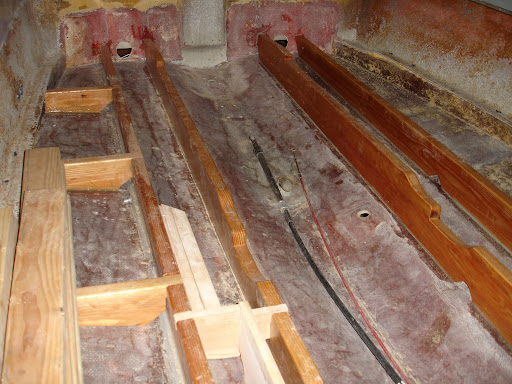
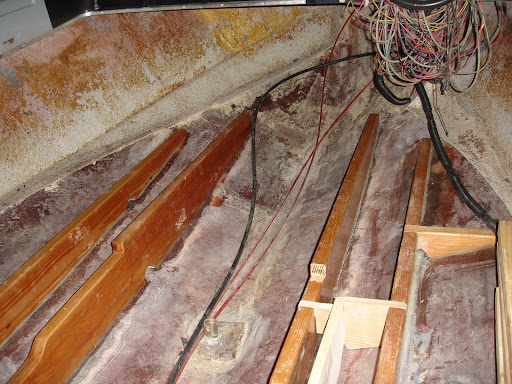
One question that comes to mind is the battery box area. I'm planning on 2 optima batteries, so I need to design a new box. I have a few ideas, but has anyone have any suggestions? Jeff |
|
|
|
|
Keeganino
Grand Poobah
Joined: October-27-2009 Location: North Carolina Status: Offline Points: 2063 |
Post Options
Thanks(0)
Quote Reply
Posted: February-15-2011 at 12:45pm |
|
Another bridge crossed. Looking good. I was going to do a 2 battery box but in the end there was not room in the Skier. You may be able to get away with it in the SN since its bigger. After listening to a lot of the guys on here I was beginning to question needing the second battery anyway. Unless you are going to beach it and pump tunes all day through a massive stereo system...
|
|
|
"working on these old boats may not be cost effective but as it shows its what it brings into your life that matters" -Roger
1973 Skier |
|
|
|
|
TRBenj
Grand Poobah
Joined: June-29-2005 Location: NWCT Status: Offline Points: 21109 |
Post Options
Thanks(0)
Quote Reply
Posted: February-15-2011 at 1:27pm |
|
2 battery boxes might be a little tough. I had trouble locating one on the BFN. Trying to keep it aft of the driver's kick panel, but not interfere with the observer seat brackets doesnt leave much room. You cant pick up much room side to side because of the space needed for the 3" vents and the conduit for the steering and control cables...
Are you planning to keep the "air box" at the driver's feet? If youre willing to make it narrower, you may be able to fit a second box further forward of the one from the factory. The early 80's 2001's had 2 boxes, but put the second one further aft, essentially under the observer's seat. The frame was moved inward so the base was pretty well cantelevered. I decided against this approach. This is how I would *like* to do it. The only thing is that Im not sure if you have the depth for a box further forward... you may not. 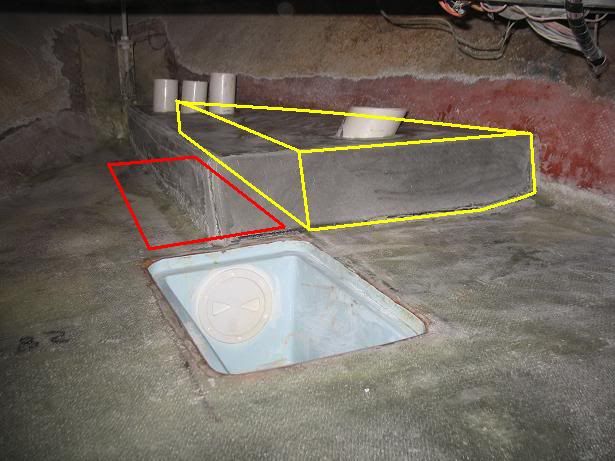
Alternatively, you could build yourself a slightly bigger battery box and put it in the same spot as the factory. Something just large enough to hold 2 Optimas (not 2 regular sized batteries) might fit in just a little more space. Your workmanship on the stringers looks excellent. Its probably too late now, but you may find that glassing everything at once is a huge pain. Doing one at a time gives you a lot more room to work. |
|
|
|
|
8122pbrainard
Grand Poobah

Joined: September-14-2006 Location: Three Lakes Wi. Status: Offline Points: 41040 |
Post Options
Thanks(0)
Quote Reply
Posted: February-15-2011 at 2:12pm |
|
Jeff,
I've got to ask why the 2 batteries? You may want to rethink the issue. BTW, as a reference, CQ has got a pretty decent  sound system in his boat and only has one battery!! You haven't been spending too much time over on PN have you? sound system in his boat and only has one battery!! You haven't been spending too much time over on PN have you? 
|
|
|
|
|
JoeinNY
Grand Poobah

Joined: October-19-2005 Location: United States Status: Offline Points: 5693 |
Post Options
Thanks(0)
Quote Reply
Posted: February-15-2011 at 3:25pm |
|
It is certainly possible to get two batteries in there.. my 83 came with two boxes, both the same size, one held the battery the other was a cooler. One of them, I think the battery box one, is pictured up above in Tims boat.
I have only one opening now it accesses a custom compartment that I put in to hold the 2 optimas and a bottle. 
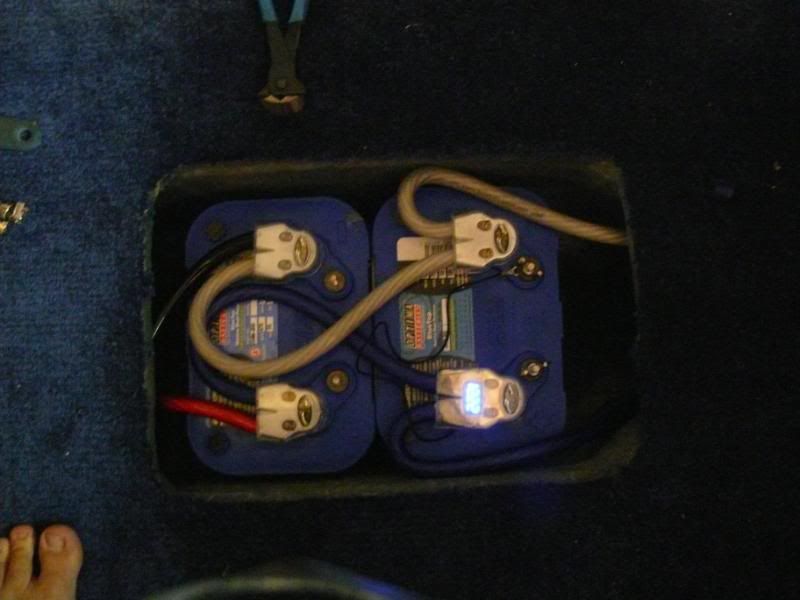
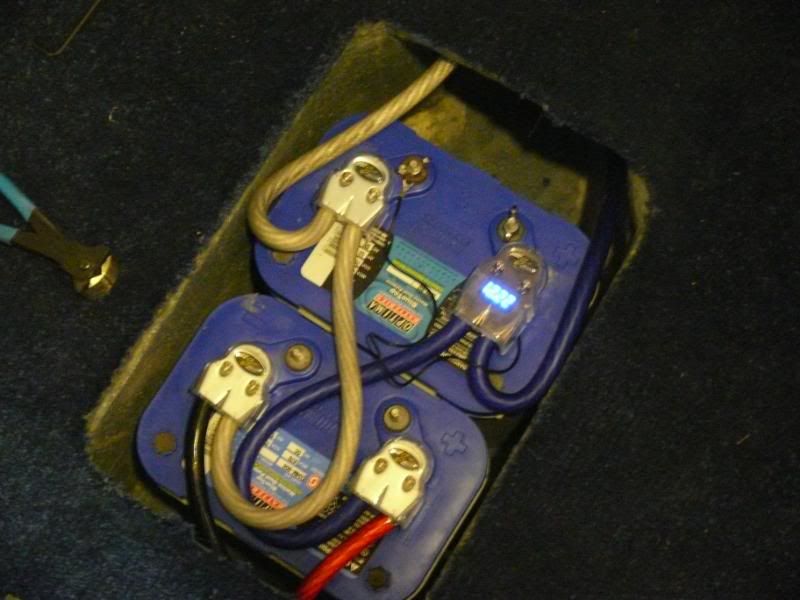
Going the direction I went makes the height really tight with the cover one, and that is with a floor that is about .25" higher than stock. I couldnt go any farter forward due to the bottle opening.. but if you ran them the long way there should be ample room for a custom box, or for two factory boxes like the earlier cooler+battery installations. |
|
|
|
|
JoeinNY
Grand Poobah
Joined: October-19-2005 Location: United States Status: Offline Points: 5693 |
Post Options
Thanks(0)
Quote Reply
Posted: February-15-2011 at 3:30pm |
|
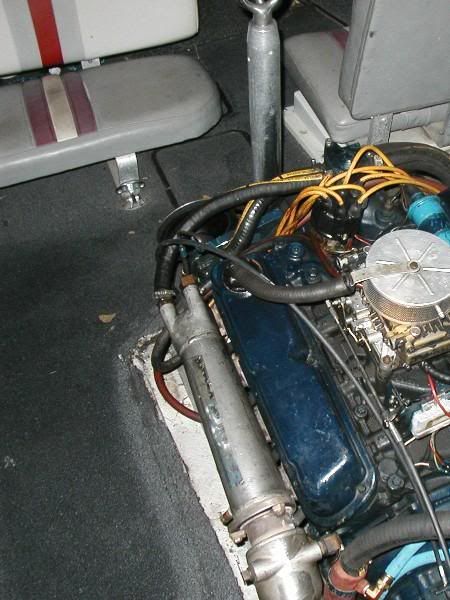
Here is the only picture I found showing the relative location..

|
|
|
|
|
Ranger
Senior Member
Joined: August-23-2010 Location: San Diego Status: Offline Points: 151 |
Post Options
Thanks(0)
Quote Reply
Posted: February-15-2011 at 4:24pm |
|
Thanks for all of the quick responses.
It might be my history with ocean boats and bass boats, but I've always wanted more than one battery to start an engine. I would probably be fine with one, but the added security of two is worth it to me. I've seen a couple of designs that parallel what you guys have described above. But I do have a question. Why do I need a box at all? I'm not foaming the hull and I'm not reinstalling the air box. It will be a flat deck under the bow. Another boat I rebuilt had a "tray" of sorts that the batteries were secured too. I'm thinking that I could build something similar between the two main stringers that would maintain the original location.I'll be using optima batteries, so leakage wont be a concern. The picture that JoeinNY posted probably best describes what I’m thinking, a complete redesign of the forward section under the deck. How do you access the bottle? Is there another hatch? I'm planning on a system that will charge both batteries will running, but will isolate them when the engine is shut off. In an emergency, the battery's can be tied together for more juice. But, I want to keep the boat "looking" original for the most part, However, I want to improve the design where possible. What are your thoughts? Thanks again for the help. Jeff |
|
|
|
|
Ranger
Senior Member
Joined: August-23-2010 Location: San Diego Status: Offline Points: 151 |
Post Options
Thanks(0)
Quote Reply
Posted: February-15-2011 at 4:29pm |
|
Pbrain,
I’ll go ahead and admit it. I had to read your post 10 times before I figured out what PN was. But I still can’t figure out CQ. And no, I haven’t been at PN. Jeff
|
|
|
|
|
Hollywood
Moderator Group 

Joined: February-04-2004 Location: Twin Lakes, WI Status: Offline Points: 13510 |
Post Options
Thanks(0)
Quote Reply
Posted: February-15-2011 at 4:46pm |
Captain Queer -> Chris Quinn |
|
|
|
|
TRBenj
Grand Poobah
Joined: June-29-2005 Location: NWCT Status: Offline Points: 21109 |
Post Options
Thanks(0)
Quote Reply
Posted: February-15-2011 at 4:47pm |
|
Joe's battery box looks to be located in the same spot as the "aft" of the 2 batt boxes his boat originally came with. It still requires the "cantelevered" observer seat that I mentioned above. Here's a shot of an original early 80's set up:
I wasnt comfortable with 12" of the seat overhanging the battery box, nor did I want to be stepping on the lid every time I got in the drivers seat... but a bunch of boats came from the factory that way so its certainly a viable option. I suppose theres no reason you technically need a box vs. a tray if youre going to be going with a fully draining, foamless design. I chose to go essentially foamless and drain all of the underfloor cavities together- but not to the bilge. I also sealed my battery box off. I figure that any path for the water to escape is also an intrusion point (and the low lying batt boxes on my other boats seem to always collect water) and I didnt want ANY water below the floor, if I could help it. I did provide means to get the water back out though, should it find its way in somehow... I just wasnt going to invite it in. Thats about the only reason I can think of against going with the tray idea. One benefit is that you'd end up with a lot more room with the same sized opening, as the factory battery box tapers quite a bit. If you do decide not to reuse the battery box in your rebuild and you'd be willing to part with it, Id be interested in it for one of my other boats- so drop me a line if you decide to sell it. |
|
|
|
|
Ranger
Senior Member
Joined: August-23-2010 Location: San Diego Status: Offline Points: 151 |
Post Options
Thanks(0)
Quote Reply
Posted: February-15-2011 at 4:56pm |
|
I'm still not sure which route I'll go, but the tray idea gives me more options. I pretty confident that I wont be using the original box and if I don't use it, you're welcome to it.
I'll let you know. Jeff |
|
|
|
|
uk1979
Platinum Member
Joined: June-13-2007 Location: United Kingdom Status: Offline Points: 1410 |
Post Options
Thanks(0)
Quote Reply
Posted: February-15-2011 at 5:07pm |
|
May be of help when thinking which way to go.

|
|
|
Lets have a go
56 Starflite 77 SN 78 SN 80 BFN |
|
|
|
|
Ranger
Senior Member
Joined: August-23-2010 Location: San Diego Status: Offline Points: 151 |
Post Options
Thanks(0)
Quote Reply
Posted: February-15-2011 at 5:15pm |
|
uk1979,
Thanks for the pictures. I have seen your setup and like what you have done. I think I have it printed somewhere. Do you have the box setting on the bottom of the hull or is it supported on the sides. I also really like the air duct's. I might also go that route if I can't find something suitable. What do you use the front box for? and how do you get access? Jeff |
|
|
|
|
uk1979
Platinum Member
Joined: June-13-2007 Location: United Kingdom Status: Offline Points: 1410 |
Post Options
Thanks(0)
Quote Reply
Posted: February-15-2011 at 5:37pm |
|
Jeff both are set in foam but the back battery box is only 1/8 off the hull, you can see my boxes start around the line of the dash so the front box is not that big, its just to stow away things but it will take beer too, just has a hinged lid on it.
I'm not a 2001 guy, Joe your man there , but would think you need to check on how much the bow slopes I think its more than a Mk 2 SN and the height of the deck, you may have more or less room ? to do it as Tim said may need to bring the boxes back towards the pylon. |
|
|
Lets have a go
56 Starflite 77 SN 78 SN 80 BFN |
|
|
|
|
WOFTAM
Groupie 
Joined: July-14-2010 Location: SW Michigan Status: Offline Points: 97 |
Post Options
Thanks(0)
Quote Reply
Posted: February-15-2011 at 11:15pm |
|
Nice going Ranger. You are giving me some productivity envy...
You said that you are not going to install an air box. What is the purpose of the airbox? Is it just to provide fresh air to the bilge? When I demo'd mine, the hoses from the scoop on the bow were little more than what I would describe as dryer vent hose. They were a definite source of moisture as any water that splashed in the scoop went into the "hose" and had remained there since 1981. If the airbox serves a function, has anyone figured out a way to drain the stuff that comes down the scoop? |
|
|
Just because you can does not mean you should.
|
|
|
|
|
Ranger
Senior Member
Joined: August-23-2010 Location: San Diego Status: Offline Points: 151 |
Post Options
Thanks(0)
Quote Reply
Posted: February-16-2011 at 12:04am |
|
I don't think it does anything at all. It's a box of foam. I'm going to run the same air duct's, I'm just not going to add the foam block.
I'm intending on routing the duct's as close to the starbord side as I can. I might try to build my own out of fiberglass like UK1979 did. I really don't want to spend the extra time, but I want it to be a clean install. So, if I can't find anything suitable, I'll try to build it. Jeff |
|
|
|
|
Keeganino
Grand Poobah
Joined: October-27-2009 Location: North Carolina Status: Offline Points: 2063 |
Post Options
Thanks(0)
Quote Reply
Posted: February-16-2011 at 12:10am |
|
The air box holds the conduit in place but also provides flotation. I used pvc electrical conduit for the lengths that run through the foam then flex duct from there to the scoop. You have to get fresh in there for the engine to breath. Also to carry away any fumes that might accumulate in the bilge.

|
|
|
"working on these old boats may not be cost effective but as it shows its what it brings into your life that matters" -Roger
1973 Skier |
|
|
|
|
Gary S
Grand Poobah

Joined: November-30-2006 Location: Illinois Status: Offline Points: 14096 |
Post Options
Thanks(0)
Quote Reply
Posted: February-16-2011 at 12:16am |
By who's standards Pete? Yours or a closet Tuber?
|
|
|
|
|
Post Reply
|
Page <1 678910 11> |
 Tweet
Tweet
|
| Forum Jump | Forum Permissions You cannot post new topics in this forum You cannot reply to topics in this forum You cannot delete your posts in this forum You cannot edit your posts in this forum You cannot create polls in this forum You cannot vote in polls in this forum |


 Topic Options
 TRBenj wrote: