 Boats For Sale:


1984 Ski Nautique project |
Post Reply 
|
Page 12> |
| Author | ||
bbishop1974 
Senior Member 

Joined: May-16-2010 Location: rindge,nh Status: Offline Points: 275 |
 Post Options Post Options
") Thanks(0) Thanks(0)
 Quote Reply Quote Reply
 Topic: 1984 Ski Nautique project Topic: 1984 Ski Nautique projectPosted: October-27-2012 at 1:47am |
|
|
nice work! i cant believe how much fiberglass you got to leave in your hull and get your stringers out.i had to get every last bit off and it was still a struggle.keep up the good work
|
||
 |
||
|
woodman935
Newbie 
Joined: July-31-2010 Status: Offline Points: 36 |
Post Options
Thanks(0)
Quote Reply
Posted: October-13-2012 at 4:48pm |
|
|
Wow, what a project !!!. These are great boats, I owned one identical to this, never had any issues, just regular maintenance. I bought it from Correct Craft in Sacramento in 1987 with 120 hours on the clock and after 700 or so hours traded it in for a new 1996 in '96.
I have a picture of "the blue boat" hanging in my office. My hull # CTC 15742 C 484. You will have a wonderful boat when finished. Woody |
||
|
||
|
skicat2001
Platinum Member 

Joined: November-24-2008 Location: Ft. Worth TX Status: Offline Points: 1950 |
Post Options
Thanks(0)
Quote Reply
Posted: October-08-2012 at 2:06pm |
|
|
You are doing a wonderful job. She was disater and looking great.

|
||
|
1985 CC 2001-SOLD
Lee Michael Johnson |
||
|
||
|
ny_nautique
Platinum Member
Joined: June-01-2011 Location: Albany NY Status: Offline Points: 1215 |
Post Options
Thanks(0)
Quote Reply
Posted: March-23-2012 at 6:09pm |
|
|
I'm finally at a point where I can post another update. Over the past few months I've been working mainly on disassembling the engine and cleaning up what I can. I've also ordered most of the seals that I need and carb rebuild kit so I'm ready once I decide what to do with the engine (do I just fix the one valve and spend the money on upgrading it next year, or do it all right now)..
Anyway, since it has been summer in March for us this week, I took the opportunity to bring the boat to my house and work on the stringers. What better way to spend four 80 degree days than in jeans, a long sleeve shirt, breathers and masks! Here's where I left off in December and what I started with this week.  I cut out the glass from the stringers, drilled a few 1-inch holes and lifted them out with my engine lift.  As you can see, the stringers were still wet after sitting since labor day, and they were heavy. They came out perfectly though, so I have some great templates.  Then it was a matter of cutting the excess glass...  And grinding...  And grinding...  And grinding...  I used 7 or 8 flapper wheels on my angle grinder! When I removed the blower assembly, I was greeted by this INSIDE the blower.  The wasp nest in addition to the big holes in the hose probably meant very little air was being pulled from the engine compartment when I ran the blower. 
|
||
|
- Jeff
1999 Ski Nautique |
||
|
||
|
Jllogan
Platinum Member

Joined: May-18-2011 Location: canton, OH Status: Offline Points: 1728 |
Post Options
Thanks(0)
Quote Reply
Posted: December-05-2011 at 4:22pm |
|
|
Jeff,
Hey got your post and am responding about my us composites order. I spent alot time on phone with them as well as scouring the forum for a game plan. Are you going to go with an original floorplan or something different? Mine varies a little bit because I am going foamless with a plywood floor coated in fiberglass. My order (I will most likely have to make another) was 500$ plus shipping which ended up more like 600$. But my fiberglass and foam needs are going to be less than the original design. After talking with us composites to get a layup of original thickness you will need about 5 layers of glass on the floor. Also it will take about 3 16lb foam kits. He also said for estimating purposes a quart of resin per yard of fabric is a good way to guess for most fabric. Also I got the epoxy resin not polyester. Dont forget to order CPES for any wood you may have, they dont sell at us composites, or at least I dont think so. post any other questions and I (or someone I am sure) will try to answer. I still have my shopping list if you want more detail but I am sure I missed some things. Other things I ordered were, thickener pumps for resin mixing cups fiberglass roller tyvek suits and some pigments ( wanted to fool around with colored resins, ive got some ideas for some side projects mainly some custom speaker boxes ) |
||
|
||
|
ny_nautique
Platinum Member
Joined: June-01-2011 Location: Albany NY Status: Offline Points: 1215 |
Post Options
Thanks(0)
Quote Reply
Posted: December-05-2011 at 2:01pm |
|
|
A few more of my work this weekend. Everything is out. 99.9% of the under-floor foam is gone. I still have the nasty sprayed foam on the transom and above the bow.
Here is the support below the front starboard edge of the rear seat. It was completely soaked and rotted. The port side wasn't as bad, but still wet. 
Most of the foam comes out pretty easy with a shovel. 
Why would they leave this 3/4" void and fill it with foam! As you can imagine, it was all soaked and the water had nowhere to go but in the stringers. 
|
||
|
- Jeff
1999 Ski Nautique |
||
|
||
|
ny_nautique
Platinum Member
Joined: June-01-2011 Location: Albany NY Status: Offline Points: 1215 |
Post Options
Thanks(0)
Quote Reply
Posted: December-05-2011 at 1:16pm |
|
Phil - the pic I labeled "wow nasty stuff" up above is the only other good one I have of that drain to nowhere. You can see the pipe running under the battery box - that was from the cooler. I never did get a good look at how it came through the bulkhead because it was so rotted by the time I got that out, it was falling apart. And, this was the only part of the boat that really smelled and I was gagging trying to get this stuff out of there! In the summer I stated that it felt like the hole was just poking through the bulkhead and it wasn't really a proper port. I still think that was the case. If you can get some light and a camera down by your pylon to take a pic of the bulkhead from the front, I would like to see it. You're probably correct on why the 4th port was capped. Good to know it was factory though. |
||
|
- Jeff
1999 Ski Nautique |
||
|
||
|
TRBenj
Grand Poobah 

Joined: June-29-2005 Location: NWCT Status: Offline Points: 21113 |
Post Options
Thanks(0)
Quote Reply
Posted: December-05-2011 at 11:53am |
|
Eric, let me guess- that Century is a v-hull? The loading on a v-hull vs. a flat bottom are very different. CC built their v-hulls with shorter stringers and lots of horizontal bulkheads too. |
||
|
||
|
verdi1
Groupie 

Joined: August-24-2011 Location: Reidsville, NC Status: Offline Points: 78 |
Post Options
Thanks(0)
Quote Reply
Posted: December-03-2011 at 1:07pm |
|
Thanks for the insight, just seems stupid they would have covered up or left very little oppening in the drain holes in that area. BTW the capped vent hole you asked about in a picture is stock I would "assume" my 84 has the exact same set up, maybe a spare for a heater? |
||
|
||
|
eric lavine
Grand Poobah
Joined: August-13-2006 Location: United States Status: Offline Points: 13413 |
Post Options
Thanks(0)
Quote Reply
Posted: December-03-2011 at 11:43am |
|
|
to give an idea of using foam as a structural part of a boat, unlike the correct crafts, Im tearing into a century, there are no stringers at all and a relying on plywood and 2 by 8's horizontally, as the engine cradle, and then inject foam into the structure. pretty cheesy. but it is truly an empty shell with no mains running front to back
|
||
|
"the things you own will start to own you"
|
||
|
||
|
ny_nautique
Platinum Member
Joined: June-01-2011 Location: Albany NY Status: Offline Points: 1215 |
Post Options
Thanks(0)
Quote Reply
Posted: December-03-2011 at 3:01am |
|
|
Yes, mine was small slit too. It felt like the coat hanger I shoved through broke through the glass/wood of the bulkhead.
I think I have a few more pics that may show it. I will post them tomorrow. |
||
|
- Jeff
1999 Ski Nautique |
||
|
||
|
verdi1
Groupie
Joined: August-24-2011 Location: Reidsville, NC Status: Offline Points: 78 |
Post Options
Thanks(0)
Quote Reply
Posted: December-02-2011 at 7:59pm |
|
|
Jeff,
Congrats on the progress looks good! I just bought an 84 SN myself and noticed the battery and cooler box held water, cleaned them all out and shoved a hose down the drain hole to nowhere! I can see a small slit in a what looks like a cross member in front of the boxes and this is where my trickle of water came out but maybe there was a flaw in design on the 84's or your boat and mine were rigged by the same idiot production worker. Do you have picture of what you discoverd as far as plumbing in that area? Just curious before I go running a flex bit through there to clean things out. Thanks for any help. |
||
|
||
|
ny_nautique
Platinum Member
Joined: June-01-2011 Location: Albany NY Status: Offline Points: 1215 |
Post Options
Thanks(0)
Quote Reply
Posted: November-29-2011 at 1:55pm |
|
Yes, I've been in the hotel in Philly where it started.  There was some nasty standing stinky water that I found this weekend. There was some nasty standing stinky water that I found this weekend.
On to the pics... Here's my work area. It is nice to have so much room. I also have great lighting and a dumpster 20 steps away. 
Under the bow being chopped up. 
My 8-year-old son is the perfect size to fit under the bow and he was a great help. His pay was a new Wii game... 
The floor is removed under the driver's seat. Lots of delamination here... Next is to remove the cooler and battery box. 

Yuck. And here's my "drain to nowhere" from the cooler. In this pic the cooler is removed and rotated upside down. The drain fitting you see has a flat piece of plastic in it... it used to be a tube but now it is 2-dimensional.... So it was letting all of the water go under the foam. 
Wow.. nasty stuff! 
Here's my full dumpster: 
And here's how it looks now. Waiting for next weekend... 
|
||
|
- Jeff
1999 Ski Nautique |
||
|
||
|
eric lavine
Grand Poobah
Joined: August-13-2006 Location: United States Status: Offline Points: 13413 |
Post Options
Thanks(0)
Quote Reply
Posted: November-26-2011 at 11:24am |
|
|
you know legionaires started from bacteria from an air conditioner, when i see the wet foam, thats what i think of
|
||
|
"the things you own will start to own you"
|
||
|
||
|
ny_nautique
Platinum Member
Joined: June-01-2011 Location: Albany NY Status: Offline Points: 1215 |
Post Options
Thanks(0)
Quote Reply
Posted: November-26-2011 at 3:53am |
|
|
I've been working on it the past few weeks with some significant progress this week. I'm hoping I can get a lot done on this 4-day weekend.
The foam on the passengers side is mostly dry. Definitely not saturated. However, scroll down to see what the driver's side looked like! Here it is before starting the work. I removed the gas tank today and the carpet and am ready to dig into the floor. 
Before I show you the floor, here are the 4 ports for the vents under the bow. Notice the right-most was capped off. Is this normal? 
Oh boy..  The observer side looks OK but the driver's side is quite wet. The boat hasn't seen water for 6 weeks yet it is soaked! The observer side looks OK but the driver's side is quite wet. The boat hasn't seen water for 6 weeks yet it is soaked!

This was the base below the driver's seat. It just melted in my hands. 
Yup, that is standing water that I found after pulling the foam. 
I could squeeze water out of the foam... 
|
||
|
- Jeff
1999 Ski Nautique |
||
|
||
|
ny_nautique
Platinum Member
Joined: June-01-2011 Location: Albany NY Status: Offline Points: 1215 |
Post Options
Thanks(0)
Quote Reply
Posted: July-13-2011 at 3:23pm |
|
|
Here's an update to my project:
I took it out for the first time this weekend and it ran OK. I had a few issues with restarting after it had warmed up which I will need to take care of. This is 2nd on the list now to installing a new impeller. The PO told us that he had just replaced the impeller and I should have checked, but didn't. We had good temps for the 2 hours I drove it early Sunday. Came back to the water later on Sunday and had an overheating issue. Had to be towed back to the dock by Jeff's 77 Nautique. (It was a good thing my mechanic was there! :) ). Last night I took off the RWP and cleaned it up so it is ready for the new impeller. Still to do this season:
Hopefully this will get me to the end of the season and I'll do the major stuff over the winter. |
||
|
||
|
TRBenj
Grand Poobah
Joined: June-29-2005 Location: NWCT Status: Offline Points: 21113 |
Post Options
Thanks(0)
Quote Reply
Posted: June-22-2011 at 3:26pm |
|
|
The ideal way to fix those holes (both in the vent and rub rail) would be to put a layer or 2 of glass behind them, and then fill them with thickened resin. A high strength filler like microfiber or aerosil-cabosil would be best since you want to screw into the holes again when reinstalling. If you can reinstall the rub rail without fear of having to reuse any of the old holes, then you could get away with a sealer (like 5200) or filling the holes with a lower strength filler, or without having to backing it with glass first.
|
||
|
||
|
ny_nautique
Platinum Member
Joined: June-01-2011 Location: Albany NY Status: Offline Points: 1215 |
Post Options
Thanks(0)
Quote Reply
Posted: June-22-2011 at 3:04pm |
|
|
Bumpity! Looking for suggestions on fixing those holes where the bow intake vents mount.
Also, what do I use to fill in the old holes from the original rub rail? |
||
|
||
|
ny_nautique
Platinum Member
Joined: June-01-2011 Location: Albany NY Status: Offline Points: 1215 |
Post Options
Thanks(0)
Quote Reply
Posted: June-21-2011 at 7:33pm |
|
|
Oh one more question... I assume it is suggested that I fill in all the holes where the original rub rail was mounted. Is that a job for 3M 5200?
|
||
|
||
|
ny_nautique
Platinum Member
Joined: June-01-2011 Location: Albany NY Status: Offline Points: 1215 |
Post Options
Thanks(0)
Quote Reply
Posted: June-21-2011 at 7:29pm |
|
|
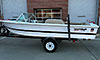
It's Naked! The blue color is coming back and she's starting to shine. I'm taking Thursday and Friday off and will have some help those days so hoping to have a good amount done by the end of the Weekend.

What suggestions do you guys have for fixing the holes here where the bow intake vents mount? 
Thanks! Jeff |
||
|
||
|
bbishop1974
Senior Member
Joined: May-16-2010 Location: rindge,nh Status: Offline Points: 275 |
Post Options
Thanks(0)
Quote Reply
Posted: June-19-2011 at 12:58am |
|
|
iknow your swim platform has some cracks but dont be shy with a sander.mine was worse,i refinished every hole with a file,retrimed all the edges and grooves and then did the teak resto kit.it looks pretty good by anyones standards.wear a mask,that dust is nasty.
|
||
|
||
|
ny_nautique
Platinum Member
Joined: June-01-2011 Location: Albany NY Status: Offline Points: 1215 |
Post Options
Thanks(0)
Quote Reply
Posted: June-17-2011 at 11:35am |
|
Yes! I couldn't believe how many were bent. Today was garbage day and I had to decide if I should throw them away or save them to be recycled. I saved them... |
||
|
||
|
Chopper
Gold Member

Joined: June-15-2006 Location: Australia Status: Offline Points: 821 |
Post Options
Thanks(0)
Quote Reply
Posted: June-17-2011 at 4:51am |
|
You must be missing a couple of screws. All mine have had 8,600 stainless screws in the rub rail. 
And of that 8,600 stainless screws, maybe 10 of them were not bent. |
||
|
||
|
ny_nautique
Platinum Member
Joined: June-01-2011 Location: Albany NY Status: Offline Points: 1215 |
Post Options
Thanks(1)
Quote Reply
Posted: June-16-2011 at 7:49pm |
|
LOL true... I just wanted to check the stuff out. |
||
|
||
|
gun-driver
Grand Poobah
Joined: July-18-2008 Location: Pittsburgh, Pa Status: Offline Points: 4112 |
Post Options
Thanks(0)
Quote Reply
Posted: June-16-2011 at 7:40pm |
|
|
Dude I like you ambition but even if it arrives Friday you've got a ton of work to do before you’re ready for that step.
Joe’s synopsis of the rub rail screws is right on. My '85 when I bought it had a little section by the corner of the windshield on the driver’s side that took the same hit. Here's what it look's like under the floor in the battery box area minus a bunch of water soaked foam. 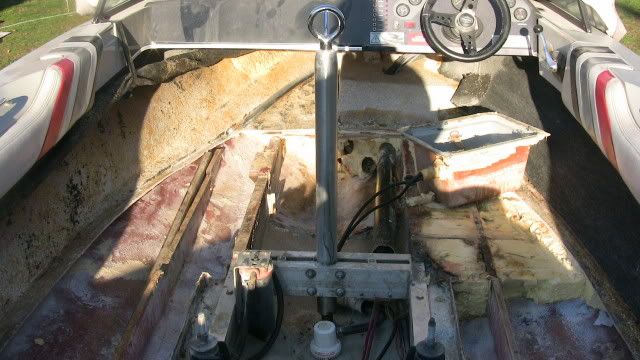
|
||
|
||
|
ny_nautique
Platinum Member
Joined: June-01-2011 Location: Albany NY Status: Offline Points: 1215 |
Post Options
Thanks(0)
Quote Reply
Posted: June-16-2011 at 2:06pm |
|
|
Thanks Pete. I did buy a color match kit last night. Hoping it arrives on Friday.
|
||
|
||
|
8122pbrainard
Grand Poobah

Joined: September-14-2006 Location: Three Lakes Wi. Status: Offline Points: 41040 |
Post Options
Thanks(0)
Quote Reply
Posted: June-16-2011 at 1:30pm |
|
|
Jeff,
For smaller quantities of gel, patch kits are available from almost any marne supply. They come with tints to match your color of gel - that's the tricky part!!! Also, check out Mini-craft of florida for smaller quantities. They also have a color matching service (for a fee) but you need to send them a quarter size or bigger sample of your gel. |
||
|
||
|
ny_nautique
Platinum Member
Joined: June-01-2011 Location: Albany NY Status: Offline Points: 1215 |
Post Options
Thanks(0)
Quote Reply
Posted: June-16-2011 at 1:08pm |
|
|
Ahh, makes sense. Thanks. For patch paste, are you talking Spectrum Color patch paste? I just called them and minimum order is a gallon for ~$220.
Good idea about making the small groove. Tim - Thanks... I can't see in there so I'm going to take some pics tonight to see what it really looks like. There is certainly no factory drain going into the bilge there... from what I can feel with my hand. |
||
|
||
|
8122pbrainard
Grand Poobah
Joined: September-14-2006 Location: Three Lakes Wi. Status: Offline Points: 41040 |
Post Options
Thanks(0)
Quote Reply
Posted: June-16-2011 at 12:56pm |
|
|
Joe has the same idea that I do. A bolt or a pretty big nail sticking out from the dock. No bumpers and large wave action took out the rub rail and the bolt/nail went after the hull gel.
Some people just don't care!!! That is reflected with the dry wall screw "repair" as well! 
|
||
|
||
|
JoeinNY
Grand Poobah

Joined: October-19-2005 Location: United States Status: Offline Points: 5693 |
Post Options
Thanks(0)
Quote Reply
Posted: June-16-2011 at 12:35pm |
|
|
They got there when the rub rail was smashed down on a dock and tore out.. the screws when with it and caused the damage. Then they jammed it back down smashed it with a mallet and stuck some drywall screws into it to keep it down. I think patch paste is going to be your friend if you are really looking to take that boat back to glory. I would grind a groove all the way around the boat in the gelcoate just below where the rub rail will cover and only repair above the groove. That will keep the stress cracks from coming up from the holes for the rub rail screws. Anything above the grind line that is already cracked you would need to go down to glass there and repair with the patch paste. Then of course smooth, wetsand.. yadda yadda. If you want to come by and pracice on my 95 first I have the patch paste already on hand.
|
||
|
||
|
Post Reply
|
Page 12> |
 Tweet
Tweet
|
| Forum Jump | Forum Permissions You cannot post new topics in this forum You cannot reply to topics in this forum You cannot delete your posts in this forum You cannot edit your posts in this forum You cannot create polls in this forum You cannot vote in polls in this forum |


 Topic Options
 verdi1 wrote: