 Boats For Sale:
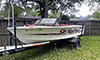


Damage boat project |
Post Reply 
|
Page <1 23456 10> |
| Author | ||||||
Mike9812121298 
Senior Member 
Joined: March-24-2017 Location: Seattle Status: Offline Points: 139 |
 Post Options Post Options
") Thanks(0) Thanks(0)
 Quote Reply Quote Reply
 Posted: April-03-2017 at 12:31am Posted: April-03-2017 at 12:31am |
|||||
|
I would have started glass but I only have the bondo resin that is not expoxy. How much glass should I order? Think this will work to start glass?
|
||||||
 |
||||||
|
KRoundy
Platinum Member 

Joined: August-23-2010 Location: Lake Stevens Status: Offline Points: 1702 |
Post Options
Thanks(0)
Quote Reply
Posted: April-03-2017 at 2:01am |
|||||
|
I think you are on the right track! You see no more delamination or cracks, right? Hard to tell from a couple of small pictures. Once you get to that time to glass it back up with the right glass and epoxy resin. Lots of places to source it here in the Seattle area. TAP plastics has a good selection of glass but make sure you get the right resin. There are some very good marinas (NOT WEST MARINE!) that carry what you need too. Up near me I've always been amazed at the selection and knowledge of the team at Harbor Marine in Everett.
|
||||||
|
Previous: 1993 Electric Blue/Charcoal Ski Nautique
Current: 2016 Ski Nautique 200 Open Bow |
||||||
|
||||||
|
8122pbrainard
Grand Poobah 

Joined: September-14-2006 Location: Three Lakes Wi. Status: Offline Points: 41040 |
Post Options
Thanks(0)
Quote Reply
Posted: April-03-2017 at 7:46am |
|||||
|
Mike,
Don't forget poly covered blocks to mimic the strut and rudder base indentations in the hull bottom. Make them slightly oversize to allow for bedding (caulking) compound. Lookin' Good!  One trick I've used for disbonded areas where they are too deep to get resin into is to drill small (about 3/32") holes through the top layer. Then when you prime the area with plain resin, the resin will flow into the disbonded layers. Injection with a syringe also woks in real tight spots. |
||||||
|
||||||
|
Mike9812121298
Senior Member
Joined: March-24-2017 Location: Seattle Status: Offline Points: 139 |
Post Options
Thanks(0)
Quote Reply
Posted: April-04-2017 at 12:22am |
|||||
|
Looking at fiberglass. What one would I want for this project and how much

|
||||||
|
||||||
|
Mike9812121298
Senior Member
Joined: March-24-2017 Location: Seattle Status: Offline Points: 139 |
Post Options
Thanks(0)
Quote Reply
Posted: April-04-2017 at 12:26am |
|||||

|
||||||
|
||||||
|
Gary S
Grand Poobah

Joined: November-30-2006 Location: Illinois Status: Offline Points: 14096 |
Post Options
Thanks(0)
Quote Reply
Posted: April-04-2017 at 12:47am |
|||||
|
I would not use something like that,chopped fibers do not have the strength that cloth or matt has. Nautiques are not originally constructed with chopped glass they use a cloth/mat layup. Many cheaper boats use chopped glass applied with a Chopper gun which mixes the resin and chops fiberglass thread and sprays it into a mold. I would lean towards something like the fifth one down here. Maybe Morfoot will see this and advise, he repairs fiberglass parts in the aviation world. A small roller like these would be nice too to work out the excess resin and bubbles as you layup the layers too
|
||||||
|
||||||
|
Morfoot
Grand Poobah

Joined: February-06-2004 Location: South Lanier Status: Offline Points: 5312 |
Post Options
Thanks(0)
Quote Reply
Posted: April-04-2017 at 1:37pm |
|||||
|
Late to the game on this one guys but a tarnished Starr texted me to have a looksee at this thread and add my $.03 worth. Glad to see you grind it all the way down and get rid of the adhesive fill that you added. Smart Move!
 You're on the right track Mike but I would NOT use chop glass on any of that repair. For strength I would definately use woven cloth. You're on the right track Mike but I would NOT use chop glass on any of that repair. For strength I would definately use woven cloth. Now that you've got it reinforced from the bottom I would brush epoxy straight onto what you have and use the brush bristles to force epoxy in between the delaminating plies. once you have done that, put some wax paper down then weigh it down with a half empty bag of sand or a gallon ziplock bag not quite full to compress the delaminated/damaged plies together. Using a sandbag will conform to the shape of the bottom of the hull. Once it cures then do a light sand with a 120 grit or coarse scotchbrite pad to rough up the epoxy. Wipe it down with acetone. Use a big piece of transparent plastic and lay it down on the repair. Use a fine line sharpie and trace each individual layer of cloth starting with the smallest first and continue with each larger ply until you have no more layers to trace. Now you have patterns to go by when you cut your cloth to epoxy in place. I would add 3 final plys on top of however many initial plies you have with each one 1/2 inch larger than the next. Several plies adhereing to the hull is better than just one big one. Stronger longer lasting repair if it's done this way. Once all the plies are down then weigh it down with those sandbags as compression is KEY to a STRONG repair! If any of this confuses you then don't hesitate to give me a call at 77Zer0 31six 6nine6three and I'll be happy to explain better than the above. Nice find and keep the pictures coming on the progress. |
||||||
|
"Morfoot; He can ski. He can wakeboard.He can cook chicken.He can create his own self-named beverage, & can also apparently fly. A man of many talents."72 Mustang "Kermit",88 SN Miss Scarlett, 99 SN "Sherman"
|
||||||
|
||||||
|
Mike9812121298
Senior Member
Joined: March-24-2017 Location: Seattle Status: Offline Points: 139 |
Post Options
Thanks(0)
Quote Reply
Posted: April-04-2017 at 3:13pm |
|||||
|
quick question, theres a local store that sells the fiberglass and resin. the lady on the phone was telling me that i would want to use vinyl ester resin over epoxy. what do you guys recommend
|
||||||
|
||||||
|
TRBenj
Grand Poobah

Joined: June-29-2005 Location: NWCT Status: Offline Points: 21113 |
Post Options
Thanks(0)
Quote Reply
Posted: April-04-2017 at 3:32pm |
|||||
|
Epoxy
|
||||||
|
||||||
|
8122pbrainard
Grand Poobah
Joined: September-14-2006 Location: Three Lakes Wi. Status: Offline Points: 41040 |
Post Options
Thanks(0)
Quote Reply
Posted: April-04-2017 at 3:53pm |
|||||
|
Epoxy. Don't go to THAT store!!!
|
||||||
|
||||||
|
tryathlete
Platinum Member

Joined: April-19-2013 Location: Lake Villa, IL Status: Offline Points: 1797 |
Post Options
Thanks(0)
Quote Reply
Posted: April-04-2017 at 3:55pm |
|||||
|
Would this glass be of use?
http://www.correctcraftfan.com/forum/forum_posts.asp?TID=40789&PID=525874 |
||||||
|
||||||
|
Gary S
Grand Poobah
Joined: November-30-2006 Location: Illinois Status: Offline Points: 14096 |
Post Options
Thanks(0)
Quote Reply
Posted: April-04-2017 at 3:55pm |
|||||

|
||||||
|
||||||
|
8122pbrainard
Grand Poobah
Joined: September-14-2006 Location: Three Lakes Wi. Status: Offline Points: 41040 |
Post Options
Thanks(0)
Quote Reply
Posted: April-04-2017 at 4:03pm |
|||||
EPOXY!! EPOXY!! EPOXY!! 
|
||||||
|
||||||
|
Mike9812121298
Senior Member
Joined: March-24-2017 Location: Seattle Status: Offline Points: 139 |
Post Options
Thanks(0)
Quote Reply
Posted: April-04-2017 at 4:30pm |
|||||
|
Ok that's what I thought just double checking!
|
||||||
|
||||||
|
MrMcD
Grand Poobah

Joined: January-28-2014 Location: Folsom, CA Status: Offline Points: 3594 |
Post Options
Thanks(0)
Quote Reply
Posted: April-04-2017 at 6:13pm |
|||||
|
Can I ask you guys what should be used to clean the tools, I saw the post showing rollers.
They look expensive to trash after application. Is this where the Sandbag idea over a plastic layer helps or eliminates the need to roll the epoxy/fiberglass mat to remove air bubbles? The advice for Mike has been outstanding. He is going to have a great boat for a little money and some elbow grease. I have a large fiberglass project ahead of me so I am trying to pay attention. Mike, I have seen several Dyno tests on the same engine, tested with a Carburetor and then with Fuel Injection. At wide open throttle and max RPM the Horsepower is identical for both. The fuel injection shines from idle all the way to wide open throttle offering a little more torque at all the mid RPM ranges making the engine feel a little more powerful even though they both make the same max horsepower. The FI system your boat came with was a known trouble source so it is very good that someone helped you out and went back to a Carb. Don't sweat it. Mark |
||||||
|
||||||
|
8122pbrainard
Grand Poobah
Joined: September-14-2006 Location: Three Lakes Wi. Status: Offline Points: 41040 |
Post Options
Thanks(0)
Quote Reply
Posted: April-04-2017 at 6:39pm |
|||||
|
Mark,
Tim's recommendation to use the sandbag is to try to compress the layers of disbonding back together. Ideally you could set up a vacuum bag to do the same but that would be difficult in Mike's project. Roller covers go in the trash but a metal laminating roller can be cleaned with a strong solvent like acetone. |
||||||
|
||||||
|
Gary S
Grand Poobah
Joined: November-30-2006 Location: Illinois Status: Offline Points: 14096 |
Post Options
Thanks(0)
Quote Reply
Posted: April-04-2017 at 7:22pm |
|||||
|
Mark I got my metal roller from US Composites it comes apart just like a paint roller.I just throw it in some acetone and use a cheap throwaway brush to get the majority of the resin off. Then I take it apart and wipe it down with some more.. While it's apart I smear mold release wax inside of it since I have some,it seems to keep the threads and the inside of the roller clear.
|
||||||
|
||||||
|
MrMcD
Grand Poobah
Joined: January-28-2014 Location: Folsom, CA Status: Offline Points: 3594 |
Post Options
Thanks(1)
Quote Reply
Posted: April-04-2017 at 8:51pm |
|||||
|
I appreciate the tips, I have only done small jobs with Fiberglass so far and keeping my mixing pots and tools useable was a chore.
For small area repairs I was told to mix the hardener and epoxy in paper cups so any excess just gets thrown away. That has made the process a little easier. Thanks |
||||||
|
||||||
|
SNobsessed
Grand Poobah
Joined: October-21-2007 Location: IA Status: Offline Points: 7102 |
Post Options
Thanks(1)
Quote Reply
Posted: April-04-2017 at 9:40pm |
|||||
|
I cut the tops off of beer cans & use them - have plenty of stock to use!
Somewhere I got the info that the wax in paper cups was bad for the mix. Maybe just bad garage lore . . . |
||||||
|
“Beer is proof that God loves us and wants us to be happy.”
Ben Franklin |
||||||
|
||||||
|
john b
Grand Poobah
Joined: July-06-2011 Location: lake Sweeny Status: Offline Points: 3236 |
Post Options
Thanks(1)
Quote Reply
Posted: April-04-2017 at 10:33pm |
|||||
|
I found the pumps from uscomposits to be neat and convenient. I oz/stroke.
|
||||||
|
1970 Mustang "Theseus' paradox"
If everyone else is doing it, you're too late! |
||||||
|
||||||
|
Mike9812121298
Senior Member
Joined: March-24-2017 Location: Seattle Status: Offline Points: 139 |
Post Options
Thanks(0)
Quote Reply
Posted: April-04-2017 at 10:51pm |
|||||
|
Thanks for all the info guys. I have a feeling if I would have went into this project blind, there's a good chance the boat would be right back in repair a few weeks later. The lady at the store was saying do 3-4 layers than let it sit for 24 hours. She also said the epoxy resin was over kill but I got it anyways. I'm going to need to find something to keep it compressed.
I also ordered the double taper drive shaft and strut bushings this morning. I still need the prop, and some small things I've seen a 2000 master craft in VA I believe they were asking 6-7k for the same issue. |
||||||
|
||||||
|
tryathlete
Platinum Member
Joined: April-19-2013 Location: Lake Villa, IL Status: Offline Points: 1797 |
Post Options
Thanks(0)
Quote Reply
Posted: April-05-2017 at 12:05am |
|||||
|
This is one of my favorite threads. True proof of why I came here to begin with, and a major factor in my decision to buy a CC. Mike, we are all living a bit vicariously through your generous willingness to give and take from CCF. What a cool story you'll have to tell about this incredible boat when it's all finished.
I hope to see it in person when I get out to Seattle sometime. |
||||||
|
||||||
|
MechGaT
Senior Member

Joined: March-09-2015 Location: Chattanooga Status: Offline Points: 271 |
Post Options
Thanks(0)
Quote Reply
Posted: April-05-2017 at 12:29am |
|||||
I found some bowls without wax at Wally World and Aldi to use for that reason. |
||||||
|
'92 Sport Nautique
|
||||||
|
||||||
|
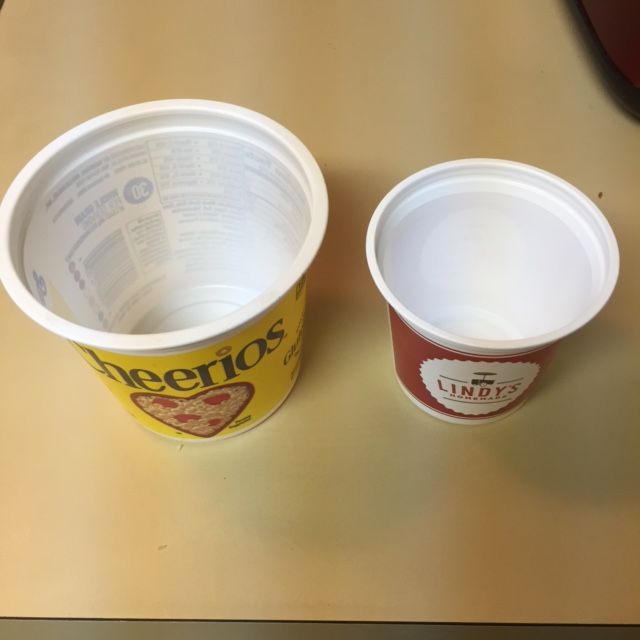
Gary S
Grand Poobah
Joined: November-30-2006 Location: Illinois Status: Offline Points: 14096 |
Post Options
Thanks(0)
Quote Reply
Posted: April-05-2017 at 12:48am |
|||||
|
I have not done any big projects that need a lot of cups so for what I do I save stuff like this -
|
||||||
|
||||||
|
Morfoot
Grand Poobah
Joined: February-06-2004 Location: South Lanier Status: Offline Points: 5312 |
Post Options
Thanks(0)
Quote Reply
Posted: April-05-2017 at 8:15am |
|||||
BAZINGA! (technically though Pete, the layers of fiberglass are delaminating from each other )I'm spoiled as I have the proper materials to do a project like this so my suggestion to use wax paper is something that those that don't have access to the proper plastics to place down over a repair or the means to vacuum bag it. You can try plastic wrap but not sure if it would stick to the repair or not. If a roller isn't available then you can always use a plastic squeegee ( like the ones you'd use to spread Bondo) to squeeze the air bubbles out. Like Garys suggestion above, if anyone or yourself eats yogurt then those containers work great for mixing epoxy. Go buy yourself a cheap digital kitchen scale and weigh out your resin. The mixing directions should include both volume and weight measurements to add. We have lead shot bags laying around and 5lb lead blocks to weigh down repairs instead of bagging everything. The avg Joe mechanic probably doesn't have lead shot around so sandbagging it works just as good. Could always add water to the sand to increase the weight without adding bulk. |
||||||
|
"Morfoot; He can ski. He can wakeboard.He can cook chicken.He can create his own self-named beverage, & can also apparently fly. A man of many talents."72 Mustang "Kermit",88 SN Miss Scarlett, 99 SN "Sherman"
|
||||||
|
||||||
|
quinner
Grand Poobah

Joined: October-12-2005 Location: Unknown Status: Offline Points: 5828 |
Post Options
Thanks(0)
Quote Reply
Posted: April-05-2017 at 10:28am |
|||||
Size can also be an issue with cups, found the DD cups to be a bit to work with, D's are nice but C's are generally the easiest to handle and manipulate. |
||||||
|
||||||
|
tryathlete
Platinum Member
Joined: April-19-2013 Location: Lake Villa, IL Status: Offline Points: 1797 |
Post Options
Thanks(0)
Quote Reply
Posted: April-05-2017 at 10:34am |
|||||
|
Quinn, you and Trump need bigger hands.
|
||||||
|
||||||
|
8122pbrainard
Grand Poobah
Joined: September-14-2006 Location: Three Lakes Wi. Status: Offline Points: 41040 |
Post Options
Thanks(0)
Quote Reply
Posted: April-05-2017 at 2:06pm |
|||||
Poly plastic sheathing (visqueen) will not stick |
||||||
|
||||||
|
Mike9812121298
Senior Member
Joined: March-24-2017 Location: Seattle Status: Offline Points: 139 |
Post Options
Thanks(0)
Quote Reply
Posted: April-05-2017 at 2:51pm |
|||||
|
I got the first couple layers down last night. Instead of a sand bag i use a bag full of bolts. should i go roughly 1-2 inches thick, and then just make it flat and mount the rudder plate onto that?
 
|
||||||
|
||||||
|
8122pbrainard
Grand Poobah
Joined: September-14-2006 Location: Three Lakes Wi. Status: Offline Points: 41040 |
Post Options
Thanks(0)
Quote Reply
Posted: April-05-2017 at 3:42pm |
|||||
|
Mike,
The thickness of your repair should be the same as the original. IE, if the hull was 3/8" over the rudder port and strut, then your final thickness should be 3/8" or slightly thicker. |
||||||
|
||||||
|
Post Reply
|
Page <1 23456 10> |
 Tweet
Tweet
|
| Forum Jump | Forum Permissions You cannot post new topics in this forum You cannot reply to topics in this forum You cannot delete your posts in this forum You cannot edit your posts in this forum You cannot create polls in this forum You cannot vote in polls in this forum |


 Topic Options
 Morfoot wrote: