 Boats For Sale:


Stringer rebuild 1987 Ski Nautique 2001 |
Post Reply 
|
Page 12> |
| Author | ||
lharley 
Newbie 
Joined: April-20-2017 Location: Lexington, SC Status: Offline Points: 33 |
 Post Options Post Options
") Thanks(0) Thanks(0)
 Quote Reply Quote Reply
 Topic: Stringer rebuild 1987 Ski Nautique 2001 Topic: Stringer rebuild 1987 Ski Nautique 2001Posted: April-20-2017 at 2:44pm |
|
|
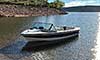
I purchased a 1987 Ski Nautique 2001 a little over 3 years ago. I knew when I got it the stringers were going to have to be re-done. I got it for a really good price the motor had low hours on it and the compression was very good. So after using it for 3 seasons every weekend from the first of May to the end of Sept. I decided that last Oct. I would tear it down and replace the stringers, clean it up and make the motor look nice. Here is my project. I will be more than glad to answer any questions and help anyone in any way. Please keep in mind I an not a professional boat builder or anything like that. I am a weekend carpenter and machinest. I tried to take pictures all along the process. The project kicked off the first weekend of Oct. 2016. We are finishing up around end of April to take it to the lake first of May. I will try to explane everything the best I can.
         |
||
 |
||
|
lharley
Newbie
Joined: April-20-2017 Location: Lexington, SC Status: Offline Points: 33 |
Post Options
Thanks(0)
Quote Reply
Posted: April-20-2017 at 3:06pm |
|
|
Mor pics of the tear down. I lable all wires with color coded tape to make it easier to put back together. Some things I just had to replace just to make it look better and for maintenance reasons.
          |
||
|
||
|
lharley
Newbie
Joined: April-20-2017 Location: Lexington, SC Status: Offline Points: 33 |
Post Options
Thanks(0)
Quote Reply
Posted: April-20-2017 at 3:36pm |
|
|
So the day came to pull the motor. I though I had more pictures of us pulling it but in the stress of having my two teenage boy helping me and worrying about the motor busting my supports and crashing through the bottom of the boat I only got a few pictures. That was a stressful day. I build an A-frame in my shop with 2x6's. I think the material including 3 4 foot pices of 1000 pound test chains and the couplers were about $100 at Lowe's. I had a 1/2 tone chain winch that I used to pull it. I double braced the 2x6's and used a ton of 3 inch screws about every 4 inches on both sides of the boards. I tried to brace it in all directions just to be safe. Taking the motor out and putting it back in were the most 2 stressful days in the project. After putting weight on the top joist I decided to double brace it because it was sagging in the center. See last picture.
        
|
||
|
||
|
lharley
Newbie
Joined: April-20-2017 Location: Lexington, SC Status: Offline Points: 33 |
Post Options
Thanks(0)
Quote Reply
Posted: April-20-2017 at 4:16pm |
|
|
I decided to strip the engin block and paint it ford racing blue and clean it up. This was only going to take me 2 weekends well once I started pulling things I started replacing parts. I got new valve covers that are black powder coated.
The harmonic balancer needed to be replaced. It is next to impossible to find a harmonic balancer for a reverse rotation 351w for under $300. So I got a standard rotation one from Sumit Racing for $80 and used my dial calipers to re-scribe the degree marks on the other side of the 0'degree TDC mark. Next I decided to replace the distributor with the Flame thrower marine distributor for $275 on Summit Racing. I got a standard rotation flame thrower distributor and took the gear off my old one TIG welded a plug in it. I then chucked it up in my lathe and re-boarded the correct size hole for the shaft on the flame thrower distributor. There was a .030 difference in the shaft sizes from the old one to the new one. I also decided to replace the exhaust manifolds due to excessive amounts of rust over 30 years. I soked the risers in muriatic acid for 2 days and it cleaned them up like new. I replaced the breather with a K&N marine rated breather and high flow filter. It is in later pictures so don't panic it is correct just not in these pictures. I also replaced the impeller housing with a new one just to be safe. I replaced all hosees and any wires that I felt needed to be replaced. This took me 6 weekends insted of 2 weekends.     |
||
|
||
|
Wisky Badger
Senior Member 
Joined: July-02-2015 Location: Wisconsin Status: Offline Points: 218 |
Post Options
Thanks(0)
Quote Reply
Posted: April-20-2017 at 4:26pm |
|
|
Is that an air filter or a flame arrestor on the top of that engine? Correct me if I am wrong but I think you need to run a coast guard approved flame arrestor. The last time I checked there is not a lot of dust on a lake.
|
||
|
||
|
lharley
Newbie
Joined: April-20-2017 Location: Lexington, SC Status: Offline Points: 33 |
Post Options
Thanks(0)
Quote Reply
Posted: April-20-2017 at 4:30pm |
|
|
As stated above I got a USCG aproved K&N marine rated high flow filter and breather. It cost $125 on Summit Racing. I like the way the triditional breather looks rather than the little tiny thing that was on it. All of it is marine rated by K&N.
 
|
||
|
||
|
bwinn
Senior Member
Joined: July-13-2009 Location: ct Status: Offline Points: 396 |
Post Options
Thanks(0)
Quote Reply
Posted: April-20-2017 at 4:42pm |
|
|
U s c g approved?
|
||
|
||
|
lharley
Newbie
Joined: April-20-2017 Location: Lexington, SC Status: Offline Points: 33 |
Post Options
Thanks(0)
Quote Reply
Posted: April-20-2017 at 4:55pm |
|
|
We started doing the fiberglass and stringers around the first week of December. That process took 2 months working nights and weekends. I will say keep everything you cut out in as close to original as you can get it. Measure 3 and 4 times trace what you can and order extra material. We ordered marine grade wood and used your standard West System fiberglass to put it all back in. Use a 2 part close cell fome to fill your cavities. I went with a 1/2 inch floor.
            |
||
|
||
|
lharley
Newbie
Joined: April-20-2017 Location: Lexington, SC Status: Offline Points: 33 |
Post Options
Thanks(0)
Quote Reply
Posted: April-20-2017 at 4:59pm |
|
|
Yes USCG aprover marine rated K&N high flow breather body and filter. I spent a week researching them they are top of the line.
|
||
|
||
|
bwinn
Senior Member
Joined: July-13-2009 Location: ct Status: Offline Points: 396 |
Post Options
Thanks(0)
Quote Reply
Posted: April-20-2017 at 5:08pm |
|
|
Sounds like you are in good shape! Stringer job looks top notch as well. Love the reverse gel boats, great job saving her!!!
|
||
|
||
|
lharley
Newbie
Joined: April-20-2017 Location: Lexington, SC Status: Offline Points: 33 |
Post Options
Thanks(1)
Quote Reply
Posted: April-20-2017 at 10:06pm |
|
|
Floor done new carpet and putting it all back together. I went with the dripless shaft seal. To get the coupler off I used the scocket and threaded rod trick. I aligned the motor and transmission up with a .002 feeler gauge. I replaced the fuel line and all the hoses. I also ran the fuel pump overflow line back into the gas tank insted of the carburetor. I rough set the timming by going full compression on the #1 cylinder set the distribitor to that position and snugged it down. I followed the firing order on the motor tag and set all my spark plug wires and plugs. I also replaced all spark plug wires. I replaced the horns and stearing cable last year. If you look I double clamped all conections that were from the outside or below the water line. I replaced anything I saw that was 30 years old just because I role that way.
If you look I put the gas tank supports on backwards. Insted of pulling them and drilling new holes in my stringers where it could cause rot I welded hinges onto my tank brackets. I can take the front 2 bolts loose and they flip up and the gas tank will slid out without loosing the back bolts. It was much quicker for me to do that than take everything loose and re-mount the tank supports. I also plumed in a inlet where I can hook a hose pipe to the water line when running it out of the warter.                   |
||
|
||
|
lharley
Newbie
Joined: April-20-2017 Location: Lexington, SC Status: Offline Points: 33 |
Post Options
Thanks(0)
Quote Reply
Posted: April-20-2017 at 11:13pm |
|
|
Next is cosmetic stuff. My dash panel was shot. I wanted to move my radio to the glove box but I couldn't find a dash panel for my year (1987) with out the radio in the dash. So I decided to make a dash panel. Went to lowes got some luan. I figured I would cut out a panel and varnish it and pop it in. Well that didn't work the luan kept breaking. So I cut a piece out fiberglassed it once cut it to size fitted it and fiber glassed it 2 more times. It is strong as an ox now ! I ligned up all my holes and used the correct size drill bit to drill all my light holes, switch holes, horn hole I cut with the jig saw. I also added a Kill switch due to having 2 teenage boys driving it. A just incase factor.
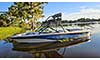
Now mounting the radio in the glove box. The glove box was shot so I cut the side out of it cut plastic pices to match the hole for the radio and then some. I super glued them in and then fiberglassed thoes pices into the glove box. Its not perfect but to buy the glovebox with the radio spot would cost $200 this cost me nothing because I had plastic and leftover fiberglass. My battery box cover was shot so I took some leftover fiberglass and coated it and made it as good as new. I also run 2 batteries. The reason is it just gives me peice of mind when the kids take it out on the lake. Teenagers will run everything on the boat and not care about the batteries. With two of them I feel better that they wont be stranded on the lake. I also installed a cut off switch where when we pull it out after the weekend I can sut the batteries off and not worry about them draining dead during the week. We have a lake house on Lake Warteree in SC we never leave it in the water during the week unless we are there. We have a public boat ramp about 1/4 mile from our house so for peice of mind I put it in and take it out every weekend. I paid $1000 to have a custom made cover for it that way we can cover it when it is in the yard at the lake during the week. It stays up at the lake from first of May to end of Sept. I eventually want to build a garage for it but that will have to wait too busy skiing and wake boarding !                   |
||
|
||
|
MechGaT
Senior Member

Joined: March-09-2015 Location: Chattanooga Status: Offline Points: 271 |
Post Options
Thanks(0)
Quote Reply
Posted: April-21-2017 at 12:13am |
|
|
Looking good.
 Can't wait to see the finished product and shots of it in use. Can't wait to see the finished product and shots of it in use.
|
||
|
'92 Sport Nautique
|
||
|
||
|
Kristof
Grand Poobah 

Joined: October-08-2007 Location: Bree, Belgium Status: Offline Points: 3411 |
Post Options
Thanks(0)
Quote Reply
Posted: April-21-2017 at 8:25am |
|
|
Nice job there!

|
||
|
||
|
KENO
Grand Poobah
Joined: June-06-2004 Location: United States Status: Offline Points: 11191 |
Post Options
Thanks(0)
Quote Reply
Posted: April-21-2017 at 9:27am |
|
Kind of curious why you did this. Must have had to put a new fitting into the tank to do it.. Looks like the K&N has no fitting for that line to attach to Seems to me it defeats the purpose of those lines |
||
|
||
|
lharley
Newbie
Joined: April-20-2017 Location: Lexington, SC Status: Offline Points: 33 |
Post Options
Thanks(0)
Quote Reply
Posted: April-21-2017 at 9:54am |
|
|
The return line is only incase the diaphragm in the fuel pump ruptures it pushes the gas into the carb insted of dumping it in the bottom of the boat. The K&N filter system I went with doesn't have the port to connect this line to. I could have drilled a hole in the bottom of the housing and conected a fitting to it and did it that way. I decided that why not just run it back to the tank. I used 1/4 inch tube ran it along side my fuel line, zip tied it to that. When I got to the tank I used a T-fitting and attached it to the fuel tank vent line. So if the diaphragm ruptures it will just push that extra fuel back into the tank. To me it just looked cleaner and I like to over engineer things. Thanks for the question !
|
||
|
||
|
KENO
Grand Poobah
Joined: June-06-2004 Location: United States Status: Offline Points: 11191 |
Post Options
Thanks(0)
Quote Reply
Posted: April-21-2017 at 11:05am |
|
|
Well you'd think that the people who designed these fuel systems would have done that instead of giving you a visual indication that your diaphragm is leaking with the clear hose that dumps any leakage into the carburetor per those pesky guys at the USCG who make the rules
The newer Holleys even went so far as to put a fitting right on the carburetor so you don't have to hook that hose to the flame arrestor. Here's a picture  The fitting with the black rubber cap right above the transfer tube is the fitting I really wouldn't say you over engineered it |
||
|
||
|
lharley
Newbie
Joined: April-20-2017 Location: Lexington, SC Status: Offline Points: 33 |
Post Options
Thanks(0)
Quote Reply
Posted: April-21-2017 at 11:08am |
|
|
I still used clear tubing so I can visually inspect it coming out of the fuel pump. It just goes back to the fuel tank vent line insted of to the breather.
|
||
|
||
|
8122pbrainard
Grand Poobah

Joined: September-14-2006 Location: Three Lakes Wi. Status: Offline Points: 41045 |
Post Options
Thanks(0)
Quote Reply
Posted: April-21-2017 at 11:14am |
|
Hopefully you did use a fuel rated tubing |
||
|
||
|
Gary S
Grand Poobah

Joined: November-30-2006 Location: Illinois Status: Offline Points: 14096 |
Post Options
Thanks(0)
Quote Reply
Posted: April-21-2017 at 12:25pm |
|
|
It dumped the extra fuel into the carb so the side benefit is that it would start to run rough and you'd open the motorbox to see what was going on. Now instead you could run for an hour easy filling the crankcase full of gas as it pushes past the top seal in the pump.....
|
||
|
||
|
backfoot100
Platinum Member 
Joined: January-03-2007 Location: United States Status: Offline Points: 1897 |
Post Options
Thanks(0)
Quote Reply
Posted: April-21-2017 at 12:34pm |
|
|
A little research goes a long way. Where do you think that 5/8" hose connection came from for the PCV????
K&N makes vent hose adapters from 1/4" to 3/4" for filter assemblies 2.75" high to 6" high. They even specifically say that trimming may be needed to adapt to most all of their filter assemblies and marine arresters. |
||
|
When people run down to the lake to see what's making that noise, you've succeeded.
Eddie |
||
|
||
|
8122pbrainard
Grand Poobah
Joined: September-14-2006 Location: Three Lakes Wi. Status: Offline Points: 41045 |
Post Options
Thanks(0)
Quote Reply
Posted: April-21-2017 at 1:11pm |
|
Excellent point +1! One day I checked the oil on my 1954 4 cylinder and immediately noticed the oil seemed thin. Yup, ruptured fuel pump diaphragm. Back then, they didn't have the insight to add the vent off the pump and route gas back to the carb incase of a rupture. Good that I caught it and didn't do any damage to the engine. Lee, I suggest removing the line to the tank and route it to the carb like it's supposed to be. |
||
|
||
|
lharley
Newbie
Joined: April-20-2017 Location: Lexington, SC Status: Offline Points: 33 |
Post Options
Thanks(0)
Quote Reply
Posted: April-21-2017 at 1:14pm |
|
|
I did get one of the 1/4 inch K&N hose fiffings. I didnt like the way it looked and you would have had to run it through you filter. I dodn't want to do that so I went with the cleaner alternative and direxted it back into the fuel tank vent line. For me I wanted the clean look and I didn't want the fuel pump to dump fuel into my carb if I had a problem. I think what I have is a good sulution.
|
||
|
||
|
8122pbrainard
Grand Poobah
Joined: September-14-2006 Location: Three Lakes Wi. Status: Offline Points: 41045 |
Post Options
Thanks(0)
Quote Reply
Posted: April-21-2017 at 1:18pm |
|
Please read Gary's comment again.
|
||
|
||
|
KENO
Grand Poobah
Joined: June-06-2004 Location: United States Status: Offline Points: 11191 |
Post Options
Thanks(0)
Quote Reply
Posted: April-21-2017 at 1:27pm |
|
Your line running through the bilge then tapping into your hopefully USCG approved vent line isn't USCG approved if it's a piece of clear tubing. The short little piece is OK with them since it is short, can't hold much fuel and it dumps into the carb so like Gary said it makes the engine run lousy or quit before you have bigger issues. What's the Burger King slogan "Have it your way" Let's hope you're not char broiled one day because of it. 
|
||
|
||
|
lharley
Newbie
Joined: April-20-2017 Location: Lexington, SC Status: Offline Points: 33 |
Post Options
Thanks(0)
Quote Reply
Posted: April-21-2017 at 4:09pm |
|
|
So the outlet pressure on the mechanical fuel pump should be between 4 and 10 PSI. A leak in the diaphragm in a mechanical fuel pump will cause a loss of fuel pressure and starve the carburetor of fuel. This may cause the engine to run lean, misfire, hesitate or stall. If the pump fails entirely, no fuel will be delivered to the carburetor and the engine will not start or run. Any of these will cause you to check under the dog house. So the point of the returne line is when the fuel pump fails it keeps the fuel from spilling into the bottom of the boat. So if the the fuel pump fails your boat will start to act up or shut off.
As stated I am not a boat mechanic but I have been around engines and motors my whole life. So please explane to me how a failed fuel pump can keep pumping fuel into the carb or any other part of the engine "filling the crankcase full of gas as it pushes past the top seal in the pump....." If gas pushes past the top seal in the fuel pump it will just be returned to the fuel tank. If you are getting gas in your crank case it is too much pressure or a bad float in the carb it would not be a failed fuel pump. Failed fuel pump = zero or very little pressure. 
|
||
|
||
|
quinner
Grand Poobah

Joined: October-12-2005 Location: Unknown Status: Offline Points: 5828 |
Post Options
Thanks(0)
Quote Reply
Posted: April-21-2017 at 4:56pm |
|
|
Yeah what he said ya goons!!
I have found that pumping too hard can break the diaphragm however Reverse Gel and Blue, that is a rockin cool boat, nice work!! |
||
|
||
|
JoeinNY
Grand Poobah

Joined: October-19-2005 Location: United States Status: Offline Points: 5698 |
Post Options
Thanks(0)
Quote Reply
Posted: April-21-2017 at 4:59pm |
|
|
The assertion is that because your fuel pump now has gas on the upside of the diaphragm that that gasoline will flood the top part of the fuel pump and there will be nothing to prevent it from following the arm that enters through the timing cover and follows the eccentric. The theory seems to hold water with me giving it a quick thought.
You would eventually notice it is failing from being lean (although that's a much worse failure mode than being rich) but I am not sure that only a small leak will show a loss in fuel pressure. I actually have a similar setup as yours on my boat, because my fuel pump is electric and located below the gas tank and I didn't want run it all the way up to the carb... but I am a rebel - and my fuel pump is not bolted to the timing cover. Now that I am thinking about it I wonder if I ran it to the carb I would get more warning when my electric pumps are about to die and leave me stranded ( they never last more than 2 years)... |
||
|
||
|
KENO
Grand Poobah
Joined: June-06-2004 Location: United States Status: Offline Points: 11191 |
Post Options
Thanks(0)
Quote Reply
Posted: April-21-2017 at 5:08pm |
|
|
Lee
In your mind there's no problem here and I really don't see any sense in discussing this with someone who figures he's smarter than the people who make the regulations and the people who manufacture the stuff to meet those regs.. |
||
|
||
|
lharley
Newbie
Joined: April-20-2017 Location: Lexington, SC Status: Offline Points: 33 |
Post Options
Thanks(0)
Quote Reply
Posted: April-21-2017 at 5:10pm |
|
|
Joe, you are correct if the pump fails or starts to fail you notice a drop in performance or it stops all together. At that point you trouble shoot. When you narrow it down to the fuel pump you replace check and change the oil and hit the lake the next weekend.
Quinner, As for pumping I have never had a diaphragm break just bruised a few. |
||
|
||
|
Post Reply
|
Page 12> |
 Tweet
Tweet
|
| Forum Jump | Forum Permissions You cannot post new topics in this forum You cannot reply to topics in this forum You cannot delete your posts in this forum You cannot edit your posts in this forum You cannot create polls in this forum You cannot vote in polls in this forum |


 Topic Options
 lharley wrote: