 Boats For Sale:


Gel Spraying Techniques |
Post Reply 
|
Page <1 4567> |
| Author | |
jbear 
Grand Poobah 

Joined: January-21-2005 Location: Lake Wales FL. Status: Offline Points: 8193 |
 Post Options Post Options
") Thanks(0) Thanks(0)
 Quote Reply Quote Reply
 Posted: April-12-2007 at 10:05pm Posted: April-12-2007 at 10:05pm |
|
I gotta agree with quinner. I have been following along learning and being mighty impressed all the way, like I bet alot of the guys are. Just haven't wanted to clutter up this thread with kudos.
john |
|
|
"Loud pipes save lives"
AdamT sez "I'm Canadian and a beaver lover myself"... |
|
 |
|
|
David F
Platinum Member 
Joined: June-11-2004 Location: United States Status: Offline Points: 1770 |
Post Options
Thanks(0)
Quote Reply
Posted: April-13-2007 at 9:16am |
|
Bill:
Suggestion: Use a graduated mixing cup or what ever and keep track of how much Styrene you put in each batch. Once you find the perfect spraying consistency for the gun you are using, you can replicate the batch every time. I know your pains. That boat is going to be a beauty! |
|
|
|
|
SkiBum
Gold Member

Joined: November-17-2006 Location: United States Status: Offline Points: 587 |
Post Options
Thanks(0)
Quote Reply
Posted: April-14-2007 at 3:37pm |
|
No new pics today. Applied the final layer of gelcote to the right side, stern, and bottom (right side only). Now just sanding. Going to get all of this sanded with at least 400 before moving to the other side to spray more.
I have my recipe now for the smoothest mix. I have also figured out the best settings on the gun. What has happened a few times is that for no good reason at all the fine, smooth spray pattern will suddenly clump or splatter. Only experienced this while trying to spray the bottom of the boat though so gravity seems to have something to do with it. I do appreciate all of the tech help and support. Dave and Pete have been instrumental but many people from the site have contributed greatly in one way or another. Thanks again. |
|
|
|
|
Bremsen
Senior Member 
Joined: June-26-2005 Location: United States Status: Offline Points: 171 |
Post Options
Thanks(0)
Quote Reply
Posted: April-17-2007 at 9:25pm |
|
bump for an incredible project.
I know I'm not the only one anxiously awaiting updates. |
|
|
|
|
SkiBum
Gold Member
Joined: November-17-2006 Location: United States Status: Offline Points: 587 |
Post Options
Thanks(0)
Quote Reply
Posted: April-18-2007 at 10:47am |


On the left side there are four coats of white gelcote. After the first coat I sanded. Then again after the third. The fourth was a thin soft coat intended to be very smooth on the spray. Did not exactly turn out that way but I have enough thickness to sand. The right side is sanded with 800 grit. The stern with 400 grit. Yes, I have not yet sanded the trace off the lip. Trying not to get bogged down. Been at the range for the last three days and working Saturdays now, as well. |
|
|
|
|
jon4pres
Senior Member

Joined: September-19-2005 Location: United States Status: Offline Points: 275 |
Post Options
Thanks(0)
Quote Reply
Posted: April-20-2007 at 4:24pm |
|
I didn't realize that gel would spray on that rough. It looks like you have alot of sanding ahead of you.
Keep up the good work. Your boat is going to be great when you are finished. |
|
|
|
|
SkiBum
Gold Member
Joined: November-17-2006 Location: United States Status: Offline Points: 587 |
Post Options
Thanks(0)
Quote Reply
Posted: April-21-2007 at 7:54pm |


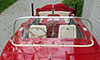
Ski Bum Jr. was in the garage this morning while I was at work. The left side of the boat now has blue and white gelcote. Working to sand down the bottom. Cut the hole in the bottom for the Perfect Pass paddle as well. Progress is slow. The first picture says it all. |
|
|
|
|
8122pbrainard
Grand Poobah

Joined: September-14-2006 Location: Three Lakes Wi. Status: Offline Points: 41040 |
Post Options
Thanks(0)
Quote Reply
Posted: April-21-2007 at 8:24pm |
|
Bill, That's great that you are getting the encouragement from Skibum Jr. How's Mrs Skibum handling it? Has the dust started to get into the house yet?
|
|
|
|
|
leo0648
Senior Member
Joined: January-30-2007 Location: United States Status: Offline Points: 115 |
Post Options
Thanks(0)
Quote Reply
Posted: April-22-2007 at 12:36am |
|
Exactly why my dad didn't want me starting this project this summer. He said he would cover the cost of labor to have someone else do it because he didnt want dust, fiberglass, and paint getting tracked in the house.
That being said, it would have been fun and Bill is doing a great job. |
|
|
|
|
SkiBum
Gold Member
Joined: November-17-2006 Location: United States Status: Offline Points: 587 |
Post Options
Thanks(0)
Quote Reply
Posted: April-22-2007 at 2:28pm |
|
I am constantly chastized for the dust that gets into the house. The garage is a mess. The boat is still a mess. Everybody wants it finished so we can go skiing. Nobody wants to help. I don't let it get me down. I am trying to come up with a good plan on how to get it all finished. There are so many things left to do, even when the gelcote is done. The fins still need to be straightened, clean the wiring harness and cables, strip-clean-and paint the tranny, engine and mounts. Still got stuff going on the inside as well. When you look at the big picture it is almost depressing. I know I will eventually finish..
|
|
|
|
|
bkhallpass
Grand Poobah

Joined: March-29-2005 Location: United States Status: Offline Points: 4723 |
Post Options
Thanks(0)
Quote Reply
Posted: April-22-2007 at 4:26pm |
|
I don't picture you as a guys who gets depressed Bill. Keep at it. It's going to be great. BKH
|
|
|
Livin' the Dream
|
|
|
|
|
SkiBum
Gold Member
Joined: November-17-2006 Location: United States Status: Offline Points: 587 |
Post Options
Thanks(0)
Quote Reply
Posted: May-05-2007 at 7:18pm |


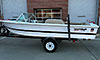
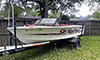
Had to go back a bit to move ahead. I worked for some time to get the remainder of the bottom of the boat covered in gelcote. Then I taped off a new stripe. Sprayed the blue on first. Then when it dried I taped onto the blue stripe leaving about 1/4" of the blue exposed at each end of the stripe. Once I sprayed the white I started sanding again. The results were much better than before but still not perfect. About 90% of the stripe has a brilliant, clean line. There are some areas with slightly jagged spots. Then even worse there are a handful of places where when sanding the white off the blue I sanded too deep into the blue. I'll have to tape those places off and try again. |
|
|
|
|
David F
Platinum Member
Joined: June-11-2004 Location: United States Status: Offline Points: 1770 |
Post Options
Thanks(0)
Quote Reply
Posted: May-07-2007 at 10:54am |
|
Bill:
Change of color lines are tough to do. Even CC has trouble getting a good clean line, thus they usually cover with vinyl pin striping. You might consider doing the same. BTW, that boat is looking awesome. You are getting closer! |
|
|
|
|
66Skylark
Senior Member

Joined: September-01-2004 Location: United States Status: Offline Points: 195 |
Post Options
Thanks(0)
Quote Reply
Posted: May-10-2007 at 12:32pm |
|
Bill,
I've followed this thread and the other one on the stringer work you did. I just wanted to say... Great job! It is really remarkable when you think about all the work you've put into the boat. You�ve still have a lot to do so hang in there� Kyle |
|
|
|
|
79nautique
Grand Poobah

Joined: January-27-2004 Location: United States Status: Offline Points: 7872 |
Post Options
Thanks(0)
Quote Reply
Posted: May-10-2007 at 12:58pm |
|
Well I think is pretty common for company's to use tape over the color transitions, they usually use an accent color to outline the colored gel area's. I know Rinker does it that way and I'm sure CC does too.
|
|
|
|
|
8122pbrainard
Grand Poobah
Joined: September-14-2006 Location: Three Lakes Wi. Status: Offline Points: 41040 |
Post Options
Thanks(0)
Quote Reply
Posted: May-11-2007 at 9:29am |
|
Bill, Looking better and better! You'll know you're done when there is a minimum of a 1/4" overspray stuck to the floor!
|
|
|
|
|
SkiBum
Gold Member
Joined: November-17-2006 Location: United States Status: Offline Points: 587 |
Post Options
Thanks(0)
Quote Reply
Posted: May-12-2007 at 7:09am |
|
I really wanted to make the line good enough that I would not have to use stripes. No such luck. I ordered some striping that should work out well.
|
|
|
|
|
8122pbrainard
Grand Poobah
Joined: September-14-2006 Location: Three Lakes Wi. Status: Offline Points: 41040 |
Post Options
Thanks(0)
Quote Reply
Posted: May-12-2007 at 9:36am |
|
Bill, You know me ? Mr. purest/originality! I thought the boat did have some vinyl stripes on it so I wouldn't worry about it. The pros have a problem too. Of coarse, when you're done with it, you can go down to Florida and give them some pointers!
|
|
|
|
|
SkiBum
Gold Member
Joined: November-17-2006 Location: United States Status: Offline Points: 587 |
Post Options
Thanks(0)
Quote Reply
Posted: May-14-2007 at 6:49am |
|
I purchased some of those abrasive disks from the woodworker website. I think they are called abralon. It was remarkable how quickly I can wet sand the entire boat using an orbital sander with the pads. I started with a 500. Then I used the 1000. I was very impressed. However, I noticed that after using the 1000 I was able to go back over it wet sanding by hand to bring out an ever smoother and brighter finish. Hope to get the 2000 done after work today. The abralon pads are a bit expensive at $25.00 per five disks but I think they are worth it. And, the GFCI works great too.
|
|
|
|
|
8122pbrainard
Grand Poobah
Joined: September-14-2006 Location: Three Lakes Wi. Status: Offline Points: 41040 |
Post Options
Thanks(0)
Quote Reply
Posted: May-14-2007 at 7:16am |
|
I'm glad you liked the Abralon pads. Yes they are expensive but they do last wet and they sure reduce the hand wet sanding. Nothing however as you are finding eliminates the hand sanding - Since the Abralon pads are soft, you still need to do some hard block wet sanding. You didn't trip the GFCI did you?
|
|
|
|
|
SkiBum
Gold Member
Joined: November-17-2006 Location: United States Status: Offline Points: 587 |
Post Options
Thanks(0)
Quote Reply
Posted: May-18-2007 at 6:46am |
|
I tripped it a few times. Found out it was where the cord plugged into the extension cord getting wet. No worries. Trying to get the trailer sanded so I can repaint and put new carpet on the bunk boards. Then I'll put the boat on the trailer and reassemble the boat. At this stage in the basic training cycle I am rarely not at work so time is hard to come by.
|
|
|
|
|
87BFN owner
Grand Poobah

Joined: August-25-2006 Location: Ypsilanti, MI Status: Offline Points: 2194 |
Post Options
Thanks(0)
Quote Reply
Posted: May-18-2007 at 9:00pm |
|
Well hang in there Bill, it's coming along very nicely.
|
|
|
|
|
jon4pres
Senior Member
Joined: September-19-2005 Location: United States Status: Offline Points: 275 |
Post Options
Thanks(0)
Quote Reply
Posted: June-19-2007 at 10:13am |
|
Whats new Bill. It has been a month since we have seen any updates.
|
|
|
|
|
77stang
Senior Member
Joined: May-19-2004 Location: United States Status: Offline Points: 342 |
Post Options
Thanks(0)
Quote Reply
Posted: June-19-2007 at 11:52am |
|
Nice Job!
re: orbital sanding - once you get past the windsheild - towards the bow Lookout with the orbital- the contours of the bow makes it very difficult to wet sand evenly without removing too much gel. i just could not keep the sander flush with the contours. anyway thats was my experience. good luck! |
|
|
|
|
leo0648
Senior Member
Joined: January-30-2007 Location: United States Status: Offline Points: 115 |
Post Options
Thanks(0)
Quote Reply
Posted: June-19-2007 at 4:21pm |
|
I have been talking to Bill via email. He seems to be very busy with military stuff and hasn't had any time to work on it.
|
|
|
|
|
SkiBum
Gold Member
Joined: November-17-2006 Location: United States Status: Offline Points: 587 |
Post Options
Thanks(0)
Quote Reply
Posted: June-21-2007 at 10:44am |
|
Our basic training company graduates this morning. I have been able to put in an hour here and there to work on the SN. I have taken a lot of pics that I'll post soon. Ran into a huge problem with reassembly. After running all the under water gear, wiring, and plumbing I installed the carpet. Then I removed the tires and left fender to allow easier access with the engine crane. Once I installed the engine/transmission I could not lower the back enough to properly align the shaft. The stringer height was incorrect! I had to trim 1/2" from the stringer height and repair the damage before I could reinstall the engine and get the proper alignment. Not everything is connected yet. But I will have some time off work to get it finished. I'll post pics as soon as I can. Thanks for all the support.
|
|
|
|
|
bkhallpass
Grand Poobah
Joined: March-29-2005 Location: United States Status: Offline Points: 4723 |
Post Options
Thanks(0)
Quote Reply
Posted: June-21-2007 at 5:58pm |
|
Nice to see you update Bill. Have missed your progress reports. BKH
|
|
|
Livin' the Dream
|
|
|
|
|
jbear
Grand Poobah
Joined: January-21-2005 Location: Lake Wales FL. Status: Offline Points: 8193 |
Post Options
Thanks(0)
Quote Reply
Posted: June-21-2007 at 9:43pm |
|
Bill: Welcome back! I am sure you have that company in good shape.
We are all waiting on the edge of our seats for an up-date. john |
|
|
"Loud pipes save lives"
AdamT sez "I'm Canadian and a beaver lover myself"... |
|
|
|
|
The Lake
Platinum Member

Joined: May-13-2005 Location: Lk Winnebago MO Status: Offline Points: 1157 |
Post Options
Thanks(0)
Quote Reply
Posted: June-22-2007 at 8:35am |
|
Bill,
I was just wondering; seems to me one of life's basic training exercising is learning all about boats. You could have a dozen guys from basic hold the boat in the air while you finish the trailer or gelcoat the bottom, etc. I really appreciate what you do; I've got a hunch you have helped shape and mold many a young man! Chuck |
|
|
|
|
leo0648
Senior Member
Joined: January-30-2007 Location: United States Status: Offline Points: 115 |
Post Options
Thanks(0)
Quote Reply
Posted: June-24-2007 at 2:01am |
|
Can't wait to see those pics!
|
|
|
|
|
Post Reply
|
Page <1 4567> |
 Tweet
Tweet
|
| Forum Jump | Forum Permissions You cannot post new topics in this forum You cannot reply to topics in this forum You cannot delete your posts in this forum You cannot edit your posts in this forum You cannot create polls in this forum You cannot vote in polls in this forum |


 Topic Options