 Boats For Sale:


85 2001 LVL Stringer Project |
Post Reply 
|
Page <1 23456 13> |
| Author | ||
8122pbrainard 
Grand Poobah 

Joined: September-14-2006 Location: Three Lakes Wi. Status: Offline Points: 41040 |
 Post Options Post Options
") Thanks(0) Thanks(0)
 Quote Reply Quote Reply
 Posted: May-19-2010 at 3:26pm Posted: May-19-2010 at 3:26pm |
|
|
Kris,
Looking good!! The coating on the LVL is a water repellent just there for when they're out in the weather on the contruction site. Just take the belt sander to them. I wouldn't worry too much about the voids in the plys. I'd CPES first and then inject some regular epoxy with a glue syringe. You don't need to fill them up completely. |
||
 |
||
|
Big Pappa
Senior Member 

Joined: March-08-2006 Location: United States Status: Offline Points: 322 |
Post Options
Thanks(0)
Quote Reply
Posted: May-20-2010 at 2:16pm |
|
Awesome, thanks for the input!! 
|
||
|
||
|
Big Pappa
Senior Member
Joined: March-08-2006 Location: United States Status: Offline Points: 322 |
Post Options
Thanks(0)
Quote Reply
Posted: June-15-2010 at 4:40pm |
|
|
OK guys, the first LVL main stringer is in. Woo Hoo I will describe as I post the pictures.

Here is the stringer shaped laying next to the original. 
Here is the shaped raw wood stringer on the scale, coming in at 27 pounds. Does anyone know what the stringer in Douglas Fir weighs? 
OK, here I decided to move the drain a little to try and add some strength, so it was located where there would be more wood and not make a thin spot. I found out later that this was a mistake because it is now in front of where the stringer is exposed. 

Here is the stringer CEPSed, filled and covered with 1 layer of mat ready to go in the boat. 
As others have done I decided to drill out a large (Either 1" or 1.5" I do not remember off the top of my head) hole in the stringer and fill it with a thickened resin (Milled fibers) where the Steering cable mounts. This way there will hopefully be no way water will be able to get to the wood. |
||
|
||
|
JoeinNY
Grand Poobah

Joined: October-19-2005 Location: United States Status: Offline Points: 5693 |
Post Options
Thanks(0)
Quote Reply
Posted: June-15-2010 at 4:52pm |
|
|
why the layer of mat before putting it in?
|
||
|
||
|
Big Pappa
Senior Member
Joined: March-08-2006 Location: United States Status: Offline Points: 322 |
Post Options
Thanks(0)
Quote Reply
Posted: June-15-2010 at 4:53pm |
|

Here is the drain in completely (In the wrong Place though) I cut a half circle like the original but I then placed a Piece of 1" PVC in there and filled the rest with thickened resin. Again working to make sure the stringer will hopefully not see water. I covered it when I was covering the stringer with mat, so What I will do is drill a small hole in there then fill the PVC with resin. Hopefully that will take care of it.
The stringer is in the boat now (I did not notice the problem until after I had it installed). So I think I am going to take a hole saw and drill a new hole in the correct place then fill it in the same way I did this one. It will take some time, but it is what I am going to have to do to pay for my mistake. LOL 
Here is where I filled one of the laps in the LVL. It is now nice and smooth. 
The stringer ready to go in. 

And here it is bedded into the boat and weighed down. I got it filleted yesterday and hopefully will get the 2" strips on today. |
||
|
||
|
8122pbrainard
Grand Poobah
Joined: September-14-2006 Location: Three Lakes Wi. Status: Offline Points: 41040 |
Post Options
Thanks(0)
Quote Reply
Posted: June-15-2010 at 4:55pm |
|
|
Kris,
I like it. Very nice!!! The LVL will be great for those not wanting to go composite and have a hard time finding Doug Fir in their area. I'm glad we now have someone who's using it. Even if the Fir is available, I really think it's a great product for the application. |
||
|
||
|
Big Pappa
Senior Member
Joined: March-08-2006 Location: United States Status: Offline Points: 322 |
Post Options
Thanks(0)
Quote Reply
Posted: June-15-2010 at 4:56pm |
|
I mainly wanted to make sure everything was going to be flat where I filled the lap Joints and to give a layer over where I filled for the drain and steering mount hole. It is probably overkill but Oh well, Better over engineered then under. 
|
||
|
||
|
Big Pappa
Senior Member
Joined: March-08-2006 Location: United States Status: Offline Points: 322 |
Post Options
Thanks(0)
Quote Reply
Posted: February-21-2011 at 8:48pm |
|
|
Hey everyone it had been a while since I last gave an update. Things are still moving forward enven though rather slowly!! After loosing 50 pounds in 2009 I decided that I wanted to help others do the same so I studied and got my personal trainer certification. I now am an online personal trainer with the site I used to loose the weight. So that combined with my normal job has kept me very busy. I also competed in a 10K mud run, an 8k run and an adventure race last year so training for those has kept me away.
The final thing is my Dad had a heart attack last year and passed away so that was a big hit on me as well. This has made me even more health conscious than ever, seeing as I made the weight change to improve my health in the first place. I have started back to work now, the second main stringer is out and I have cleaned up the hull of all the old fiberglass from the old stringer. The new LVL stringer is cut out, shaped, coated with CPES, then a layer of mat and the drain installed. All that is left is to install it, then lay up some mat on it. After that all the stringers will be in. Woo Hoo, it only took like 3 years. LOL I am shooting to really get at it and have the boat ready for water in June or July. It will be nice to finally have a boat to take out on the water again!! Kris |
||
|
||
|
uk1979
Platinum Member 
Joined: June-13-2007 Location: United Kingdom Status: Offline Points: 1411 |
Post Options
Thanks(0)
Quote Reply
Posted: February-22-2011 at 11:09am |
|
|
Its not just you that's loosing weight,the is boat too

Stringer with glass on 
|
||
|
Lets have a go
56 Starflite 77 SN 78 SN 80 BFN |
||
|
||
|
2001Stinger
Newbie 
Joined: July-22-2010 Location: Cntrl Minnesota Status: Offline Points: 32 |
Post Options
Thanks(0)
Quote Reply
Posted: February-27-2011 at 2:35am |
|
Hey big papa, Wondering if you were ever able to convert all the measurements to the computer. I also need to start a stringer job on my 2001 and would like to have some good numbers to work off cause I think my stringers are going to be worhless for getting good measurements from. If I can get those measurements I would like to get them into one of my computer programs where I can run full-size patterns from. If that works out good I was thinking of starting a post so if other people would like a full-size pattern to do their stringers from I could run the pattern and mail it out to them. My way of giving back to fellow nautique owners. Thanks |
||
|
||
|
storm34
Grand Poobah

Joined: November-03-2008 Location: Dexter Iowa Status: Offline Points: 4492 |
Post Options
Thanks(0)
Quote Reply
Posted: February-27-2011 at 5:12am |
|
A pattern has been brought up before, but I think the consensus was that each boat has just enough difference in the hull that a pattern will not work. It's a great idea to get you a starting template, but I would want to have the measurements pretty big so you can bring them down according to your specific hull. |
||
|
||
|
2001Stinger
Newbie
Joined: July-22-2010 Location: Cntrl Minnesota Status: Offline Points: 32 |
Post Options
Thanks(0)
Quote Reply
Posted: February-27-2011 at 11:25am |
|
|
I agree these patterns would definitely be for a starting point only.
Mainly I would like to make them for having a good starting reference. |
||
|
||
|
Big Pappa
Senior Member
Joined: March-08-2006 Location: United States Status: Offline Points: 322 |
Post Options
Thanks(0)
Quote Reply
Posted: March-02-2011 at 2:48pm |
|
|
As others have said both of my stringers ended up being a little different once they were finally done. You can use measurements off the site to get close but I would leave the cuts 1/4" to 1/2" big then take it down to the correct size to fit your boat with a plain and sander. Each boat is a little different and when you grind down the fiberglass it could have some slight differences. Good luck on your project.
|
||
|
||
|
Big Pappa
Senior Member
Joined: March-08-2006 Location: United States Status: Offline Points: 322 |
Post Options
Thanks(0)
Quote Reply
Posted: March-14-2011 at 3:27am |
|
|
OK, Boys and girls after three years from starting this post all 4 of my stringers are in!!! Woo Hoo!!! Lots of working on the boat then it will sit for a month then work on it again and it would sit. They are all 4 in and fiberglassed down, now time to get all the rest completed so I can get it wet again this year and free up the space in my garage from boat parts laying everywhere!!

I got in there today and poped a chalk like where the floor was originally on each side wall and checked my secondaries and they are both just right on height. So I am good on that part I just have a little work on the mains to have everything level and set for the caps to go on. I am going to run a few 8" or 12" (I have not decided yet) strips across all 4 stringers in 4 or 5 places just to tie everything together and build in a little more strength. Then I am going to put my caps on all 4 of the stringers then they will be totally water tight and completed. I am shooting to get that completed this week, then hop on replacing the blocking at the back of the boat. Here are all the stringers installed Finally!! Mains are LVL and secondaries are 1X Douglas Fir. 

|
||
|
||
|
Kristof
Grand Poobah

Joined: October-08-2007 Location: Bree, Belgium Status: Offline Points: 3391 |
Post Options
Thanks(0)
Quote Reply
Posted: March-14-2011 at 11:00am |
|
|
Lookin' good!
|
||
|
- Gun control means: using BOTH hands!
- Money doesn't make one happy, but when it rains cats and dogs, it's still better to cry in a Porsche than on a bicycle... |
||
|
||
|
TimSpangler
Senior Member

Joined: November-19-2010 Location: Gettysburg, PA Status: Offline Points: 198 |
Post Options
Thanks(0)
Quote Reply
Posted: March-14-2011 at 12:24pm |
|
|
Nice Belt sander. Do you like it? I was on the design team for that sander, did a lot of the 3D modeling and drawings for it. It was my favorite project.
I will be starting this process once it warms up and will be referencing several post on the site (including this one). Looking good! |
||
|
||
|
TRBenj
Grand Poobah

Joined: June-29-2005 Location: NWCT Status: Offline Points: 21123 |
Post Options
Thanks(0)
Quote Reply
Posted: March-14-2011 at 12:32pm |
|
Your wood work looks excellent! What did you use for a glass schedule on the stringers? Did you bring the glass all the way to the top? Are you planning to wrap the tops of any (notably the sections that will be exposed)? The glass looks a little light, but pictures can be deceiving! |
||
|
||
|
Big Pappa
Senior Member
Joined: March-08-2006 Location: United States Status: Offline Points: 322 |
Post Options
Thanks(0)
Quote Reply
Posted: March-14-2011 at 12:45pm |
|
I love the sander, there are some times when I wish the left hand side were a little slimmer so I can get it in tight places but it is not that big of a deal. It has all the power that I want, I just have to remember to stop a little more often and let the belt cool down so I quit breaking them. :-) Or find some better belts one. |
||
|
||
|
Big Pappa
Senior Member
Joined: March-08-2006 Location: United States Status: Offline Points: 322 |
Post Options
Thanks(0)
Quote Reply
Posted: March-14-2011 at 1:05pm |
|
Thanks!! I laid down 2 strips of mat below the stringers to bed them down then once that set up I filleted them with thickened epoxy (mixture of Milled fibers and Aerosil-Cabosil) I then laid down 2" strips fiber cloth on a 45, then 4" strips fiber cloth on the opposite 45, then 8" strips fiber cloth straight up and down. Each strip was longer than the one before going farther up the srtinger and down the hull with the 8" strip going all the way to the top of the stringer. Once each sides main and secondary were in I went back and laid 8" strips from the top of one down across then to the top of the other. to connect the two with one piece of glass. The glass looks light because I had just went over it with a DA cleaning the excess fiberglass from the tops of the stringers then running over the bilge area to flatten things out and get ready for the next layer of glass. Before I did this it was clear as can be and you could just barely see the fabric of the fiber cloth. I am going to wrap the tops of the stringers, I have a little work to do with a plain to get the mains at just the right hight and I am going to lay up some strips in 4 or 5 places going across all 4 stringers to connect all 4 of them. It is probably not necessary but it does not hurt either. :-) Once I get that completed I will wrap the tops and they will be water proofed as much as I can possibly make them. It will dang sure be a whole heck of a lot better than it was from the factory!! |
||
|
||
|
TRBenj
Grand Poobah
Joined: June-29-2005 Location: NWCT Status: Offline Points: 21123 |
Post Options
Thanks(0)
Quote Reply
Posted: March-14-2011 at 1:24pm |
|
If Im following you correctly, then you have 4 layers of cloth going from the sides of the stringers to the hull, only 2 of which are going in the longitudinal direction? If so, thats significantly less glass than Ive used in the past. Ill let someone better informed on the strength of your schedule to comment whether youre ok or not. Personally, I would probably opt to add a few more layers in the longitudinal direction, and probably at least one layer with significant thickness (mat or biax). |
||
|
||
|
Big Pappa
Senior Member
Joined: March-08-2006 Location: United States Status: Offline Points: 322 |
Post Options
Thanks(0)
Quote Reply
Posted: March-14-2011 at 6:54pm |
|
I was planning on the strips across all the stringers to be in Biax but it sounds like I may need to lay some along all the stringers as well for a little more strength. The layup I was using I got from SkiBum's build thread on his 87 SN so I thought I was in good shape. |
||
|
||
|
akabulla
Gold Member

Joined: November-15-2008 Location: United States Status: Offline Points: 649 |
Post Options
Thanks(0)
Quote Reply
Posted: March-14-2011 at 7:07pm |
|
|
I did the same as yours and followed ski bums when I did mine. I did one layer of 45 degree 2" strips, 1 layer of 4" at the other 45 degree and then 8" straight up and down. But then I also did a layer of mat over the cloth and then laid biaxial over the tops running down the sides over the mat.
2 seasons in and it is still as solid as it was when I did it. This is what it looked like before the floor went down: 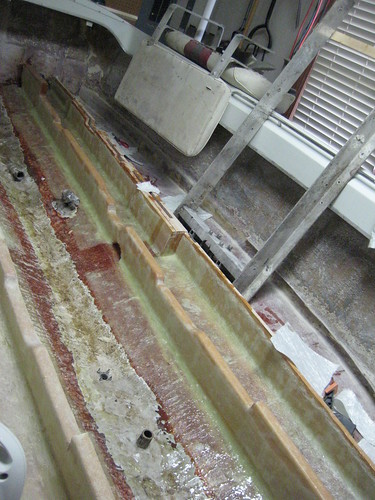
|
||
|
||
|
Big Pappa
Senior Member
Joined: March-08-2006 Location: United States Status: Offline Points: 322 |
Post Options
Thanks(0)
Quote Reply
Posted: May-23-2011 at 2:36am |
|
|
So I have finally finished the stringers in my boat. Yeaaaa!!!! Since my last update I have added a layer of mat on all sides of each stringer. The layer on the mains runs from the top of the main down through the bilge area to the top of the other main. Then on the other side it runs from the top of the main down and back up to the top of the secondary. Then on the other side of the secondary I went from the top down and up the hull about 8".
Next I poured foam in the secondaries so I could cap them off. Then I took and caped it off all four stringers with Biax running fron the hull up and over and back down to the hull. Now the only area that is not covered with epoxy and fiberglass is the cutouts where the rear braces go. they will get covered when the bracing goes in. Everywhere else is completly covered and sealed from water getting in, Hopefully!!! I also made me a roller as I did not clean my other one that I bought and it no longer turns. I decided to build one so I could take it apart if it happened again and could clean it up easily. Turns out it works a lot better as well. :-) Win Win!! Here is what I came up with. 
Here are the stringers all finished up. Now it is time to put in the Tubing up front and get ready to pour some foam and get the floor back in. :-) I am moving along at a snails pace but I am making progress. I am shooting to be finished by August so we can at least get it wet a couple of times this year. 

|
||
|
||
|
Big Pappa
Senior Member
Joined: March-08-2006 Location: United States Status: Offline Points: 322 |
Post Options
Thanks(0)
Quote Reply
Posted: May-23-2011 at 2:50am |
|
|
Oh and the drivers side stringers are light colored because I went back today and sanded down the vertical places on the main and put another lay on because it did not stick well in those places. So it is Fiberglass dust you are seeing there.
|
||
|
||
|
8122pbrainard
Grand Poobah
Joined: September-14-2006 Location: Three Lakes Wi. Status: Offline Points: 41040 |
Post Options
Thanks(0)
Quote Reply
Posted: May-23-2011 at 9:06am |
|
|
Keep the pictures coming. This is a great thread on using LVL when Doug Fir is tough to find in your area.
|
||
|
||
|
Big Pappa
Senior Member
Joined: March-08-2006 Location: United States Status: Offline Points: 322 |
Post Options
Thanks(0)
Quote Reply
Posted: June-01-2011 at 2:35pm |
|
|
was able to get some work on the boat this weekend. I started by pulling the boat out of the garage for a bit on saturday and giving it a spray off with the pressure washer to knock about 1/2" of fiberglass dust off of it. I gave the inside a wash off as well getting a lot of the dust out from up under the bow and the under the lip all the way around the boat. Then let it sit in the sun and bake for the day and soak up some rays since it has not seen the light of day for a while.
But I also got to work on cutting up some 3/4" Marine ply for replacing the blocking that is going back in the boat. I got these parts cut out and ready to be CPESed. Front Bulkhead Brace between mains in the front Block off between Mains and secondaries The blocks for the Swim Deck The blocks for the Exhaust the blocks that mount high on each side (What are these for anyway?) the Lift ring blocks and the ply under the front seats I still have the bracing that goes under the floor and the rear brace between the mains to cut out. I thought I was going to be able to reuse the rear floor, because it looked great on the bottom but after pulling the carpet Sunday and seeing the top it is going to have to be replaced as well. It is still solid but not 100% so it is getting tossed and replaced while I am doing all this work. I also started working on my planning for the routing of the vents and cable routing for up front. I am going to run 3" pvc for the 3 vents and the 1 cable tube. For the Battery drain I am using a through hull on the battery side that will connect to a Brass one way drain that I will have in the Bulkhead. That way I can plug up that drain and none of the bilge water can go back up the tube to the battery. I am then going to connect the 2 with a 1" flexible tube with clamps and 5200. When I pulled this area out the tube was broken and lots of water was in the foam under the battery box. I am doing all I can to keep this from happening again. Here are a few pictures. This is all of the wood and fiberglass that has come out of the boat. 
Here is the boat rubbing it's eyes freshly in the sunlight for the first time in a while. 
A pile of wood ready to be CPESed and put into the boat 
The old rear floor and the new front floor in the boat along with the PVC I am running for the vents. 
|
||
|
||
|
TRBenj
Grand Poobah
Joined: June-29-2005 Location: NWCT Status: Offline Points: 21123 |
Post Options
Thanks(0)
Quote Reply
Posted: June-01-2011 at 2:51pm |
|
Im guessing you now know that marine ply isnt really needed... but Im sure it will work just fine. Regarding the vents, do you have a plan to connect them to the flexible vent hoses at the bow? 3" PVC is 3.5" OD, so getting the hoses over it might be tough. In the past, Ive used 2" (2-3/8" OD) and 2.5" (2-7/8" OD) instead. I couldnt find the 2.5" PVC locally though. On the conduit, 3" is probably OK, but if you have the room to fit 4" in there, you'll thank yourself later when it comes time to run everything through there! Do lay out how everything will be routed early on though- fitting all the vents and conduit past the battery box gets extremely tight. Id be curious to see what your solution for the battery box drain looks like- Ive yet to find a solution that I felt 100% comfortable with. I sealed the batt box up entirely on the last boat. |
||
|
||
|
Big Pappa
Senior Member
Joined: March-08-2006 Location: United States Status: Offline Points: 322 |
Post Options
Thanks(0)
Quote Reply
Posted: June-01-2011 at 4:43pm |
|
Yea I figured I would use Marine in the areas that would be covered with Glass. The rear floor is going to be a regular plywood since it is a lot easier to get to if need be. I will not have room for a 4", the 3" just barely fits in there. I did not think about the hose from the vent down to my vents. Worse case I can get a 3" to 2.5" reducer and put on there. Do you think that would work? I will put what I have planned for the batter box together in a mock up out of the boat and take a picture to post up so you can see and get a better idea. |
||
|
||
|
TRBenj
Grand Poobah
Joined: June-29-2005 Location: NWCT Status: Offline Points: 21123 |
Post Options
Thanks(0)
Quote Reply
Posted: June-01-2011 at 5:14pm |
|
Yes, that will work- but it essentially makes the larger 3" vents a waste of space. If you hadnt already purchased the PVC, then I would have suggested you go with 2.5" or 2" instead, which would have made room for a larger conduit. |
||
|
||
|
Big Pappa
Senior Member
Joined: March-08-2006 Location: United States Status: Offline Points: 322 |
Post Options
Thanks(0)
Quote Reply
Posted: June-01-2011 at 5:48pm |
|
That is true. I have not cut into the 3" that I have bought so I will have to look into taking it back and getting some 2.5" and 4" PVC. Thanks for the heads up!!
|
||
|
||
|
Post Reply
|
Page <1 23456 13> |
 Tweet
Tweet
|
| Forum Jump | Forum Permissions You cannot post new topics in this forum You cannot reply to topics in this forum You cannot delete your posts in this forum You cannot edit your posts in this forum You cannot create polls in this forum You cannot vote in polls in this forum |


 Topic Options
 8122pbrainard wrote: