Shaft Coupling Removal Issue |
Post Reply 
|
Page 12> |
| Author | ||
skutsch 
Grand Poobah 

Joined: June-19-2008 Location: Racine, WI Status: Offline Points: 2874 |
 Post Options Post Options
 Thanks(0) Thanks(0)
 Quote Quote  Reply Reply
 Topic: Shaft Coupling Removal Issue Topic: Shaft Coupling Removal IssuePosted: October-21-2014 at 1:22pm |
|
Great Picture Pete! I learn something new again and this picture is definitely worth a 1000 words. |
||
 |
||
TRBenj 
Grand Poobah 

Joined: June-29-2005 Location: NWCT Status: Online Points: 21205 |
 Post Options Post Options
 Thanks(0) Thanks(0)
 Quote Quote  Reply Reply
 Posted: October-21-2014 at 1:16pm Posted: October-21-2014 at 1:16pm |
|
That option is not viable on a traditional correct craft/ramlin wishbone trailer. |
||
 |
||
8122pbrainard 
Grand Poobah 

Joined: September-14-2006 Location: Three Lakes Wi. Status: Offline Points: 41045 |
 Post Options Post Options
 Thanks(0) Thanks(0)
 Quote Quote  Reply Reply
 Posted: October-21-2014 at 12:13pm Posted: October-21-2014 at 12:13pm |
|
|
For those who may not know the difference in the correct way to install the cotter pin, here's the explanation. Basically it comes down to tightness of the cotter pin. With the pin installed as shown, the eye is engaged in the grove of the nut and the legs are bent over so they are tight. If installed incorrectly, there is a good chance that vibration will "eat" through the pin and you will loose it. Then you can loose the nut as well as the prop if it's not properly lapped/seated to the shaft. I have seen plenty of boats were the cotter pin is gone. We even had a CCfan member loose his brand new prop! Keeping the nut in place is important since there are occasions where the nut is backed off slightly so the groves line up with the cotter pin hole. Backing the nut off is normal practice since the nut is really used to seat the prop on it's taper. A properly seated lapped prop really doesn't need the nut. It's there as a back up.
|
||
 |
||
OldSchoolBlue84 
Gold Member 

Joined: December-02-2012 Location: Valparaiso, IN Status: Offline Points: 814 |
 Post Options Post Options
 Thanks(0) Thanks(0)
 Quote Quote  Reply Reply
 Posted: October-21-2014 at 11:52am Posted: October-21-2014 at 11:52am |
|
|
Thanks Pete, I bought a new cotter pin and going to install it the right way. Appreciate it

|
||
|
Kostas
1984 Ski Nautique 2001 |
||
 |
||
8122pbrainard 
Grand Poobah 

Joined: September-14-2006 Location: Three Lakes Wi. Status: Offline Points: 41045 |
 Post Options Post Options
 Thanks(0) Thanks(0)
 Quote Quote  Reply Reply
 Posted: October-21-2014 at 9:53am Posted: October-21-2014 at 9:53am |
|
HW is correct. It's not the radial position of the cotter pin but rather the direction you bent it. You bent it around the nut which is not the proper method. A cotter pin should be bent with one leg aft over the shaft and the other leg forward over the nut towards the prop hub. Nice picture found on the internet: 
|
||
 |
||
baitkiller 
Platinum Member 

Joined: October-11-2011 Location: SW Florida Status: Offline Points: 1693 |
 Post Options Post Options
 Thanks(0) Thanks(0)
 Quote Quote  Reply Reply
 Posted: October-21-2014 at 9:52am Posted: October-21-2014 at 9:52am |
|
|
Hey I have a few of those $2.95 Harbor Freight tape measures too!
|
||
|
Jesus was a bare-footer.............
|
||
 |
||
MrMcD 
Grand Poobah 

Joined: January-28-2014 Location: Folsom, CA Status: Offline Points: 3778 |
 Post Options Post Options
 Thanks(0) Thanks(0)
 Quote Quote  Reply Reply
 Posted: October-21-2014 at 5:18am Posted: October-21-2014 at 5:18am |
|
|
You can also put spacers between the bunks and your trailer in the rear.
It is only 2 bolts on each side. I say that because of the number of times I drag the trailer guard on driveways. |
||
 |
||
OldSchoolBlue84 
Gold Member 

Joined: December-02-2012 Location: Valparaiso, IN Status: Offline Points: 814 |
 Post Options Post Options
 Thanks(0) Thanks(0)
 Quote Quote  Reply Reply
 Posted: October-21-2014 at 12:28am Posted: October-21-2014 at 12:28am |
|
|
Kostas
1984 Ski Nautique 2001 |
||
 |
||
Hollywood 
Moderator Group 

Joined: February-04-2004 Location: Twin Lakes, WI Status: Offline Points: 13522 |
 Post Options Post Options
 Thanks(0) Thanks(0)
 Quote Quote  Reply Reply
 Posted: October-21-2014 at 12:20am Posted: October-21-2014 at 12:20am |
|
|
Spin the pin 90. Doesn't it say that in the Acme install directions?
For the convenience of all cotter pin install |
||
 |
||
OldSchoolBlue84 
Gold Member 

Joined: December-02-2012 Location: Valparaiso, IN Status: Offline Points: 814 |
 Post Options Post Options
 Thanks(0) Thanks(0)
 Quote Quote  Reply Reply
 Posted: October-21-2014 at 12:13am Posted: October-21-2014 at 12:13am |
|
|
Thanks guys.....
I was just snapping some pics to give you guys an idea of where the prop was positioned. The boat normaly sits even with edge of the bunks. I do need to push the boat 2" forward to make it flush. I was thinking a plate of some sort to give it more even surface space then just washers. I know, overkill. Now you got me thinking about the counter pin, how did I install it wrong? Been trying to find pictures to compare. I did have to back off the nutts to allign the counter pin with the hole. Is that ok? Thanks again! |
||
|
Kostas
1984 Ski Nautique 2001 |
||
 |
||
TRBenj 
Grand Poobah 

Joined: June-29-2005 Location: NWCT Status: Online Points: 21205 |
 Post Options Post Options
 Thanks(0) Thanks(0)
 Quote Quote  Reply Reply
 Posted: October-20-2014 at 11:52pm Posted: October-20-2014 at 11:52pm |
|
|
Clearance from my prop to trailer is about 1/4". Like HW said, it can't physically get any closer once the boat is sitting all the way forward on the trailer. Most of the 80's prop guards seemed to be spaced lower with a few washers.
|
||
 |
||
Hollywood 
Moderator Group 

Joined: February-04-2004 Location: Twin Lakes, WI Status: Offline Points: 13522 |
 Post Options Post Options
 Thanks(0) Thanks(0)
 Quote Quote  Reply Reply
 Posted: October-20-2014 at 11:15pm Posted: October-20-2014 at 11:15pm |
|
|
You did the cotter pin wrong.
The prop-hull clearance picture doesn't make any sense, you're not measuring the largest diameter which is at the blade tip (where it also hits the trailer). I have an 88 trailer and 540 and my clearance is quite minimal. The 84 trailer/prop guard might be naturally closer and/or your boat may be further forward than it should. 3/4" spacer is probably overkill. You'll never have less clearance than you do now so even minimal would be sufficient. I'd be comfortable with as little as 1/4". Can't say I know my clearance off the top of my head. |
||
 |
||
OldSchoolBlue84 
Gold Member 

Joined: December-02-2012 Location: Valparaiso, IN Status: Offline Points: 814 |
 Post Options Post Options
 Thanks(0) Thanks(0)
 Quote Quote  Reply Reply
 Posted: October-20-2014 at 10:58pm Posted: October-20-2014 at 10:58pm |
|
Winner winner  Spoke with my father-in-law and mention to him about the difficulties of the coupler install and he then proceeded to tell me.....well maybe it's because I had the marina change it since the original shaft got bend "somehow" Spoke with my father-in-law and mention to him about the difficulties of the coupler install and he then proceeded to tell me.....well maybe it's because I had the marina change it since the original shaft got bend "somehow"  Told him he could of told me this at the beginning Told him he could of told me this at the beginning 
|
||
|
Kostas
1984 Ski Nautique 2001 |
||
 |
||
OldSchoolBlue84 
Gold Member 

Joined: December-02-2012 Location: Valparaiso, IN Status: Offline Points: 814 |
 Post Options Post Options
 Thanks(0) Thanks(0)
 Quote Quote  Reply Reply
 Posted: October-20-2014 at 10:09pm Posted: October-20-2014 at 10:09pm |
|
|
Well I finally installed the 540 prop today
 Thanks to Pete's "proper prop installation" and Eric's "alignment" forum topics Thanks to Pete's "proper prop installation" and Eric's "alignment" forum topics  Of course I did come up with an issue  After installing the new prop, I notice the prop is now touching the trailer. I took off the new prop and installed the old and it clears the trailer little more than a 1/4". Sooooo after some thinking, could I lower the rear of the trailer support to get atiquite clearance? Was thinking 3/4" stainless steel plates under the rail where the rear support bolts up. Any concerns?? After installing the new prop, I notice the prop is now touching the trailer. I took off the new prop and installed the old and it clears the trailer little more than a 1/4". Sooooo after some thinking, could I lower the rear of the trailer support to get atiquite clearance? Was thinking 3/4" stainless steel plates under the rail where the rear support bolts up. Any concerns?? Thanks everyone Kostas N 84SN2001 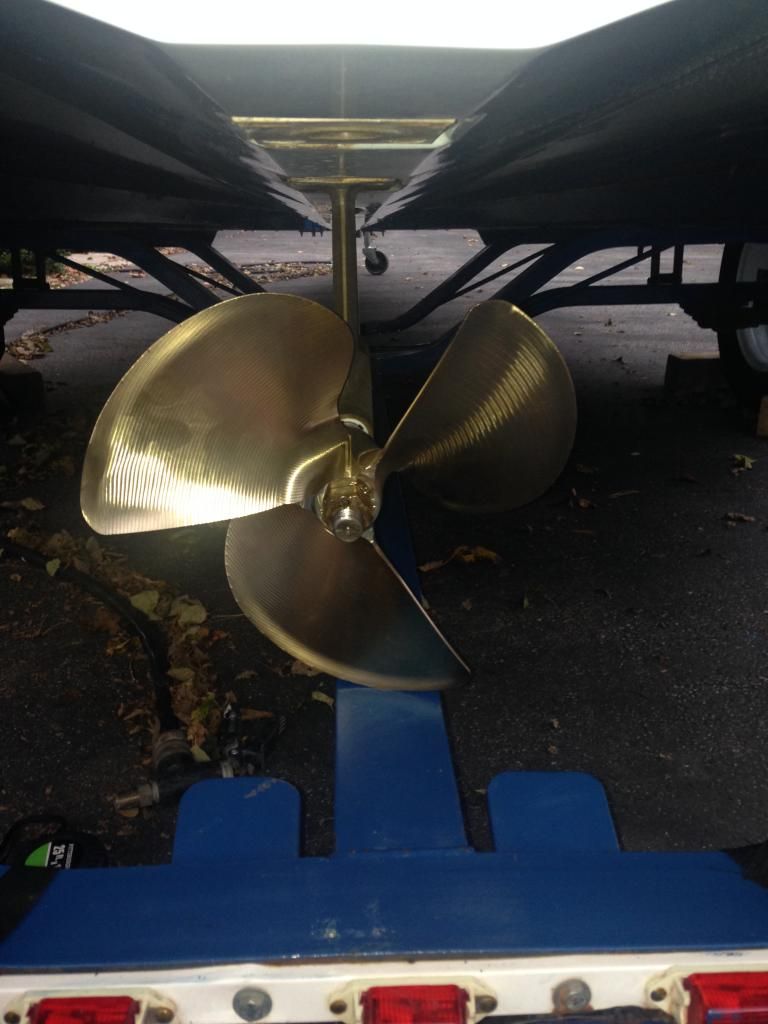 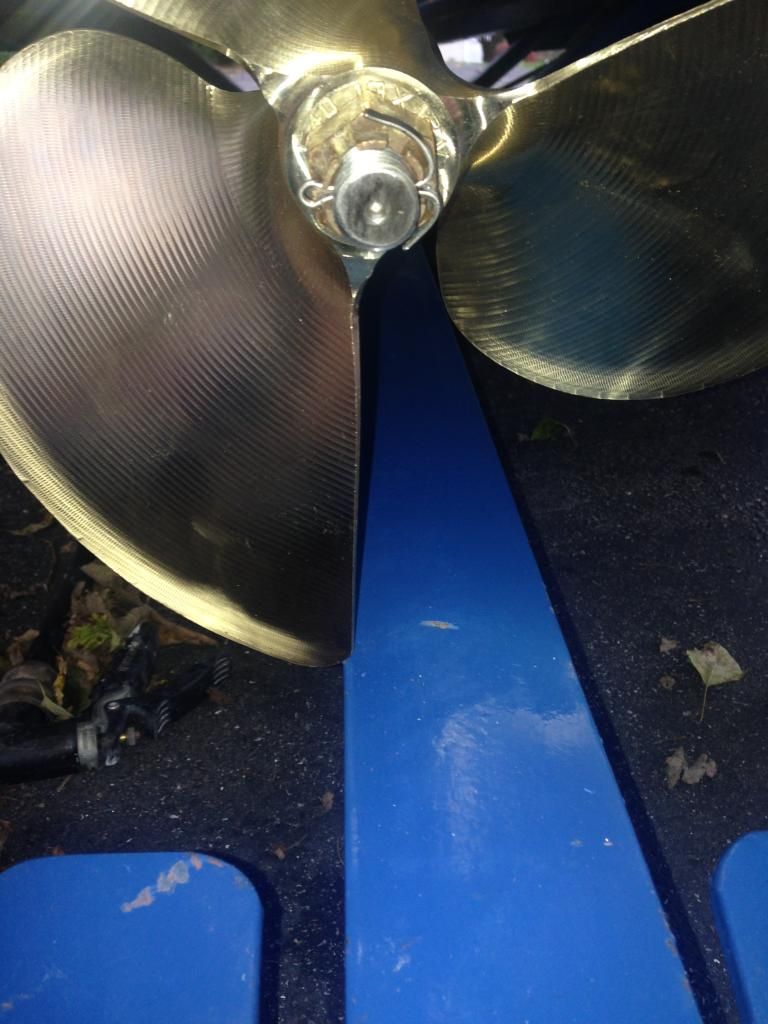 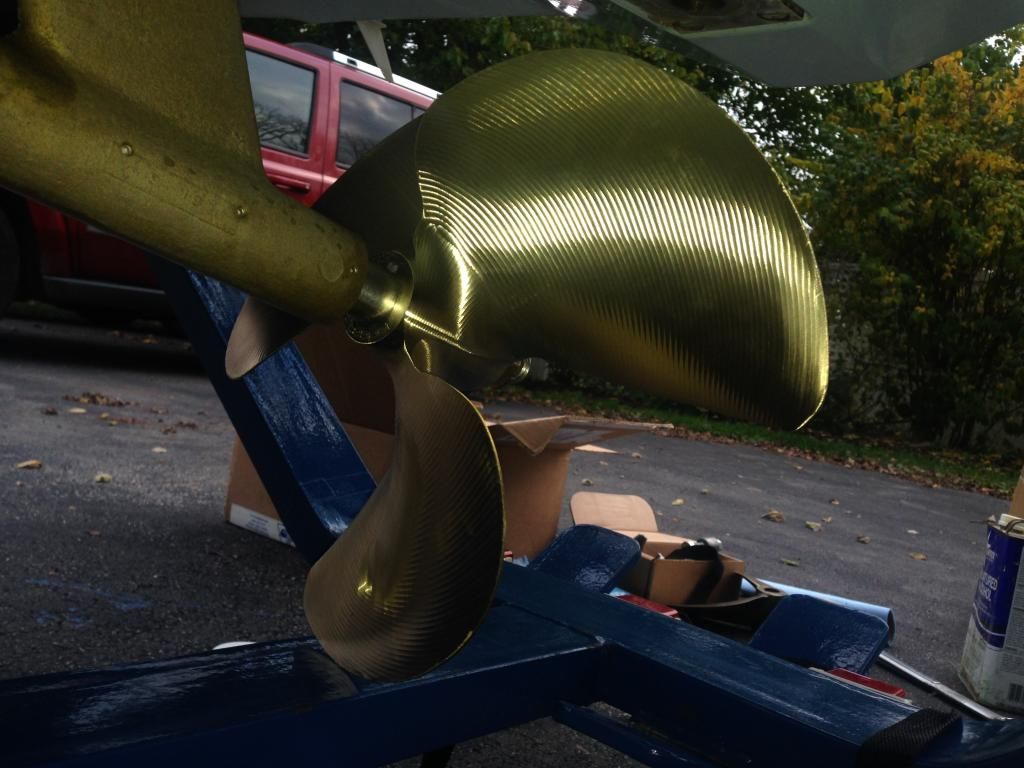 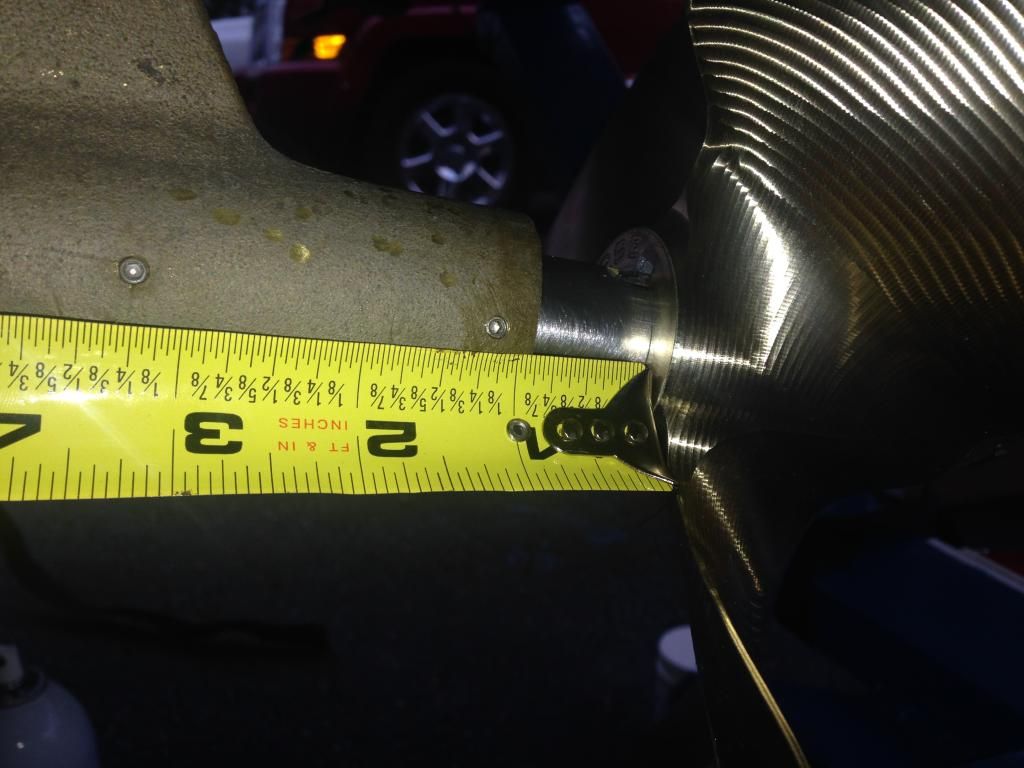 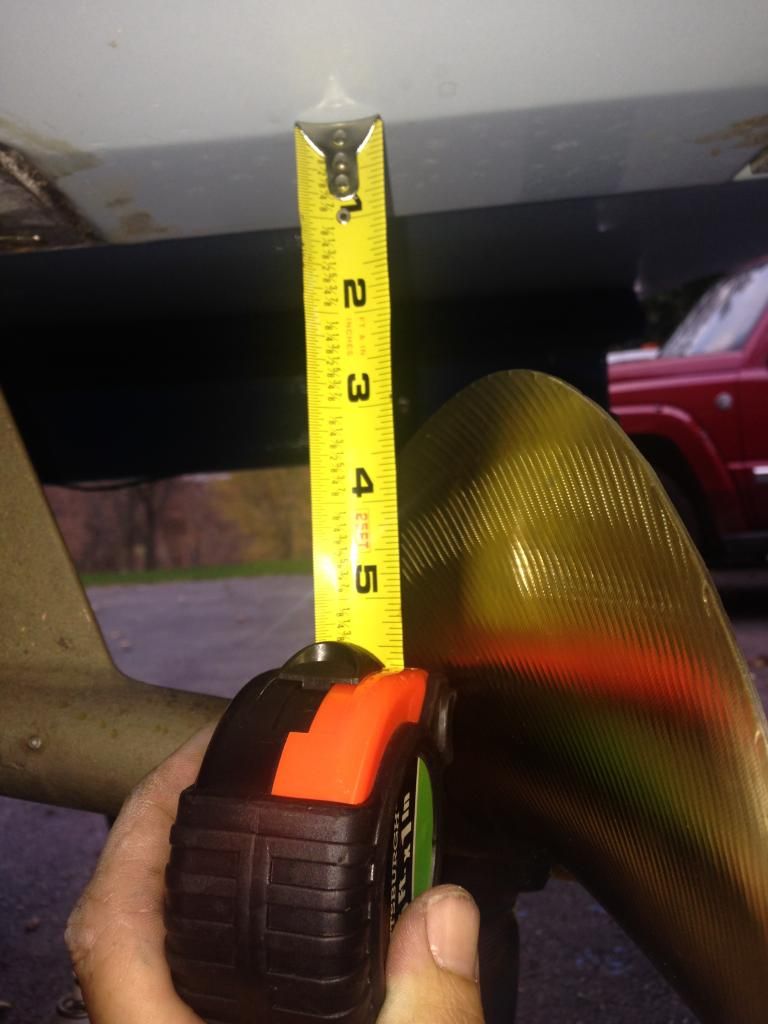 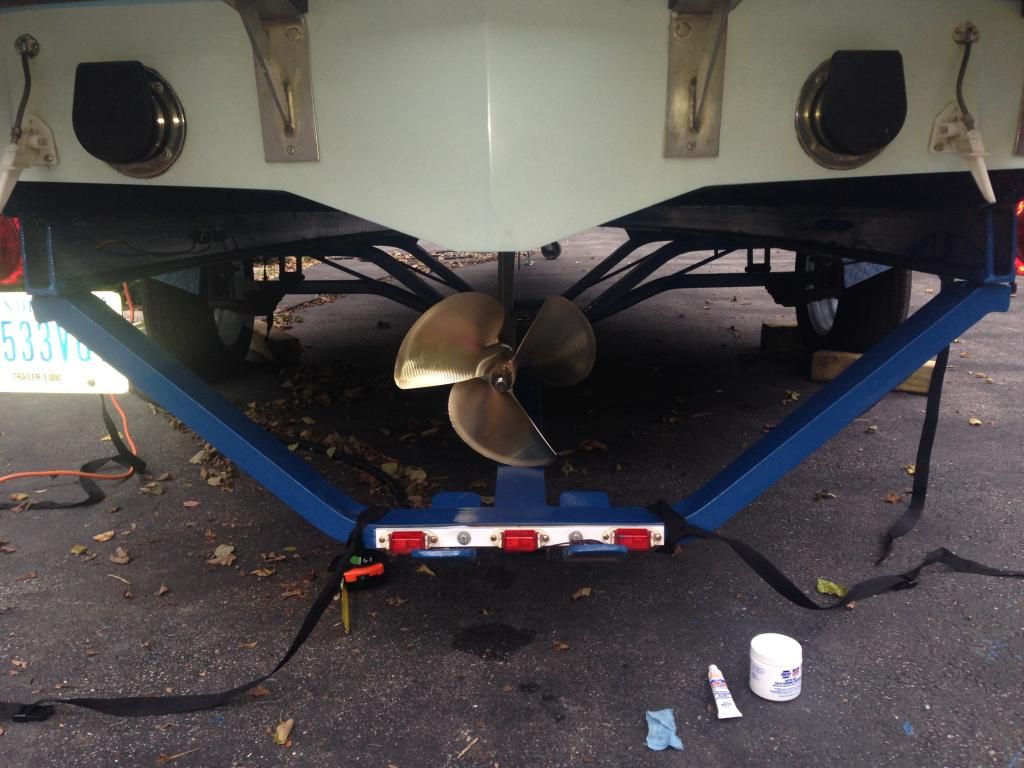 |
||
|
Kostas
1984 Ski Nautique 2001 |
||
 |
||
OldSchoolBlue84 
Gold Member 

Joined: December-02-2012 Location: Valparaiso, IN Status: Offline Points: 814 |
 Post Options Post Options
 Thanks(0) Thanks(0)
 Quote Quote  Reply Reply
 Posted: October-15-2014 at 11:31pm Posted: October-15-2014 at 11:31pm |
|
Yes ! but not till next year 
|
||
|
Kostas
1984 Ski Nautique 2001 |
||
 |
||
JDD33 
Senior Member 
Joined: October-20-2012 Location: Natick, MA Status: Offline Points: 499 |
 Post Options Post Options
 Thanks(0) Thanks(0)
 Quote Quote  Reply Reply
 Posted: October-15-2014 at 10:13pm Posted: October-15-2014 at 10:13pm |
|
|
Running and spinning a New 540!!!!!! Yeah Buddy!!!!
|
||
|
Old school goin back to school!
|
||
 |
||
MrMcD 
Grand Poobah 

Joined: January-28-2014 Location: Folsom, CA Status: Offline Points: 3778 |
 Post Options Post Options
 Thanks(0) Thanks(0)
 Quote Quote  Reply Reply
 Posted: October-15-2014 at 5:22pm Posted: October-15-2014 at 5:22pm |
|
|
Glad you got it headed towards running.
|
||
 |
||
gun-driver 
Grand Poobah 
Joined: July-18-2008 Location: Pittsburgh, Pa Status: Offline Points: 4127 |
 Post Options Post Options
 Thanks(0) Thanks(0)
 Quote Quote  Reply Reply
 Posted: October-15-2014 at 10:25am Posted: October-15-2014 at 10:25am |
|
|
It's always nice when the wife helps with your shaft.

|
||
 |
||
OldSchoolBlue84 
Gold Member 

Joined: December-02-2012 Location: Valparaiso, IN Status: Offline Points: 814 |
 Post Options Post Options
 Thanks(0) Thanks(0)
 Quote Quote  Reply Reply
 Posted: October-14-2014 at 11:27pm Posted: October-14-2014 at 11:27pm |
|
|
Well finally I was able to install the coupler
 Had the wife cook it for 4 hours and with assistance from her, it actually slid right on with no problem. I was able to match up the set screw but going to need to replace one of them since it snapped off when I tried to use them to seat the coupler in its exact place, no biggy Had the wife cook it for 4 hours and with assistance from her, it actually slid right on with no problem. I was able to match up the set screw but going to need to replace one of them since it snapped off when I tried to use them to seat the coupler in its exact place, no biggy  Thanks for everyone's input and support and not letting me say f'it Thanks for everyone's input and support and not letting me say f'it 
|
||
|
Kostas
1984 Ski Nautique 2001 |
||
 |
||
96SNEFI 
Senior Member 
Joined: March-23-2009 Location: Canada Status: Offline Points: 138 |
 Post Options Post Options
 Thanks(0) Thanks(0)
 Quote Quote  Reply Reply
 Posted: October-14-2014 at 2:23am Posted: October-14-2014 at 2:23am |
|
|
I was so pissed off at the hassle it was to remove the coupling and then having read beforehand this business of heating/cooling things that I opted for one of these:
split coupling Took the shaft and coupling to a machine shop and they trued them together and also declared the shaft straight on arrival. I also went for one of these to avoid any hassles with shaft packing: shaft log |
||
 |
||
MrMcD 
Grand Poobah 

Joined: January-28-2014 Location: Folsom, CA Status: Offline Points: 3778 |
 Post Options Post Options
 Thanks(0) Thanks(0)
 Quote Quote  Reply Reply
 Posted: October-14-2014 at 2:11am Posted: October-14-2014 at 2:11am |
|
|
Sorry about your troubles, something is off and a Micrometer should show you where to start fixing.
I switched to the ARE after my shaft was ruined along with a prop. Very easy install and very high quality. |
||
 |
||
OldSchoolBlue84 
Gold Member 

Joined: December-02-2012 Location: Valparaiso, IN Status: Offline Points: 814 |
 Post Options Post Options
 Thanks(0) Thanks(0)
 Quote Quote  Reply Reply
 Posted: October-13-2014 at 7:25pm Posted: October-13-2014 at 7:25pm |
|
Agree! We need Pete to start posting again 
|
||
|
Kostas
1984 Ski Nautique 2001 |
||
 |
||
baitkiller 
Platinum Member 

Joined: October-11-2011 Location: SW Florida Status: Offline Points: 1693 |
 Post Options Post Options
 Thanks(0) Thanks(0)
 Quote Quote  Reply Reply
 Posted: October-13-2014 at 7:12pm Posted: October-13-2014 at 7:12pm |
|
|
Need one of Petes fancy measuring tool thingies.
|
||
|
Jesus was a bare-footer.............
|
||
 |
||
NAUTIQUEjunky 
Senior Member 

Joined: July-17-2010 Location: Henderson NC Status: Offline Points: 210 |
 Post Options Post Options
 Thanks(0) Thanks(0)
 Quote Quote  Reply Reply
 Posted: October-13-2014 at 6:57pm Posted: October-13-2014 at 6:57pm |
|
|
I would be willing to bet that your shaft has been replaced before, and its a few thousands off from the factory one..After some heat and ice or freezer time u shouldnt be struggling with it like you have been. Its and interference fit so after expanding the new collar with heat and somewhat shrinking the shaft with freezer and still no go... than the diameters are deff too far apart imop.
|
||
|
1977 MasterCraft Stars&Stripes
1994 Ski Nautique 2000 Super Air Nautique 1986 Ski Nautique 2001 1999 Sport Nautique gt40 current |
||
 |
||
OldSchoolBlue84 
Gold Member 

Joined: December-02-2012 Location: Valparaiso, IN Status: Offline Points: 814 |
 Post Options Post Options
 Thanks(0) Thanks(0)
 Quote Quote  Reply Reply
 Posted: October-13-2014 at 2:00pm Posted: October-13-2014 at 2:00pm |
|
|
Well no luck over the weekend. I cleaned the heck out of it with emery cloth and tried the propain cooker for 1 plus hours with zero luck. The best was back in my the oven for 3 hours and no ice but still fell short. Going to get a quote on the A.R.E system from skidim and decide then what to do. Wife is tired of me talking about my "shaft"
 So I have a welder buddy coming over tomorrow and will give it a last try. I talked with a machine shop to take a look but wanted around $125, I rather put the money on the A.R.E system, wasted enough time already. If I go this route, I will try to sell the shaft and 2 couplers and let someone else give it a try. Not sure what used parts go for, any idea or I should not even bother? Thanks for everyone's input! |
||
|
Kostas
1984 Ski Nautique 2001 |
||
 |
||
Gary S 
Grand Poobah 

Joined: November-30-2006 Location: Illinois Status: Offline Points: 14096 |
 Post Options Post Options
 Thanks(0) Thanks(0)
 Quote Quote  Reply Reply
 Posted: October-11-2014 at 2:04pm Posted: October-11-2014 at 2:04pm |
|
|
I'd break out the Weber grill,but there isn't going to be a next time for me,I'd get an A.R.E. set up. But at least you would be right next to the boat,no need to run thru the house heading toward the boat and cooling the coupler as you go

|
||
 |
||
Hollywood 
Moderator Group 

Joined: February-04-2004 Location: Twin Lakes, WI Status: Offline Points: 13522 |
 Post Options Post Options
 Thanks(0) Thanks(0)
 Quote Quote  Reply Reply
 Posted: October-11-2014 at 1:34pm Posted: October-11-2014 at 1:34pm |
|
|
Try 3 hours in the oven. Ditch the ice. You might be causing the shaft to sweat and if so you're screwed.
|
||
 |
||
MrMcD 
Grand Poobah 

Joined: January-28-2014 Location: Folsom, CA Status: Offline Points: 3778 |
 Post Options Post Options
 Thanks(0) Thanks(0)
 Quote Quote  Reply Reply
 Posted: October-11-2014 at 3:13am Posted: October-11-2014 at 3:13am |
|
|
Having the Shaft and Coupling clean and burr free is very important.
The clearance on this interference fit is smaller than zero. Anything that sticks up will bugger up your install. Take really fine emery cloth and make sure the finish is smooth on the shaft and the coupler inside surface. Do not sand it or you will reduce your interference fit. Just smooth any rough spots or high spots. Your picture shows damage or gauling on the shaft and coupler. You will need to smooth that back out. On install it needs to be one smooth move. Once the hot coupler touches heat transfers quickly and the shaft will grow locking you in place. You have to be faster than the heat transfer. Should be 1-5 second install. Make sure the key is fitted both to the shaft and the coupler, if the key is tight you will not win. The key cant be tight or sloppy. The one hour in the oven might work but I would use a gas stove top or even a coleman stove to heat the coupler, set it on direct flame, it will heat in 4 or 5 minutes, Best of luck. |
||
 |
||
baitkiller 
Platinum Member 

Joined: October-11-2011 Location: SW Florida Status: Offline Points: 1693 |
 Post Options Post Options
 Thanks(0) Thanks(0)
 Quote Quote  Reply Reply
 Posted: October-11-2014 at 12:40am Posted: October-11-2014 at 12:40am |
|
|
Don is on the right track. A new coupling must, in my opinion, be >fit and faced< upon the shaft. Take it to a prop shop and they will install the coupling, set the counter bore and grub screw locations correctly, chuck it up in the lathe and face the coupling, check and true the shaft then index and dissemble the pieces ready for you to install. Add another Bill to blue print the prop while you are at it.
Balance the price of that service regionally against a pre-fit ARE set up and follow your wallet. Call your local prop shop and ask for an estimate. The guy I use is expensive but Rain Man precise. It would be perfect but within range of the ARE cost wise. You should still do the prop though.. |
||
|
Jesus was a bare-footer.............
|
||
 |
||
OldSchoolBlue84 
Gold Member 

Joined: December-02-2012 Location: Valparaiso, IN Status: Offline Points: 814 |
 Post Options Post Options
 Thanks(0) Thanks(0)
 Quote Quote  Reply Reply
 Posted: October-11-2014 at 12:36am Posted: October-11-2014 at 12:36am |
|
|
Well the 3rd attemp was no good
 I believe its not getting hot enough, electric oven at 550 degrees. Unfortunately I do not have a freezer larger enough for the drive shaft. I believe its not getting hot enough, electric oven at 550 degrees. Unfortunately I do not have a freezer larger enough for the drive shaft. John, I remeber you telling me that at Tims. My buddy has a deep frier cooker that I will give it a final try. I just want to be able to look back and see my new 540 prop on  Below are some pictures of the drive shaft and the new coupler. Only was able to get it about a 1/4". Thanks for your input, appreciate it.  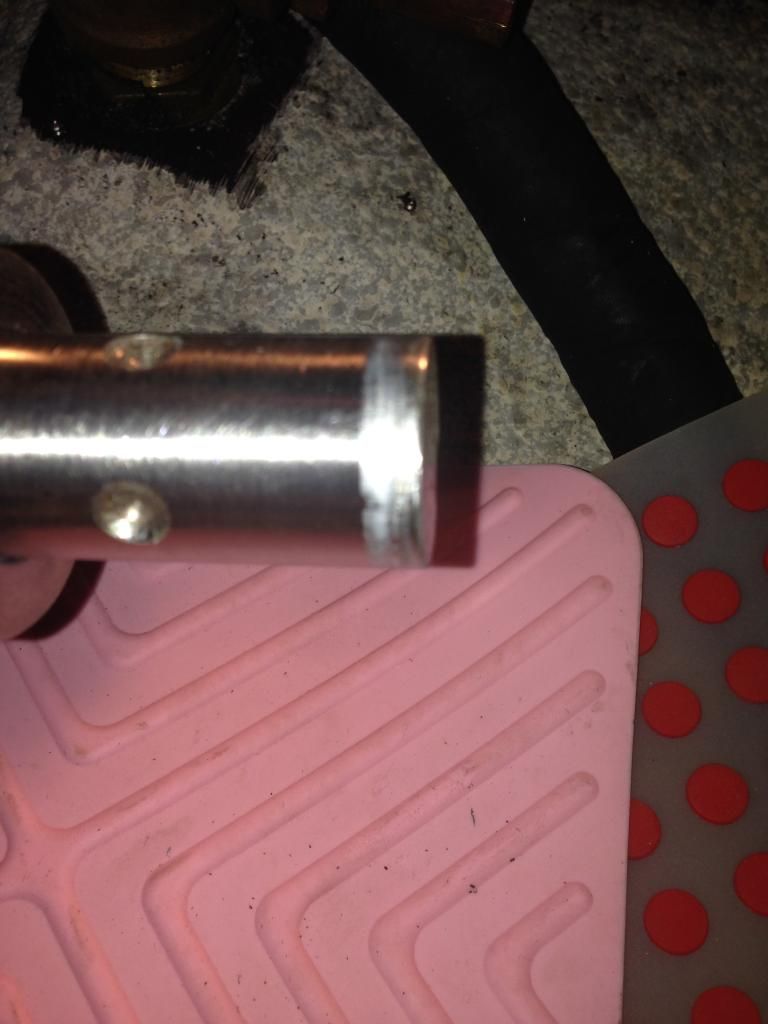 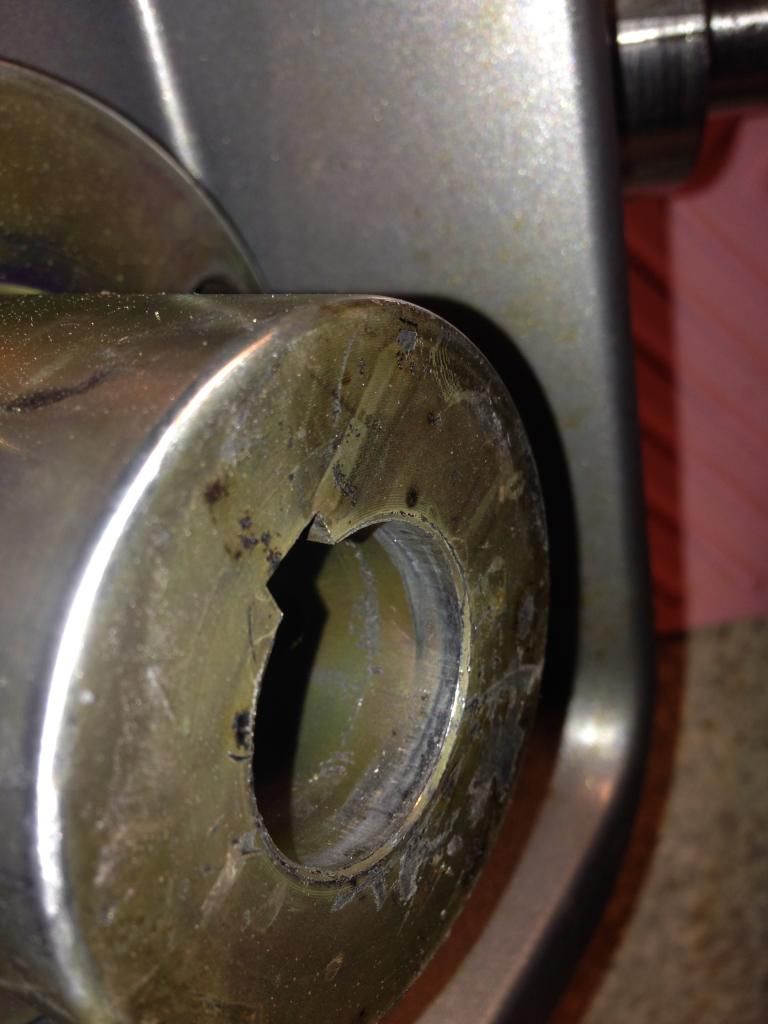 |
||
|
Kostas
1984 Ski Nautique 2001 |
||
 |
||
Post Reply 
|
Page 12> |
|
Tweet
|
| Forum Jump | Forum Permissions  You cannot post new topics in this forum You cannot reply to topics in this forum You cannot delete your posts in this forum You cannot edit your posts in this forum You cannot create polls in this forum You cannot vote in polls in this forum |