 Boats For Sale:


Separating a Stuck Coupler |
Post Reply 
|
Page <123> |
| Author | |||
79nautique 
Grand Poobah 

Joined: January-27-2004 Location: United States Status: Offline Points: 7872 |
 Post Options Post Options
") Thanks(0) Thanks(0)
 Quote Reply Quote Reply
 Posted: May-13-2010 at 5:14pm Posted: May-13-2010 at 5:14pm |
||
to play it safe and They also need to be grade 5 or better |
|||
 |
|||
|
8122pbrainard
Grand Poobah

Joined: September-14-2006 Location: Three Lakes Wi. Status: Offline Points: 41045 |
Post Options
Thanks(0)
Quote Reply
Posted: May-13-2010 at 5:20pm |
||
???? A 3/8 stainless bolt has a shear strength of around 10,000 lbs x 4 is 40,000!!! Even Billy's or Joe's engines would shear them!!! |
|||
|
|||
|
79nautique
Grand Poobah
Joined: January-27-2004 Location: United States Status: Offline Points: 7872 |
Post Options
Thanks(0)
Quote Reply
Posted: May-13-2010 at 5:27pm |
||
|
so your trying to say regular china junk is good enough?
|
|||
|
|||
|
sjpitts
Senior Member 
Joined: April-16-2007 Location: United States Status: Offline Points: 111 |
Post Options
Thanks(0)
Quote Reply
Posted: May-13-2010 at 6:52pm |
||
|
I just wanted to replace them because they were a bit rusty. Not too bad, but a bit.
Because they are rusty, maybe they are not stainless. Jared |
|||
|
|||
|
sjpitts
Senior Member
Joined: April-16-2007 Location: United States Status: Offline Points: 111 |
Post Options
Thanks(0)
Quote Reply
Posted: May-13-2010 at 6:53pm |
||
Ok, what does this mean? Are trying to say don't use stainless? I am sorry, I don't get the joke. Jared |
|||
|
|||
|
behindpropeller
Platinum Member 
Joined: July-31-2006 Status: Offline Points: 1810 |
Post Options
Thanks(0)
Quote Reply
Posted: May-13-2010 at 7:00pm |
||
|
Stainless is fine....
Unless you plan on putting a carbide prop on your machine. |
|||
|
|
|||
|
|||
|
GottaSki
Grand Poobah
Joined: April-21-2005 Location: NE CT Status: Offline Points: 3357 |
Post Options
Thanks(0)
Quote Reply
Posted: May-13-2010 at 7:13pm |
||
|
I may see '79's point on this one..
Stainless tends to gall up and sieze a bit easier than grade 5 likes to rust. |
|||
|
"There is nothing, absolutely nothing, half so much worthwhile as messing around with boats...simply messing."
River Rat to Mole |
|||
|
|||
|
sjpitts
Senior Member
Joined: April-16-2007 Location: United States Status: Offline Points: 111 |
Post Options
Thanks(0)
Quote Reply
Posted: May-13-2010 at 7:14pm |
||
|
Thanks man for the answer on the stainless.
Next question. I think I have the side to side aligned well enough. But now it is pretty clear that the top has a larger gap than the bottom. May .006. So I am thinking I need to raise the front of the engine. So my best guess is that I need to loosen the lock nuts, and then turn the big silver bolts clockwise just a bit. See the pictures below, I think I need to turn that bolt clockwise to raise the front. And then retighten the lock bolt. Sound like the right plan? Thanks again guys 

|
|||
|
|||
|
Okie Boarder
Gold Member
Joined: August-31-2009 Location: OK Status: Offline Points: 779 |
Post Options
Thanks(0)
Quote Reply
Posted: May-13-2010 at 7:28pm |
||
|
Jared,
You got it. |
|||
|
|||
|
behindpropeller
Platinum Member
Joined: July-31-2006 Status: Offline Points: 1810 |
Post Options
Thanks(0)
Quote Reply
Posted: May-13-2010 at 8:10pm |
||
|
Some brass nuts on your stainless bolts work good :)
|
|||
|
|
|||
|
|||
|
8122pbrainard
Grand Poobah
Joined: September-14-2006 Location: Three Lakes Wi. Status: Offline Points: 41045 |
Post Options
Thanks(0)
Quote Reply
Posted: May-13-2010 at 10:10pm |
||
No joke. I'd go stainless. I did with my 64. |
|||
|
|||
|
8122pbrainard
Grand Poobah
Joined: September-14-2006 Location: Three Lakes Wi. Status: Offline Points: 41045 |
Post Options
Thanks(0)
Quote Reply
Posted: May-13-2010 at 10:11pm |
||
Never-seize on SS threads. I remember when I first saw the stuff. A saleman came into the shop with a piece of SS threaded rod, smashed the threads with a hammer, put the never seize on and then ran the nut off over the damaged threads. The nut was smoking but it came off! It actually re rolled the threads! |
|||
|
|||
|
8122pbrainard
Grand Poobah
Joined: September-14-2006 Location: Three Lakes Wi. Status: Offline Points: 41045 |
Post Options
Thanks(0)
Quote Reply
Posted: May-13-2010 at 10:14pm |
||
Chris, I don't recall saying and even re read that I ever mentioned "China junk"! I hate to tell you but grade 5's and 8's are coming in from them too. I agree it is a shame. |
|||
|
|||
|
sjpitts
Senior Member
Joined: April-16-2007 Location: United States Status: Offline Points: 111 |
Post Options
Thanks(0)
Quote Reply
Posted: May-13-2010 at 10:19pm |
||
|
I got it done. And I just reused the old bolts. Thanks for all the help.
Jared |
|||
|
|||
|
79nautique
Grand Poobah
Joined: January-27-2004 Location: United States Status: Offline Points: 7872 |
Post Options
Thanks(0)
Quote Reply
Posted: May-14-2010 at 10:39am |
||
i would be dropping the rear mounts to close the top gap. |
|||
|
|||
|
sjpitts
Senior Member
Joined: April-16-2007 Location: United States Status: Offline Points: 111 |
Post Options
Thanks(0)
Quote Reply
Posted: May-14-2010 at 4:15pm |
||
Why is that? Why would you chose one or the other? I thought about lowering the back, but the front seemed a little easier to do. I guess you would have to move it less using the back. Is that it? Jared |
|||
|
|||
|
Okie Boarder
Gold Member
Joined: August-31-2009 Location: OK Status: Offline Points: 779 |
Post Options
Thanks(0)
Quote Reply
Posted: May-14-2010 at 4:30pm |
||
|
I'll let him answer but I'm going to venture a guess. Lowering the back lets the engine sit down farther in the bilge and closer to the stringers. Raising the front does the opposite, which could put some stress on the mounts.
I tried to lower more than raise when I did mine with that thought in mind. Not sure if I'm right but it seems to make some sense to me. |
|||
|
|||
|
8122pbrainard
Grand Poobah
Joined: September-14-2006 Location: Three Lakes Wi. Status: Offline Points: 41045 |
Post Options
Thanks(0)
Quote Reply
Posted: May-14-2010 at 4:38pm |
||
|
Both are correct. Front or rear mount adjustment may be needed to keep the shaft centered in the shaft log and maintain alignment to the strut.
|
|||
|
|||
|
sjpitts
Senior Member
Joined: April-16-2007 Location: United States Status: Offline Points: 111 |
Post Options
Thanks(0)
Quote Reply
Posted: May-14-2010 at 5:14pm |
||
|
That makes a lot of sense. I didn't think about that.
But in that case, maybe raising the front was right for me. If you scroll up the thread and see the picture of the shaft from under the boat it looks like the shaft is "lower" rather than "higher" in the log. But that picture is a couple of years old. Jared |
|||
|
|||
|
8122pbrainard
Grand Poobah
Joined: September-14-2006 Location: Three Lakes Wi. Status: Offline Points: 41045 |
Post Options
Thanks(0)
Quote Reply
Posted: May-14-2010 at 5:27pm |
||
|
Jared,
A true drive train alignment starts at the strut and then goes forward because the strut is the fixed position. Now's the time for you to check to be sure the strut is ok and not bent. What I do and suggest, is with the coupling halves disconnected, make a wood V block to rest the forward end of the prop shaft on. Make it so you can move it around in different positions. When turning the prop shaft you should find the "sweet" spot where the shaft turns the easiest. Hopefully this is when the shaft is roughly centered in the shaft log. If it turns freely, then you know the strut position is good. Clamp off the V block to maintain the position and align the engine to it. |
|||
|
|||
|
marcus12
Groupie 

Joined: February-11-2009 Location: United States Status: Offline Points: 49 |
Post Options
Thanks(0)
Quote Reply
Posted: May-14-2010 at 8:22pm |
||
|
hi guys i'm in the process of trying to do an alignment myself and it looks like from the back of the engine it needs to go to the right to close the gap. I've loosened the pinch bolts on the front and back, and I can't get thr engine to budge a bit even with a hammer and crow bar. Any suggestions?
|
|||
|
|||
|
Okie Boarder
Gold Member
Joined: August-31-2009 Location: OK Status: Offline Points: 779 |
Post Options
Thanks(0)
Quote Reply
Posted: May-14-2010 at 8:30pm |
||
|
Make sure the pinch bolts are completely loose so you can move them with your hand. Put some PB Blaster on the shanks from the trunions and let it soak in real good. Then try moving it again.
|
|||
|
|||
|
marcus12
Groupie
Joined: February-11-2009 Location: United States Status: Offline Points: 49 |
Post Options
Thanks(0)
Quote Reply
Posted: May-15-2010 at 1:19am |
||
|
When you say pinch bolts are completely loose, do you mean the nut on the threaded bolt? I have the nut completely off both front and rear threaded bolts "pinch bolts" like shown in eric's threadand it still won't budge. I really don't know where to get to put pressure on it either, i'm kind of scared of breaking something. Any help will be greatly appreciated.
|
|||
|
|||
|
8122pbrainard
Grand Poobah
Joined: September-14-2006 Location: Three Lakes Wi. Status: Offline Points: 41045 |
Post Options
Thanks(0)
Quote Reply
Posted: May-15-2010 at 9:19am |
||
|
Marcus,
The pinch bolts are the small fasteners that clamp (squeeze) the mount down onto the horizontal shank (round rod - not threaded). These can be stubborn as they do rust up inside. Sometimes the mount needs to be removed and loosened up on the bench or in the vise. |
|||
|
|||
|
marcus12
Groupie
Joined: February-11-2009 Location: United States Status: Offline Points: 49 |
Post Options
Thanks(0)
Quote Reply
Posted: May-15-2010 at 12:12pm |
||
|
But the pinch bolts are the threaded rods right? How do I remove then without messing up the threads?
|
|||
|
|||
|
eric lavine
Grand Poobah
Joined: August-13-2006 Location: United States Status: Offline Points: 13413 |
Post Options
Thanks(0)
Quote Reply
Posted: May-15-2010 at 12:16pm |
||
|
the "pinch bolts"
what i do is take the nut all the way to the end of the threads and tap it thru with my brass hammer...i think this is being overlooked. if the mount does not have a split, it is the tapered type mount, so the more you tighten the nut the tighter the trunion. you will notice on the opposite end that there are no means to hold the other end of the bolt.....this is the tapered type. if the mount is split and you see a bolt head at both ends this is the clamp type. simply by loosening the tapered type will not move the trunion, you have to tap it out and release the taper |
|||
|
"the things you own will start to own you"
|
|||
|
|||
|
marcus12
Groupie
Joined: February-11-2009 Location: United States Status: Offline Points: 49 |
Post Options
Thanks(0)
Quote Reply
Posted: May-15-2010 at 12:52pm |
||
|
Eric, the engine mount on my 85 SN has a split, so are you saying I need to tap the pinch bolt through the hole toward the bottom, or have I missed something. Sorry for the confusion I've just never done an alignment.
|
|||
|
|||
|
marcus12
Groupie
Joined: February-11-2009 Location: United States Status: Offline Points: 49 |
Post Options
Thanks(0)
Quote Reply
Posted: May-15-2010 at 1:37pm |
||
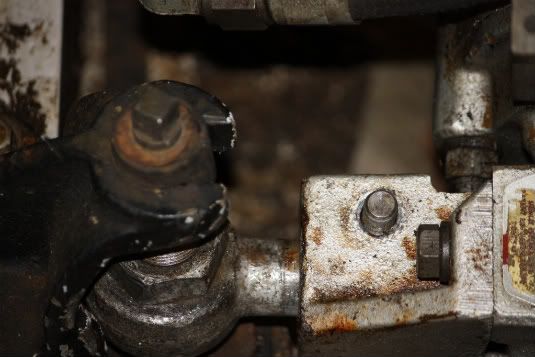 This is a picture of what i'm looking at. What do I need to tap through. This is a picture of what i'm looking at. What do I need to tap through.
|
|||
|
|||
|
Okie Boarder
Gold Member
Joined: August-31-2009 Location: OK Status: Offline Points: 779 |
Post Options
Thanks(0)
Quote Reply
Posted: May-15-2010 at 2:07pm |
||
|
Tap that threaded piece you have the nut off of. If it is the split style it sounds like it will come out all the way. Otherwise it will kind of tap toward center until it gets to the other side of the interference fit. If it doesn't move easily, do like Eric said and put a nut back on it to keep from messing up the threads.
|
|||
|
|||
|
8122pbrainard
Grand Poobah
Joined: September-14-2006 Location: Three Lakes Wi. Status: Offline Points: 41045 |
Post Options
Thanks(0)
Quote Reply
Posted: May-15-2010 at 2:08pm |
||
|
Please read again - slowly.

From your picture, it looks like you have moved the engine sideways. See the shiny spot on the round (NOT THREADED, HORIZONTAL) rod. |
|||
|
|||
|
Post Reply
|
Page <123> |
 Tweet
Tweet
|
| Forum Jump | Forum Permissions You cannot post new topics in this forum You cannot reply to topics in this forum You cannot delete your posts in this forum You cannot edit your posts in this forum You cannot create polls in this forum You cannot vote in polls in this forum |


 Topic Options
 behindpropeller wrote: