Another BFN Rebuild |
Post Reply 
|
Page <1 1516171819 31> |
| Author | ||
TRBenj 
Grand Poobah 

Joined: June-29-2005 Location: NWCT Status: Offline Points: 21186 |
 Post Options Post Options
 Thanks(0) Thanks(0)
 Quote Quote  Reply Reply
 Posted: August-26-2010 at 2:46pm Posted: August-26-2010 at 2:46pm |
|
|
Progess has been slow, but the bilge is almost done. Just one coat of resin, then a quick scuff, followed by a few coats of paint. Its not quite perfect, but should be smooth enough not to hold a ton of dirt.
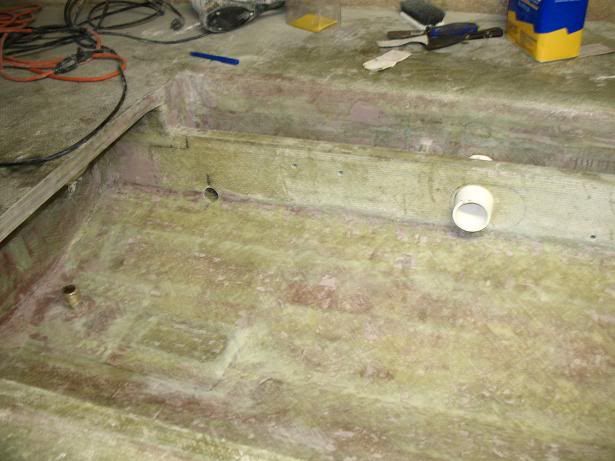
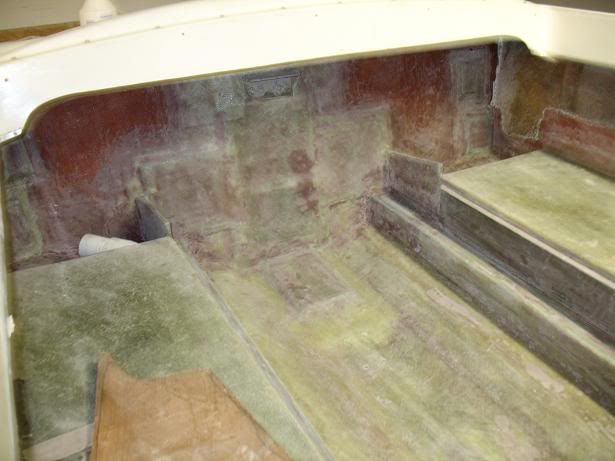
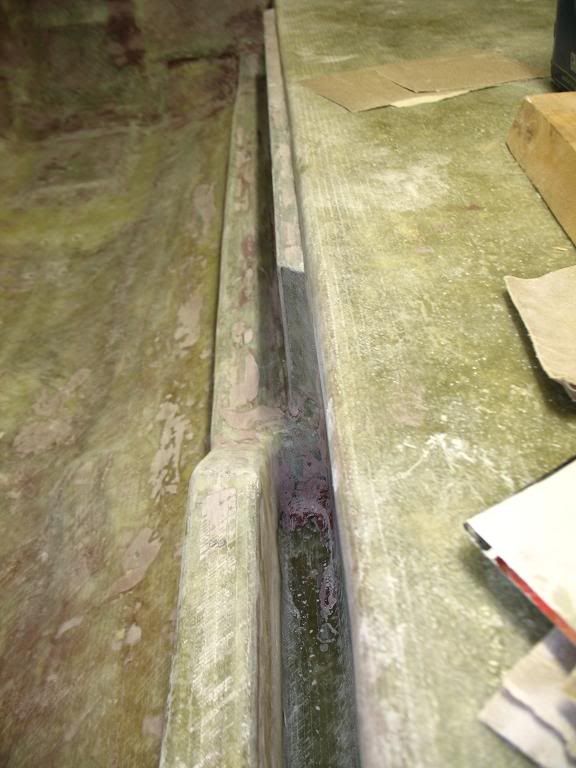
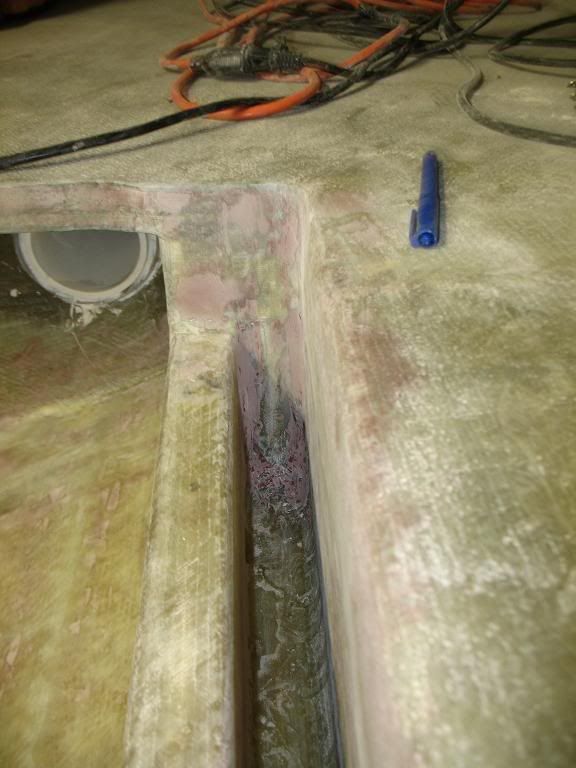
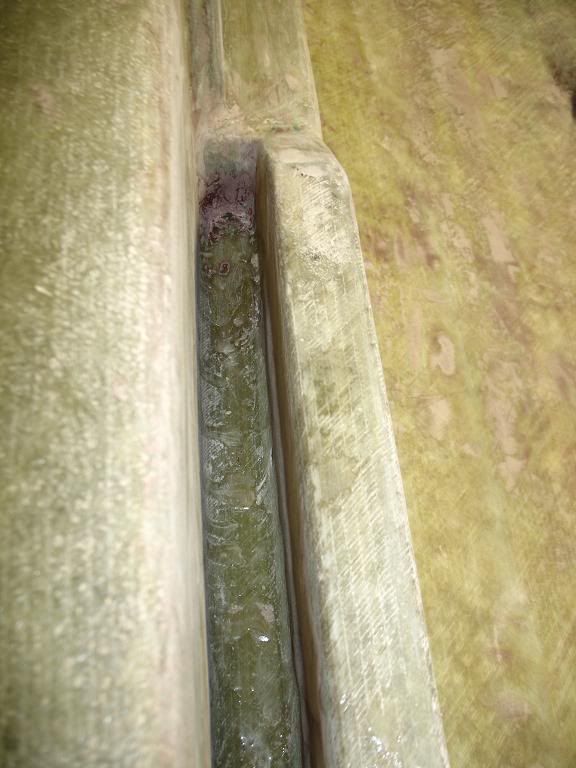
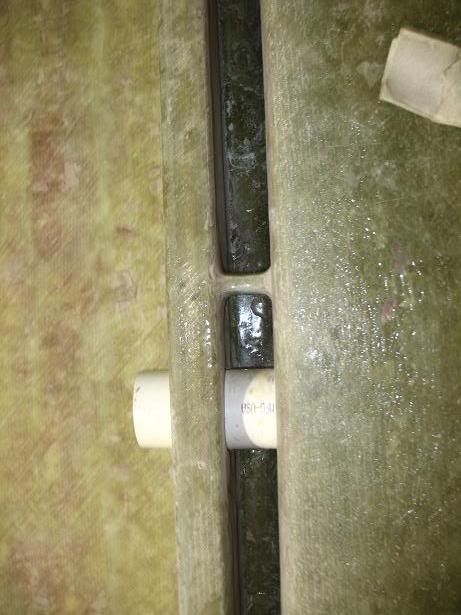
The engine is also coming along- mainly just cooling and electrical left before it can be dropped in. 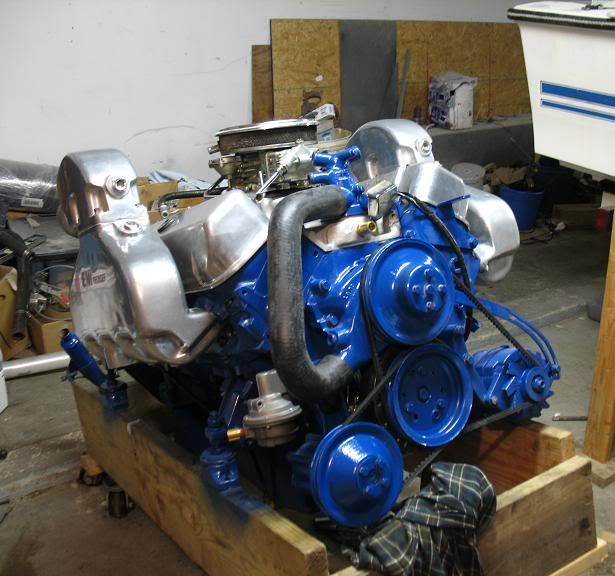
A quick measurement across the tops of the risers revealed that its 32" wide. We're a little doubtful the motorbox will fit over them, but we'll give it a try. |
||
 |
||
gun-driver 
Grand Poobah 
Joined: July-18-2008 Location: Pittsburgh, Pa Status: Offline Points: 4127 |
 Post Options Post Options
 Thanks(0) Thanks(0)
 Quote Quote  Reply Reply
 Posted: August-26-2010 at 2:52pm Posted: August-26-2010 at 2:52pm |
|
|
Maybe I missed it in the thread, but what kind of risers are they.
|
||
 |
||
TRBenj 
Grand Poobah 

Joined: June-29-2005 Location: NWCT Status: Offline Points: 21186 |
 Post Options Post Options
 Thanks(0) Thanks(0)
 Quote Quote  Reply Reply
 Posted: August-26-2010 at 2:55pm Posted: August-26-2010 at 2:55pm |
|
|
The manifolds and risers are polished aluminum EMI Thunders.
|
||
 |
||
8122pbrainard 
Grand Poobah 

Joined: September-14-2006 Location: Three Lakes Wi. Status: Offline Points: 41045 |
 Post Options Post Options
 Thanks(0) Thanks(0)
 Quote Quote  Reply Reply
 Posted: August-26-2010 at 3:25pm Posted: August-26-2010 at 3:25pm |
|
|
Tim,
Looking real good!! When you did the "quick" measurement on the dog house, how far is it off? If it's not wide enough, are you considering doing what Joe did to his? |
||
 |
||
TRBenj 
Grand Poobah 

Joined: June-29-2005 Location: NWCT Status: Offline Points: 21186 |
 Post Options Post Options
 Thanks(0) Thanks(0)
 Quote Quote  Reply Reply
 Posted: August-26-2010 at 3:55pm Posted: August-26-2010 at 3:55pm |
|
|
Pete, it was a really quick measurement taken on the outside of the box. Its somewhat buried in the corner of the garage, so I wasnt about to dig it out. If it fits, it will be by a very small margin... but I suspect that it wont.
In the event that it doesnt, I'll consider Joe's method, but its more likely that Ill split the box down the middle and make it a few inches wider. The box is pretty square, so I wouldnt mind preserving its lines. I may also add a little height to it, just in case the engine grows taller in the future. Those modifications would likely require new vinyl, which we were tentatively planning to do for next year anyways. Unfortunately, Ive been informed that the marbled blue vinyl (like you have in your Tique) has been discontinued... not sure what plan B is just yet. |
||
 |
||
8122pbrainard 
Grand Poobah 

Joined: September-14-2006 Location: Three Lakes Wi. Status: Offline Points: 41045 |
 Post Options Post Options
 Thanks(0) Thanks(0)
 Quote Quote  Reply Reply
 Posted: August-26-2010 at 4:18pm Posted: August-26-2010 at 4:18pm |
|
I like this idea and in fact was going to recommend it. Sure simpler than bumping out the top sides like Joe did. However, his did come out really nice. Unless you were really looking for it, you wouldn't know it wasn't the original shape. |
||
 |
||
TRBenj 
Grand Poobah 

Joined: June-29-2005 Location: NWCT Status: Offline Points: 21186 |
 Post Options Post Options
 Thanks(0) Thanks(0)
 Quote Quote  Reply Reply
 Posted: August-26-2010 at 4:23pm Posted: August-26-2010 at 4:23pm |
|
I agree that Joe's came out very nice. I think it fits the shape of the 2001 box nicely as well- plus it allowed him to reuse his vinyl, which was in good shape. The vinyl isnt too much of a concern to me since its towards the end of its life... which means I may either be doing some extra glass work this year, or running around without a motorbox! |
||
 |
||
JoeinNY 
Grand Poobah 

Joined: October-19-2005 Location: United States Status: Offline Points: 5698 |
 Post Options Post Options
 Thanks(0) Thanks(0)
 Quote Quote  Reply Reply
 Posted: August-26-2010 at 4:52pm Posted: August-26-2010 at 4:52pm |
|
|
On the topic of motor box modifications we were having a little discussion at the NE reunion about whether you could fit a 351 in the fiberglass first generation mustang motor box... about 10 minutes later the question was answered while looking at one fo the boats in attendance... All white late 60's mustang that had been a well used boat over the years.. I was looking at the motor box and something wasnt right.. then I looked closer and nothing was right it maintained the original lines the proportions were off everywhere. Long story short it had been repowered with 351w, box widened signficantly (4-6 inches) and at least 4 bulges added beside that.. it was painted after that and no one ever filled and sanded to a high level of finish but you had to respect the efforts.
|
||
 |
||
storm34 
Grand Poobah 

Joined: November-03-2008 Location: Dexter Iowa Status: Offline Points: 4492 |
 Post Options Post Options
 Thanks(0) Thanks(0)
 Quote Quote  Reply Reply
 Posted: August-26-2010 at 4:58pm Posted: August-26-2010 at 4:58pm |
|
Tim, why not make a wood cover? |
||
 |
||
TRBenj 
Grand Poobah 

Joined: June-29-2005 Location: NWCT Status: Offline Points: 21186 |
 Post Options Post Options
 Thanks(0) Thanks(0)
 Quote Quote  Reply Reply
 Posted: August-26-2010 at 5:19pm Posted: August-26-2010 at 5:19pm |
|
|
Joe, I suspected that was the case. The early (1969 and earlier) glass boxes just look too narrow to fit a 351w. I think Billy said his 302 with PCM manifolds barely fit under the cover. I dont know if you could sneak some narrow (Interceptor, etc) logs in there, but I kinda doubt it. There is at least one (all red) Mustang in the diaries that claims to have one that fits, but I agree that the box is snug. The 1970+ glass box looks like it would fit a big motor underneath though... if Im not mistaken, the same one was used on most 70's boats (351w powered Ski Nautique included).
Chris, building a wood box is an option- but it would only be a temporary thing and it wouldnt look very pretty. For the amount of work involved in making a wood one, I would more likely just split the glass one and widen it- even if it means running it with no upholstery for this year. |
||
 |
||
Gary S 
Grand Poobah 

Joined: November-30-2006 Location: Illinois Status: Offline Points: 14096 |
 Post Options Post Options
 Thanks(0) Thanks(0)
 Quote Quote  Reply Reply
 Posted: August-26-2010 at 9:50pm Posted: August-26-2010 at 9:50pm |
|
|
So your saying my motorbox doesn't look purdy???
 I agree with you tho,it would be easier to widen the one you have. But if you didn't have one I think a wood one would be just fine. I agree with you tho,it would be easier to widen the one you have. But if you didn't have one I think a wood one would be just fine.
|
||
 |
||
TRBenj 
Grand Poobah 

Joined: June-29-2005 Location: NWCT Status: Offline Points: 21186 |
 Post Options Post Options
 Thanks(0) Thanks(0)
 Quote Quote  Reply Reply
 Posted: August-27-2010 at 1:48am Posted: August-27-2010 at 1:48am |
|
|
Gary, Im sure youre just poking fun at me, but clearly I meant that a temporary wood box that I would build wouldnt be pretty. I have no beef with the factory wood boxes from the 60's and earlier.
Simply put, if Im going to put any sort of time into coming up with a wider solution (whether temporary or permanent), the effort might as well be put towards the glass box. |
||
 |
||
JoeinNY 
Grand Poobah 

Joined: October-19-2005 Location: United States Status: Offline Points: 5698 |
 Post Options Post Options
 Thanks(0) Thanks(0)
 Quote Quote  Reply Reply
 Posted: August-27-2010 at 2:08am Posted: August-27-2010 at 2:08am |
|
Tim what the heck get that thing in the water already. I was all about slowing down a little but august is on it's way out. Split down the middle is prob the way to go it's two evenings work at most. |
||
 |
||
tuna_tugger 
Senior Member 
Joined: February-28-2010 Location: Los Cabos, MX Status: Offline Points: 105 |
 Post Options Post Options
 Thanks(0) Thanks(0)
 Quote Quote  Reply Reply
 Posted: September-08-2010 at 3:52am Posted: September-08-2010 at 3:52am |
|
Tim, I have one question how did you like working with coosa and would you recommend it? |
||
|
Don Liberman
|
||
 |
||
TRBenj 
Grand Poobah 

Joined: June-29-2005 Location: NWCT Status: Offline Points: 21186 |
 Post Options Post Options
 Thanks(0) Thanks(0)
 Quote Quote  Reply Reply
 Posted: September-08-2010 at 11:41am Posted: September-08-2010 at 11:41am |
|
|
Having to pre-glass all the panels and laminate pieces together for longer lengths or thicknesses certainly added to the time and complexity of the build. So did all of the extra bulkheads and ribs that we installed- but that was due to the no-foam nature of our rebuild rather than our material of choice. That being said, on any boat that I plan to keep forever, assuming I have the budget and schedule to support such a project, I cant imagine ever going a different route.
The only downside with working with the coosa is that its extremely itchy- especially when you create any dust (any time you cut, grind or sand it). Other than that, it was a dream- its only 2/3 the weight of plywood, so moving the sheets around was pretty easy. It always stays perfectly straight, so no bowing, cupping or twisting like wood tends to do. Since it consists partly of foam, its quick and easy to shape it with a grinder, file or sander. Its also incredibly strong- especially once a layer or 2 of glass has been added. I expect this boat to last darn near forever. |
||
 |
||
tuna_tugger 
Senior Member 
Joined: February-28-2010 Location: Los Cabos, MX Status: Offline Points: 105 |
 Post Options Post Options
 Thanks(0) Thanks(0)
 Quote Quote  Reply Reply
 Posted: September-08-2010 at 12:02pm Posted: September-08-2010 at 12:02pm |
|
|
||
|
Don Liberman
|
||
 |
||
TRBenj 
Grand Poobah 

Joined: June-29-2005 Location: NWCT Status: Offline Points: 21186 |
 Post Options Post Options
 Thanks(0) Thanks(0)
 Quote Quote  Reply Reply
 Posted: September-08-2010 at 12:24pm Posted: September-08-2010 at 12:24pm |
|
|
You may want to go back a few pages and look at all the pics- there are a lot of them so that should clear things up. Yes, we used coosa for everything- stringers, ribs, bulkheads, backers, bases and floors.
|
||
 |
||
JoeinNY 
Grand Poobah 

Joined: October-19-2005 Location: United States Status: Offline Points: 5698 |
 Post Options Post Options
 Thanks(0) Thanks(0)
 Quote Quote  Reply Reply
 Posted: September-08-2010 at 5:19pm Posted: September-08-2010 at 5:19pm |
|
|
Tim, you done yet? Less time staring at your reflection in the mirror smooth finish of your bilge and more time turning wrenches here!
|
||
 |
||
TRBenj 
Grand Poobah 

Joined: June-29-2005 Location: NWCT Status: Offline Points: 21186 |
 Post Options Post Options
 Thanks(0) Thanks(0)
 Quote Quote  Reply Reply
 Posted: September-08-2010 at 7:26pm Posted: September-08-2010 at 7:26pm |
|
|
Ha, sorry Joe- we're still plugging away here. Will post back with new pictures as soon as theres something worth sharing.
|
||
 |
||
lewy2001 
Grand Poobah 

Joined: March-19-2008 Location: NSW Australia Status: Offline Points: 2234 |
 Post Options Post Options
 Thanks(0) Thanks(0)
 Quote Quote  Reply Reply
 Posted: September-09-2010 at 12:17am Posted: September-09-2010 at 12:17am |
|
|
At least it should be strong enough to break ice

|
||
|
If you're going through hell, keep going
89 Ski <a href="http://www.correctcraftfan.com/diaries/details.asp?ID=5685" ta |
||
 |
||
TRBenj 
Grand Poobah 

Joined: June-29-2005 Location: NWCT Status: Offline Points: 21186 |
 Post Options Post Options
 Thanks(0) Thanks(0)
 Quote Quote  Reply Reply
 Posted: September-21-2010 at 3:01pm Posted: September-21-2010 at 3:01pm |
|
|
Still no progress to report here... actually, quite the contrary.
2 weeks ago I put the first coat of Bilgekote on... and it still hasnt set up. I called Interlux and they told me that these prep instructions on the datasheet do not apply to epoxy based fiberglass- only poly and vinylester. "BARE FIBERGLASS In Good Condition Begin by scrubbing well using soap and water and a stiff brush. Rinse with fresh water and allow to dry. Degrease by wiping with a rag soaked in Fiberglass Solvent Wash 202. Sand with 180 grade (grit) paper. Remove sanding residue." Apparently bilgekote will not set up when applied over epoxy resin- instead, a primer is needed. Im glad they made that distinction clear. So, instead of having the carpet in and engine installed by now, instead we get to remove all the bilge paint. What a nightmare. Not sure whether to stick with the bilgekote (with primer) or to go to plan B with gelcoat. In other news, we have a bent strut... not a bend Ive seen before either. The body that holds the shaft is perfectly straight with respect to the baseplate- but the body itself is bent. This causes the shaft to bind when installed in the strut with the new bushings. That will probaby drive us to buy a new $350 strut. 
|
||
 |
||
Keeganino 
Grand Poobah 

Joined: October-27-2009 Location: North Carolina Status: Offline Points: 2063 |
 Post Options Post Options
 Thanks(0) Thanks(0)
 Quote Quote  Reply Reply
 Posted: September-21-2010 at 3:09pm Posted: September-21-2010 at 3:09pm |
|
|
I had a problem with my BilgeKote setting up too. I passed it off as me over applying the product. I let it bake in the 90 degree plus sun for days and it still had tacky spots. Needless to say my bilge is not the prettiest, but then again- it's the bilge.
Tough break on the motor! Looking forward to meeting you this weekend at Lake Norman. Looks like its gonna be a blast. |
||
|
"working on these old boats may not be cost effective but as it shows its what it brings into your life that matters" -Roger
1973 Skier |
||
 |
||
WakeSlayer 
Grand Poobah 

Joined: March-15-2006 Location: United States Status: Offline Points: 2138 |
 Post Options Post Options
 Thanks(0) Thanks(0)
 Quote Quote  Reply Reply
 Posted: September-21-2010 at 4:57pm Posted: September-21-2010 at 4:57pm |
|
|
That is odd about the bilgekote. Mine was faired out using West epoxy and the 410 Fairing filler. I did not have any trouble. Do you suppose the filler negated that problem?
|
||
|
Mike N
1968 Mustang |
||
 |
||
82 Nautique 1 
Senior Member 

Joined: January-06-2007 Location: Rock Island, IL Status: Offline Points: 265 |
 Post Options Post Options
 Thanks(0) Thanks(0)
 Quote Quote  Reply Reply
 Posted: September-21-2010 at 5:10pm Posted: September-21-2010 at 5:10pm |
|
|
TR, I have done 2 SN bilges as follows:
Sand existing gel/paint (Grey material off down to the fibreglass Wash clean several times with warm water Wipe entire area with acetone Apply bilge coat (No Thinning) with paint brush Applied 2 coats. It is very durable and shines quite well. I waited about 2 days between coats. Dennis |
||
 |
||
TRBenj 
Grand Poobah 

Joined: June-29-2005 Location: NWCT Status: Offline Points: 21186 |
 Post Options Post Options
 Thanks(0) Thanks(0)
 Quote Quote  Reply Reply
 Posted: September-21-2010 at 5:47pm Posted: September-21-2010 at 5:47pm |
|
So have I! I have no idea what caused the problem this time. Its been 2 weeks though, and its definitely not setting up properly. Interlux is blaming the lack of primer. Not sure what else to say, but Im not happy. Since I need to remove it all and apply an intermediate step, Im seriously considering using gelcoat instead. |
||
 |
||
Mark Mel 
Gold Member 

Joined: September-16-2005 Location: United States Status: Offline Points: 583 |
 Post Options Post Options
 Thanks(0) Thanks(0)
 Quote Quote  Reply Reply
 Posted: September-21-2010 at 5:56pm Posted: September-21-2010 at 5:56pm |
|
|
Tim just leave it there, and glue in some acrylic mirror. PL construction adhesive would hold it in there fine.
This way you'll have a nice view of the bottom of the engine too. ;) |
||
 |
||
JoeinNY 
Grand Poobah 

Joined: October-19-2005 Location: United States Status: Offline Points: 5698 |
 Post Options Post Options
 Thanks(0) Thanks(0)
 Quote Quote  Reply Reply
 Posted: September-21-2010 at 6:17pm Posted: September-21-2010 at 6:17pm |
|
|
It is in the bilge so no UV requirements why dont you just use some epoxy and throw in some tint for the color of choice.?
|
||
 |
||
TRBenj 
Grand Poobah 

Joined: June-29-2005 Location: NWCT Status: Offline Points: 21186 |
 Post Options Post Options
 Thanks(0) Thanks(0)
 Quote Quote  Reply Reply
 Posted: September-21-2010 at 6:20pm Posted: September-21-2010 at 6:20pm |
|
|
Good point Joe, that would save me a step.
|
||
 |
||
Keeganino 
Grand Poobah 

Joined: October-27-2009 Location: North Carolina Status: Offline Points: 2063 |
 Post Options Post Options
 Thanks(0) Thanks(0)
 Quote Quote  Reply Reply
 Posted: September-21-2010 at 6:48pm Posted: September-21-2010 at 6:48pm |
|
Now that is a great idea! Wish I would have thought of that before I painted mine. |
||
|
"working on these old boats may not be cost effective but as it shows its what it brings into your life that matters" -Roger
1973 Skier |
||
 |
||
79TiqueRebuild 
Senior Member 
Joined: January-21-2009 Location: Kansas City, Mo Status: Offline Points: 238 |
 Post Options Post Options
 Thanks(0) Thanks(0)
 Quote Quote  Reply Reply
 Posted: September-21-2010 at 10:43pm Posted: September-21-2010 at 10:43pm |
|
|
I also had a terrible time of the bilgekote drying. I thought the product applied great and very good coverage. But it seemed to take forever to dry. I mentioned it in my thread but no one jumped in so I figured it was operator error or a bad batch of paint. It helped getting out in the sun and heat but also had debris dried in the paint.I think I still have some tacky spots. Wish I would of went with the tint in the epoxy. Monty
|
||
 |
||
Post Reply 
|
Page <1 1516171819 31> |
|
Tweet
|
| Forum Jump | Forum Permissions  You cannot post new topics in this forum You cannot reply to topics in this forum You cannot delete your posts in this forum You cannot edit your posts in this forum You cannot create polls in this forum You cannot vote in polls in this forum |