 Boats For Sale:


83 SN restore in Idaho |
Post Reply 
|
Page <12345 6> |
| Author | |
KFD14 
Senior Member 

Joined: September-07-2008 Location: Hailey, Idaho Status: Offline Points: 226 |
 Post Options Post Options
") Thanks(0) Thanks(0)
 Quote Reply Quote Reply
 Posted: May-09-2010 at 4:40am Posted: May-09-2010 at 4:40am |
|
Thanks BKH - After a long winter it's nice to be making some progress on it again.
Just wondering if those layers are going to be sufficent. Defaulting to the experts here for their advice. |
|
 |
|
|
8122pbrainard
Grand Poobah 

Joined: September-14-2006 Location: Three Lakes Wi. Status: Offline Points: 41045 |
Post Options
Thanks(0)
Quote Reply
Posted: May-09-2010 at 9:12am |
|
I don't feel you need to double up except around the engine on the mains a couple feet forward and aft.
|
|
|
|
|
KFD14
Senior Member
Joined: September-07-2008 Location: Hailey, Idaho Status: Offline Points: 226 |
Post Options
Thanks(0)
Quote Reply
Posted: May-09-2010 at 1:56pm |
|
Ya Pete. That's what I was thinking also. I'm guessing that the biaxial adds a lot of strength also. Will probably lay it up along the sides then cap them off with another layer of biax, on the mains any way. I think that the secondaries will be fine with the current layup. Especially after I build the floor. I am planning on taking that layup all the way from the floor down the side of the secondary to the hull, should be plenty of strength there.
|
|
|
|
|
KFD14
Senior Member
Joined: September-07-2008 Location: Hailey, Idaho Status: Offline Points: 226 |
Post Options
Thanks(0)
Quote Reply
Posted: May-09-2010 at 5:53pm |
|
So I am planning on ordering the rest of my glass tommorrow. I am planning on foaming and then rebuilding the floor with glass, playwood under the front seats - like original.
I was thinking that the way to go is biaxial sandwiching matt. Do I have the right idea or is it a layer of matt with two layers of biax on top? Is this enough or do I need to do more layers? Do I even need the matt or can I go with two or three layers of biax? Thoughts... |
|
|
|
|
bkhallpass
Grand Poobah

Joined: March-29-2005 Location: United States Status: Offline Points: 4723 |
Post Options
Thanks(0)
Quote Reply
Posted: May-09-2010 at 7:08pm |
|
Problem is, you can't find epoxy mat. No one is making it. I'm told that regular mat is difficult to work with in epoxy as it falls apart. The mat is easier to shape around the stringers on the first layer, make the turns, avoid air bubbles, etc.
After talking with Joe in NY, and TRBenj, I am planning to do the first layer of floor, over the stringers, with a layer of 10 oz cloth. Hopefully, I can get a nice fit. Than I plan to do a couple of layers of Biax to build up thickness. These guys seemed to think that would be enough. BKH |
|
|
Livin' the Dream
|
|
|
|
|
KFD14
Senior Member
Joined: September-07-2008 Location: Hailey, Idaho Status: Offline Points: 226 |
Post Options
Thanks(0)
Quote Reply
Posted: May-09-2010 at 7:26pm |
|
Got ya, I didn't catch that the matt at US composites was not compatable with epoxy resin, Thanks.
|
|
|
|
|
bkhallpass
Grand Poobah
Joined: March-29-2005 Location: United States Status: Offline Points: 4723 |
Post Options
Thanks(0)
Quote Reply
Posted: May-09-2010 at 8:09pm |
|
Hey Seth, I don't know if the mat is compatible. I am a relative neophyte with fiberglass, and I have not personally tried the mat with epoxy. It may work. I don't know.
What I do know is the in the past one could get mat for epoxy resin. It was stitched together, I'm told the stitching made it better to work with in epoxy. When I talked to US composite, they confirmed they can't get epoxy mat from anyone. They also suggested that regular mat could be hard to work with in epoxy. They steered me toward biaxial. If I had some mat, I'd probably try it on some test pieces and see how it works. In the little fiberglass work I have done in the past, I liked mat on the first layer and the last layer. As I said, it forms up more easily on the first layer, and it leaves a smooter surface than does cloth on the last layer. BKH |
|
|
Livin' the Dream
|
|
|
|
|
79TiqueRebuild
Senior Member
Joined: January-21-2009 Location: Kansas City, Mo Status: Offline Points: 238 |
Post Options
Thanks(0)
Quote Reply
Posted: May-09-2010 at 10:21pm |
|
I got my mat from fiberglasssite
It went down good horizontal for the floor but not much fun for bends. Everything else came from us composites. Monty |
|
|
|
|
KFD14
Senior Member
Joined: September-07-2008 Location: Hailey, Idaho Status: Offline Points: 226 |
Post Options
Thanks(0)
Quote Reply
Posted: August-27-2010 at 2:19am |
|
I've finally made some progress...slow progress...but it is progress.


I haven't decided if I need to put two layers of biaxial on the mains. They currently have a layer running up the sides then a cap that runs down to the intersection of the hull. That gives them two layers on the sides but only one layer bonding to the hull. Any thoughts, I know Pete said earlier that I should do two especially in the area of the motor mount. Is that the prevailing opinion? Thanks, Seth |
|
|
|
|
WakeSlayer
Grand Poobah

Joined: March-15-2006 Location: United States Status: Offline Points: 2138 |
Post Options
Thanks(0)
Quote Reply
Posted: August-27-2010 at 3:15pm |
|
I put a second complete cap down and onto the hull from well before the motor to well behind it. Bulletproof. I assume you ran layers of tape under that, too?
|
|
|
Mike N
1968 Mustang |
|
|
|
|
KFD14
Senior Member
Joined: September-07-2008 Location: Hailey, Idaho Status: Offline Points: 226 |
Post Options
Thanks(0)
Quote Reply
Posted: August-27-2010 at 5:00pm |
|
Mike, Ya - it's layered 2", 4"x2, 8"x2, biaxial up the sides, biaxial cap over top. I layed a wide layer of biaxial as the first layer and I would have to go really wide for a second layer to have any contact with the hull. I might have layed that first layer to wide. This is why I question the second layer. Everthing feels super bomber now, but I also don't want to f#@& anything up and have it all blow apart under a hard acceleration. Oh and two layers of matt between hull and stringers.
|
|
|
|
|
Keeganino
Grand Poobah

Joined: October-27-2009 Location: North Carolina Status: Offline Points: 2063 |
Post Options
Thanks(0)
Quote Reply
Posted: August-27-2010 at 5:30pm |
|
I double capped my mains with biaxial from the pylon back to about 6 inches past the tranny mount. So far so good. Your getting to the fun part- looks great!
|
|
|
"working on these old boats may not be cost effective but as it shows its what it brings into your life that matters" -Roger
1973 Skier |
|
|
|
|
bkhallpass
Grand Poobah
Joined: March-29-2005 Location: United States Status: Offline Points: 4723 |
Post Options
Thanks(0)
Quote Reply
Posted: August-27-2010 at 10:01pm |
|
I only use 2,4,8 and capped with two layers of cloth. Obviously the boat is not back together yet, but those stringers are darned solid. BKH
|
|
|
Livin' the Dream
|
|
|
|
|
bkhallpass
Grand Poobah
Joined: March-29-2005 Location: United States Status: Offline Points: 4723 |
Post Options
Thanks(0)
Quote Reply
Posted: August-27-2010 at 10:05pm |
|
P.S. Interesting, your secondary assembly is different than mine. Wonder if they change the stringers slightly from 82 to 83. On mine, there was no inside stringer at the secondary in the section beside the motor box. Like you, I put a piece in anyway, but I made it even with the secondary by the muffler section. It appears you set yours in farther. Might be a good idea as mine has only about 1/2 inch clearance on each side for the motor box to sit. BKH
|
|
|
Livin' the Dream
|
|
|
|
|
KFD14
Senior Member
Joined: September-07-2008 Location: Hailey, Idaho Status: Offline Points: 226 |
Post Options
Thanks(0)
Quote Reply
Posted: August-27-2010 at 11:59pm |
|
I think the original build up was the same. I found that to be an area of significant deteriation when I pulled it apart. Plus I wasn't sure I could or wanted to re-create the build the factory did. In my lay up that area is actually open to the bildge with a drain. I don't think much water will get there but at least noe there is a way out. I made it as close as I could to the mains so there would be plenty of support for the motor box.
I also couldn't believe how much more solid my stingers felt after the first layer or biax. Like I said before they seem bomb proof. |
|
|
|
|
KFD14
Senior Member
Joined: September-07-2008 Location: Hailey, Idaho Status: Offline Points: 226 |
Post Options
Thanks(0)
Quote Reply
Posted: September-02-2010 at 3:05am |
|
Well I started the second layer of Biax on the mains. While waiting for some resin to cure I started cleaning up the battery box and cooler box. I realized I'm going to need to put a layer of glass on these as well. There are at least two places where they have worn small holes in the glass - that won't be water tight :) I am planning on using the bilge cote to paint them when done. THant way they will match the new bilge.
Question- the battery box has a large "port" style opening that used to go through the bulkhead. At first look I thought it was a vent but its not. Is this necessary? What was it intended for? If I don't need it I'm going to glass over the opening and do away with it. It's the largest round hole in the upper part of the box in the following photos. 
Guess I meant the middle part of the box 

|
|
|
|
|
TRBenj
Grand Poobah

Joined: June-29-2005 Location: NWCT Status: Offline Points: 21169 |
Post Options
Thanks(0)
Quote Reply
Posted: September-02-2010 at 11:17am |
|
Very interesting. Joe's '83 battery box (which I am using in our BFN) had the same exact port in it. It looked a little hokey, so I figured it had been added later. I have no idea what its purpose would have been- the cavity the box sat in should have been filled with foam, so there wouldnt have been anything to access. Maybe it was utilized when the boat was being assembled?
I removed the port and glassed the hole shut... then cut a new one at the opposite end of the box and reinstalled it. Im using it as a drain access point, since that will be the lowest point of the hull (we are not refoaming). While youre reworking the box, give some thought to the other openings. We chose to go bigger on the battery cable conduit (3") to make it easier to get the cables and terminals through. We also couldnt come up with a battery box drain concept that I liked, so we ended up plugging that hole as well. |
|
|
|
|
C-Bass
Platinum Member 

Joined: November-18-2008 Location: Columbus, IN Status: Offline Points: 1248 |
Post Options
Thanks(0)
Quote Reply
Posted: September-02-2010 at 11:40am |
|
+1 on making the cable hole bigger. I'm not doing a rebuild, but I just installed some 2/0 cable a month ago and it was a major PIA to get both cables thru that hole. It eventually happened, but it wasn't easy.
As a side note...on our stock battery box...where does that drain lead to??? I've noticed it having about an inch of water in the bottom before and didn't know why this wouldn't have drained back to the bilge, as it was mostly dry. I'm sure I'm due for a rebuild of the floor stringers, etc... but won't start on that till winter of 2011. Is there something that would help this in the meantime? |
|
|
|
|
gun-driver
Grand Poobah
Joined: July-18-2008 Location: Pittsburgh, Pa Status: Offline Points: 4127 |
Post Options
Thanks(0)
Quote Reply
Posted: September-02-2010 at 11:52am |
|
Did your boat have an access port behind the battery box in the floor? My '85 had a port behind the box in the floor. The bulk head was right behind the battery box so there was no foam aft of there.
I assume it was to allow access to the vent hose's and/or the bottom pylon bolt. Maybe that's what it is for?? After looking at your demo pictures on the first page, it's definitely to allow access to the bottom of the pylon area. 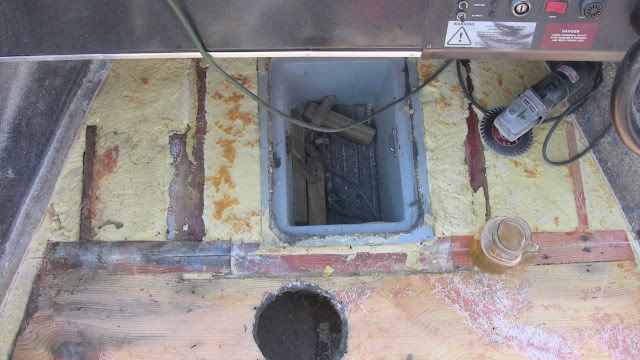
|
|
|
|
|
KFD14
Senior Member
Joined: September-07-2008 Location: Hailey, Idaho Status: Offline Points: 226 |
Post Options
Thanks(0)
Quote Reply
Posted: September-02-2010 at 1:25pm |
|
My 2001 had the cooler option. As you can see in these photos the battery box, closest to the bulkhead, has that port built right into the bulkhead.


I'm not sure that it's for access as you could access everything from in front of the engine. Would have been much more difficult to access from the battery box than to just open the engine cover. ???? |
|
|
|
|
KFD14
Senior Member
Joined: September-07-2008 Location: Hailey, Idaho Status: Offline Points: 226 |
Post Options
Thanks(0)
Quote Reply
Posted: July-28-2011 at 4:26am |
|
Well it's been a while since I have updated this, really just started to make some progress again. So for any one that might have been interested here is an update. As you can see in the following photos I have finished pouring the foam and shaping it. I have dry fitted the front floor sections, I decided to use wood all the way forward. I don't really have a reason but it seems like it's going to work well. I have a little touch up to do and I need to CPES the wood for the floor but I should be laying the glass on the floor in a day or two. Time to pick out the carpet color !


|
|
|
|
|
bkhallpass
Grand Poobah
Joined: March-29-2005 Location: United States Status: Offline Points: 4723 |
Post Options
Thanks(0)
Quote Reply
Posted: July-28-2011 at 6:19am |
|
Hey, it's the only guy on the site with a rebuild as slow as mine. However, you've taken a decided lead over me at this point. Looking good. BKH
|
|
|
Livin' the Dream
|
|
|
|
|
8122pbrainard
Grand Poobah
Joined: September-14-2006 Location: Three Lakes Wi. Status: Offline Points: 41045 |
Post Options
Thanks(0)
Quote Reply
Posted: July-28-2011 at 9:56pm |
|
Seth,
 I hope you're CPES's that ply! Look'n fantastic!!!! I hope you're CPES's that ply! Look'n fantastic!!!!
|
|
|
|
|
KFD14
Senior Member
Joined: September-07-2008 Location: Hailey, Idaho Status: Offline Points: 226 |
Post Options
Thanks(0)
Quote Reply
Posted: July-29-2011 at 12:50am |
|
You know it Pete.
Brian, I told my wife it'd be done by her birthday. That's in June I just haven't specified what year :) I hope to have it on the water in September, any projections on yours?? |
|
|
|
|
dwcar
Platinum Member

Joined: February-11-2007 Location: Houston Texas Status: Offline Points: 1103 |
Post Options
Thanks(0)
Quote Reply
Posted: July-29-2011 at 1:28am |
|
Looks great Seth. Cant wait to see her back on the water!!
|
|
|
83Ski
|
|
|
|
|
bkhallpass
Grand Poobah
Joined: March-29-2005 Location: United States Status: Offline Points: 4723 |
Post Options
Thanks(0)
Quote Reply
Posted: July-29-2011 at 2:37am |
Definitely before my daughter's 16th Birthday (she's 4 now). BKH |
|
|
Livin' the Dream
|
|
|
|
|
KFD14
Senior Member
Joined: September-07-2008 Location: Hailey, Idaho Status: Offline Points: 226 |
Post Options
Thanks(0)
Quote Reply
Posted: July-29-2011 at 2:54am |
 Nice, my son is 3......and she'll be shocked when you finished it early.. Nice, my son is 3......and she'll be shocked when you finished it early.. 
|
|
|
|
|
jlagrow
Newbie 
Joined: December-25-2010 Location: Houston Status: Offline Points: 14 |
Post Options
Thanks(0)
Quote Reply
Posted: July-29-2011 at 2:35pm |
|
Hey Seth, your foam looks great!! What aproach did you use to get it so level? I am getting close to foaming my Southwind. Did you get your foam from US Composite?
John |
|
|
1976 Southwind 20 open
|
|
|
|
|
KFD14
Senior Member
Joined: September-07-2008 Location: Hailey, Idaho Status: Offline Points: 226 |
Post Options
Thanks(0)
Quote Reply
Posted: July-29-2011 at 6:24pm |
|
Hey John, Thanks. I actually bought the foam from two different members of this site. They had bought it and decided latter to go the no foam route - lots of pros and cons to both methods that have been discussed in great detail in other posts. It is the same foam that US Composites sells. I have two small kids and felt that the benefits out weighed the negatives.
I used a similar approach to leveling the foam that most others do. I first poured it then I cut it down with a hand saw. That brought it down to about the level I needed it but the saw being very flexible was a little hard to control, especially at the tip. I then attacked the high areas with an orbital sander. A belt sander would have worked better but I don't own one and my budget for the resto is about shot. So I took a section of 1x6 and stappled a piece of 50grit sandpaper to it. That worked really well. I did most of the rough work by sight then used a straight edge to work out the minute differences. I tried to leave the foam a little higher at the gunnel and slope it towards the bilge. It ended up not being much of a slope, maybe an 1/8" at most. I started the pour at the stern and worked forward. I did the rough cut there before I filled the bow. I used some of the cut offs to supplement the pour in the bow since that area holds the most foam. It took roughly two gallons per side and 1 1/2 gallons in the bow. US Compostes sells it by the pound. I don't remember what the conversion is but it came out to one gallon of each part A and part B per side and 3/4 of each for the front. I'll probably use most of the rest in the air box area and a couple of touch ups I need to do. I found that the trick with the foam was to use small amounts in warm temps, 80 degrees plus. Stir very rapidly for 25 seconds and pour. Make sure that you are ready because there is precious little time to do the pour once mixed. I used a stack of plastic party cups that I bought at the grocery store. They have a little line about an inch up from the bottom and I found I could use them multiple times before the sprung a leak or got to goupy to work with. The foam was kind of fun to work with as long as I had the area totally preped. It felt like the most rapid progression of the resto so far. Just remember that any thing it touches it sticks relentlessly to, skin, hair, clothes, side of the boat...you get the picture. Hope this helps. Oh ya I used the 2lb foam, I can't believe how solid it feels. Good luck. |
|
|
|
|
KRoundy
Platinum Member

Joined: August-23-2010 Location: Lake Stevens Status: Offline Points: 1702 |
Post Options
Thanks(0)
Quote Reply
Posted: July-29-2011 at 9:12pm |
|
Wow. You do great work.
|
|
|
Previous: 1993 Electric Blue/Charcoal Ski Nautique
Current: 2016 Ski Nautique 200 Open Bow |
|
|
|
|
Post Reply
|
Page <12345 6> |
 Tweet
Tweet
|
| Forum Jump | Forum Permissions You cannot post new topics in this forum You cannot reply to topics in this forum You cannot delete your posts in this forum You cannot edit your posts in this forum You cannot create polls in this forum You cannot vote in polls in this forum |


 Topic Options
 KFD14 wrote: