 Boats For Sale:


85 2001 LVL Stringer Project |
Post Reply 
|
Page <1 89101112 13> |
| Author | ||||||
skyway2k 
Senior Member 

Joined: June-24-2010 Location: Lake Gage, IN Status: Offline Points: 130 |
 Post Options Post Options
") Thanks(0) Thanks(0)
 Quote Reply Quote Reply
 Posted: June-25-2012 at 11:53pm Posted: June-25-2012 at 11:53pm |
|||||
|
Exciting!!! Great work! The boat looks spectacular!

|
||||||
 |
||||||
|
SNobsessed
Grand Poobah 
Joined: October-21-2007 Location: IA Status: Offline Points: 7102 |
Post Options
Thanks(0)
Quote Reply
Posted: June-26-2012 at 1:48am |
|||||
|
Kris - Very nice touches on your project, one for the books. You get more done in 1 weekend than I could do in a month. You must have a trampoline to bounce yourself into the boat!

|
||||||
|
“Beer is proof that God loves us and wants us to be happy.”
Ben Franklin |
||||||
|
||||||
|
newguy1986
Senior Member

Joined: April-08-2011 Location: Houston Status: Offline Points: 226 |
Post Options
Thanks(0)
Quote Reply
Posted: June-26-2012 at 11:25am |
|||||
|
Man... thats a lot of work for one weekend! great job and your boat looks awesome!! this will be a great go by...
I wanna see this thing... haha |
||||||
|
1986sn 2001
|
||||||
|
||||||
|
Big Pappa
Senior Member

Joined: March-08-2006 Location: United States Status: Offline Points: 322 |
Post Options
Thanks(0)
Quote Reply
Posted: June-27-2012 at 1:42pm |
|||||
|
Thanks everyone, it is starting to come together. I put in close to 30 hours on the boat from Friday afternoon to Sunday afternoon. Lots of work but I am that much closer to making waves.

|
||||||
|
||||||
|
Big Pappa
Senior Member
Joined: March-08-2006 Location: United States Status: Offline Points: 322 |
Post Options
Thanks(0)
Quote Reply
Posted: June-27-2012 at 2:10pm |
|||||
|
I was not able to work on the boat Monday afternoon, wife had a softball game so I had to watch the kids. Some people and their priorities I tell you!!
 One good thing is my Humminbird 650 came in on Monday as did my Nautique Trailer Guide pads and shock tube.  Yesterday I had to do some running around to pick up some stuff like 8awg wire to run some new grounds to the front and rear of the boat and a new positive to the front. By suggestion I am also running a new ignition wire. I could not find a purple wire to run it with so I bought some green and will just have to label it. I picked up some new fenders and fender line, a handle for using on the battery box lid, battery hold down strap, bus for ground (That I now do not think I will need) and the materials below for building a raw water Tee for running my boat on the hose at the house. This is everything apart so you can see the parts.  The valve is a full opening 3/4" ball valve so it should not restrict water flow.  Here it is all put together.  Also last night I cleaned up my strainer and strainer mount so they are ready to go back in the boat along with the new Tee. I also ran my bilge pump hose, on another note I think I am going to have to scuff up a place in my bilge for the bilge pump to mount. I hot glued it down Saturday with super strength hot glue and it pulled up yesterday. I will try scuffing a few places and see if that holds. Then I went to the back of the boat and went to work with the buffer. I wanted to get this done before I stated mounting everything back there to make it easier and so I did not get compound all over all the new stuff. The previous owner had some repairs done on the port rear after a jet ski hit the boat at his dock. The damage was not all that bad from what I could see when I had the floor up. (I made sure to inspect this area good and added some fiberglass inside to reinforce just in case.) But anyway after the repairs the maroon stripe was repainted and so was some of the white on the bottom. This is the only thing I do not like about the boat. Well that, the lack of storage space and only rated for 6 people, but that is neither here nor there.  The thing with the paint is that it is chipping off on the back pretty bad on the port where things were mounted. It is under the swim deck so it is not that big of a deal but it aggrivates my OCD a little. The thing with the paint is that it is chipping off on the back pretty bad on the port where things were mounted. It is under the swim deck so it is not that big of a deal but it aggrivates my OCD a little.  
|
||||||
|
||||||
|
63 Skier
Grand Poobah

Joined: October-06-2006 Location: Concord, NH Status: Offline Points: 4269 |
Post Options
Thanks(0)
Quote Reply
Posted: July-02-2012 at 1:15am |
|||||
|
Hey Kris, on your raw water fittings, don't you want a female hose end on your tee, not a male? Seems like you'll be connecting to the male end of the hose. I'm putting one in mine shortly so was thinking about it.
|
||||||
|
'63 American Skier - '98 Sport Nautique
|
||||||
|
||||||
|
Big Pappa
Senior Member
Joined: March-08-2006 Location: United States Status: Offline Points: 322 |
Post Options
Thanks(0)
Quote Reply
Posted: July-02-2012 at 7:01pm |
|||||
I am going to have to make an adapter hose with a female on both ends. I wanted the male end on the boat so I could put on a cap with the seal as an extra line of defense so that it is sealed and hopefully keep the air leaks to a minimum. |
||||||
|
||||||
|
Big Pappa
Senior Member
Joined: March-08-2006 Location: United States Status: Offline Points: 322 |
Post Options
Thanks(0)
Quote Reply
Posted: July-03-2012 at 1:28pm |
|||||
|
I do not have a whole lot to update you all with right now. The wife had a yard sale this weekend and I had to help with that. The hottest weekend of the year (over 100 degrees all weekend) and the wife decides to have a yard sale!!
  After being in the heat all day I was just too wore out to do much on the boat.  I did get out Sunday and get a little bit done. It mostly was dealing with one of the exhaust manifolds. When I was pulling the boat apart one of the riser bolts seized and snapped the head off. I had about 1/2" of bolt sticking out so I soaked it in penetrating oil then tried a bolt extractor. The first go round I just successfully removed the threads and outside metal of the bolt. I then went down a size applied heat to the manifold and broke the bolt again. Now I did not have enough bolt for a bolt extractor to bite. I did try a pair of vise grips with no avail. Next it was time to drill the bolt and try a screw extractor. I broke the extractor. I drilled the hole a little larger and tried again. Broke the extractor again.  I drilled the hole larger and stepped up to the largest extractor that I could get in the bolt without getting in the threads. It would not budge. I even tried some stuff from CRC called Freeze off. It us supposed to "Freeze the rust and help the penetrating oil get in the bolt. It did not do much for me in this application. After that I gave up. Yesterday I went and bought a Helicoil in the correct size and drilled out the hole and installed the new threads. It was not my first choice of things to do but I did not have much other choice here. After today I am off for the remainder of the week. I will not be working on the boat tomorrow, but Thursday - Sunday the name of the game is get the boat running and as close to ready to go to the lake as possible!! I have 1 manifold and both risers to blast and paint. 1 muffler to repair or replace, then it is putting everything back together, hooking things up and getting it running. After that it is just throwing new parts at the boat and building seat bases. Woo Hoo!! 
|
||||||
|
||||||
|
63 Skier
Grand Poobah
Joined: October-06-2006 Location: Concord, NH Status: Offline Points: 4269 |
Post Options
Thanks(0)
Quote Reply
Posted: July-03-2012 at 5:05pm |
|||||
|
That's going to be pretty amazing when you get done, I hope you get to spash it next week. I can't wait for some on-water pictures.
Understood on the hose fitting, easy enough to keep a short adapter hose handy. On my last install I used female hose fitting with ball valve like you, but put a decent quality hose valve into the female fitting so it acted as a 2nd valve. Not quite as foolproof as a cap, but 2 valves is pretty close. |
||||||
|
'63 American Skier - '98 Sport Nautique
|
||||||
|
||||||
|
Jllogan
Platinum Member 

Joined: May-18-2011 Location: canton, OH Status: Offline Points: 1728 |
Post Options
Thanks(0)
Quote Reply
Posted: July-03-2012 at 5:13pm |
|||||
This is exactly what i have done as well. Thought the cap was important to ensure a tight system. Im sure over time that ball valve can get weak/not seal so great. I bought a shorter 10 foot hose and added an extra female end. |
||||||
|
||||||
|
63 Skier
Grand Poobah
Joined: October-06-2006 Location: Concord, NH Status: Offline Points: 4269 |
Post Options
Thanks(0)
Quote Reply
Posted: July-03-2012 at 5:32pm |
|||||
Ball valves will likely outlast the boat, but it's pretty easy to hit the handle or even just bouncing moving it a bit and then you've got an air leak. On my jet boat the ball valve opened and in that case it's the opposite, the water line is pressurized by the jet, so I noticed the bilge pump was on and went looking, found a pretty solid stream of water emptying into the bilge! That's the last time I left it un-capped. |
||||||
|
'63 American Skier - '98 Sport Nautique
|
||||||
|
||||||
|
Big Pappa
Senior Member
Joined: March-08-2006 Location: United States Status: Offline Points: 322 |
Post Options
Thanks(0)
Quote Reply
Posted: July-09-2012 at 3:46pm |
|||||
|
Wow so I have been a busy bee working on the boat all day every day from the 5th through yesterday. I did not take may pictures as I went, mainly because I did not take the time to do it.
I did take a few last night though of several places so I will post those up and let you all know what has been done in each picture. I will start with the rear of the boat. (Small Note as of this point this one thread has used all of my image space allowed here on the site. )Items installed: Swim Deck Brackets. I decided to use through bolts on all the bracket bolts but the 2 outer bottom bolts that I can not get to because it is under the floor. These were installed with 4200 and are rock solid!! Exhaust Through hull. Mounted with 4200 Transom Tie Down loops. Mounted with 4200 Transom Ski Ring. Mounted with 4200 and a 1/4" Aluminum Backing plate Rear Lift ring Prop Lapped to prop shaft then installed with new cotter pin Rudder port mounted with 4200 Rudder installed but not safety wired yet. New speedo hose ran from tubes mounted on transom to where new pitots will be installed. |
||||||
|
||||||
|
Big Pappa
Senior Member
Joined: March-08-2006 Location: United States Status: Offline Points: 322 |
Post Options
Thanks(0)
Quote Reply
Posted: July-09-2012 at 4:29pm |
|||||
|
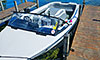
Next we move inside the boat to the rear.
 The gas tank is just sat in there right now. I wanted to run it this weekend. More on that later. The tank was cleaned on the outside. New tank strips was made from 1X4s coated in cpes then rubber strips were contact cemented and stapled on with SS Staples. Steering cable mount was drilled. I was worried about this because I did not have an exact dimension on where I overdrilled and filled with epoxy for this to mount. I looked through a bunch of pictures from when I did this though and made an educated guess. No wood shavings when I drilled so I am saying my thank yous!!! Steering cable installed. I cleaned all the old grease from the steering wheel end and coated in a new layer of marine grease. I also cleaned the bottom tube inside and out on the steering wheel where the excess cable goes. You can see the installed rudder port. I installed the 2 speedo tubes, with 4200 on the screws, on the wood right under the lift ring. I repaired the starboard muffler by putting 2 rounds of cloth around the ends. There were a couple of places where it was separating, probably would not have leaked but I wanted to make sure. Once repaired I gave both mufflers a fresh coat of paint and wrapped them in some new carpet and installed them in the boat. |
||||||
|
||||||
|
Big Pappa
Senior Member
Joined: March-08-2006 Location: United States Status: Offline Points: 322 |
Post Options
Thanks(0)
Quote Reply
Posted: July-09-2012 at 4:36pm |
|||||
|
Here is a look at my hose hookup.
 I do not have my hose clamps on the hookup yet, I know. I placed it after the strainer with the thought that when I turn the water on it will back flow out the raw water inlet filling the strainer creating enough of a blockage that the impeller can prime itself. That is my thought we will see how well it works.You can also see my new 1/0 AWG positive battery cable ans starter cable here. I also blasted and painted the bracket that the starter solenoid and other electronics mount to. |
||||||
|
||||||
|
Gary S
Grand Poobah

Joined: November-30-2006 Location: Illinois Status: Offline Points: 14096 |
Post Options
Thanks(0)
Quote Reply
Posted: July-09-2012 at 4:52pm |
|||||
|
Looking great!
|
||||||
|
||||||
|
Big Pappa
Senior Member
Joined: March-08-2006 Location: United States Status: Offline Points: 322 |
Post Options
Thanks(0)
Quote Reply
Posted: July-09-2012 at 4:55pm |
|||||
|
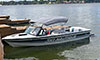
And here is a look at the engine and front of the boat.
 Lets start with the engine is now aligned with the prop shaft, log and strut. I had the strut aligned with the log before I installed the engine. I had the stuffing box installed when I first tried to align the engine and got it pretty close and thought I wonder where the shaft is in the log? I am glad I checked because it was way low. So I pulled the stuffing box up to the top of the shaft next to the coupling, then did the alignment again getting the shaft in the center of the log. FYI ... It was much easier to align the engine for me when I could watch the shaft in the log. Ran all of my hoses from the Raw water inlet to the impeller to water pump to exhaust manifolds. Some were new hoses some were old hoses in good condition that were cleaned up. Installed hose hookup. Installed new impeller installed belts installed and hooked up alternator painted alternator Installed all the engine electrical. Ran my new 1/0 awg battery, ground and starter cables. Sandblasted, painted and installed exhaust manifolds and risers. I chased all the threads in the heads and manifolds, installed with new gaskets and hardware with some anti seize. No more broken bolts for me!! cleaned and Installed exhaust hoses and mufflers Installed throttle and transmission cables Installed throttle and transmission control cleaned and hooked up dash wiring Hooked up battery and found out that it is no longer good and needs to be replaced. Installed coolant pieces up front with a new thermostat Cut carpet to go on top of air box. I store things up there often so I thought I would add a little carpet since I had it. |
||||||
|
||||||
|
TRBenj
Grand Poobah

Joined: June-29-2005 Location: NWCT Status: Offline Points: 21169 |
Post Options
Thanks(0)
Quote Reply
Posted: July-09-2012 at 5:09pm |
|||||
|
Hopefully you aligned the engine to where the shaft spun freely (regardless of whether it was centered in the log or not)?
Make sure you point that water tee towards the top... it would be a PITA to connect to the hose with it pointed down like that once the motorbox is installed. Im not sure that the strainer will fit neatly under the motorbox the way you have your hoses run... CC would have put that first hose from the pick up under the tranny and up over the top by coming through between the tranny mount and bellhousing on the starboard side. Are those 2 mufflers different lengths, or did you stagger them lengthwise on purpose? Just curious. Make sure you get that throttle cable away from the coupler before you engage the transmission Looking good! |
||||||
|
||||||
|
Big Pappa
Senior Member
Joined: March-08-2006 Location: United States Status: Offline Points: 322 |
Post Options
Thanks(0)
Quote Reply
Posted: July-09-2012 at 5:11pm |
|||||
|
Finally after all this work I pulled it out of the garage yesterday afternoon at about 7:00 to fire it up. After figuring out that my boat battery was toast I was not going to let that hold me back so I yanked the battery out of my truck and threw that in the boat.
Turning over was a little slow at first, which I expected after it has been sitting for 4 years. (The engine was fogged and filled with anti freeze after the last time I ran it and I turned it over every so often with a wrench over the years. She loosened up and was turning pretty good after a few turns of the key. After 4 or 5 tries with no even trying to fire even with starting fluid I checked and no fire. I pulled the distributor cap and it had some corrosion in it so I cleaned those contact points and the rotor. After that I have a little fire but it is more of a orange fire vs a good blue fire. At this point it was way past dark, so I decided to call defeat and try again later. So I am going to pick up a new battery today and dig into the ignition system to figure out what is going on with that. The plugs, wires, coil, cap and rotor all only have about 20 hours on them. Granted that was 4 years ago. Any Ideas of what to look for? No points it was converted before I owned the boat so not sure how old that is. What is the ignition resistor? Mine is hooked up but it looks old and was rusty on the connection. I pulled the wires and cleaned them and the post but not even sure what it does. I would also note that this ran like a top when I pulled the motor. 1 turn of the key and it fired every time. Hot, cold, ran yesterday, ran 3 weeks ago it did not matter. around 780 hours on the ticker. |
||||||
|
||||||
|
Jllogan
Platinum Member
Joined: May-18-2011 Location: canton, OH Status: Offline Points: 1728 |
Post Options
Thanks(0)
Quote Reply
Posted: July-09-2012 at 5:27pm |
|||||
|
Those electronic modules are known to go bad. Maybe you should put the points back in.
|
||||||
|
||||||
|
Big Pappa
Senior Member
Joined: March-08-2006 Location: United States Status: Offline Points: 322 |
Post Options
Thanks(0)
Quote Reply
Posted: July-09-2012 at 5:29pm |
|||||
Yes when I aligned my strut I made sure that the center of the log was where the shaft spun freely.
Good point
I do not have the strainer mounted yet. Once It is mounted the hose should be a lot closer to the engine. I will keep a watch on this and will change it if I need to. I have some extra hose so I can do that pretty easily. I did it this way just to keep the routing easy for me.
Yes they are different lengths. Previous owner must have replaced one at some point.
Yes it will mount to the starboard stringer as I get closer to getting finished and I start mounting the wiring.
Thanks!!
|
||||||
|
||||||
|
TRBenj
Grand Poobah
Joined: June-29-2005 Location: NWCT Status: Offline Points: 21169 |
Post Options
Thanks(0)
Quote Reply
Posted: July-09-2012 at 5:36pm |
|||||
|
Neither the strainer nor the control cables need to be hard mounted to anything, FYI- if you can just route them a little differently, they will stay where theyre supposed to. Be especially careful on the control cables... dont introduce any tighter bends than you absolutely have to. Just the slightest extra bit of bending will cause them to be less than smooth at the control.
|
||||||
|
||||||
|
Big Pappa
Senior Member
Joined: March-08-2006 Location: United States Status: Offline Points: 322 |
Post Options
Thanks(0)
Quote Reply
Posted: July-09-2012 at 5:46pm |
|||||
I say "mounted", I just mean zip tied up out of the way so they are neat and not flopping around. My throttle cable has a place where it sat against the drive shaft for a little bit with the previous owner. Nothing wrong with the cable, it is silky smooth. The sheathing is melted off on one side for about an inch. I just want to prevent that and keep things neat. Saying that made me think, I should put a piece of heat shrink over that to seal it up. |
||||||
|
||||||
|
Big Pappa
Senior Member
Joined: March-08-2006 Location: United States Status: Offline Points: 322 |
Post Options
Thanks(0)
Quote Reply
Posted: July-09-2012 at 5:47pm |
|||||
Would it go bad just sitting? |
||||||
|
||||||
|
TRBenj
Grand Poobah
Joined: June-29-2005 Location: NWCT Status: Offline Points: 21169 |
Post Options
Thanks(0)
Quote Reply
Posted: July-09-2012 at 5:55pm |
|||||
|
Good call on the heatshrink... that may extend the life of the cable a bit. If you want to eliminate the zip ties, you could route the hoses and cables similar to this. Food for thought.
 If you have spark at the plugs, then your EI module is not bad. I would personally skip the starting fluid and just pour a little bit of fresh gas down the throat of the carb. You may need to open the throttle butterflies most of the way to get it to kick after doing this. |
||||||
|
||||||
|
Big Pappa
Senior Member
Joined: March-08-2006 Location: United States Status: Offline Points: 322 |
Post Options
Thanks(0)
Quote Reply
Posted: July-09-2012 at 6:10pm |
|||||
I like that routing I will try that when I get home after putting on some heat shrink on the throttle cable. I tried some gas directly down the carb. I did not hold the throttle wide open though. |
||||||
|
||||||
|
Big Pappa
Senior Member
Joined: March-08-2006 Location: United States Status: Offline Points: 322 |
Post Options
Thanks(0)
Quote Reply
Posted: July-09-2012 at 6:15pm |
|||||
|
I also forgot to mention that I put in the fuel line and fuel/ water separator with a new filter in it. Do I need to fill this up with gas to get things primed and the fuel pump pulling gas?
How much gas do I need in the tank for the pickup to grab fuel? I put about 4 gallons in because it 1. is what I had and 2. I need to pull the tank back forward to finish a few things and did not want to have to deal with a heavy tank. |
||||||
|
||||||
|
TRBenj
Grand Poobah
Joined: June-29-2005 Location: NWCT Status: Offline Points: 21169 |
Post Options
Thanks(0)
Quote Reply
Posted: July-09-2012 at 6:21pm |
|||||
|
4 gallons in the tank should be plenty. If the fuel/water separator had been pre-filled, that would speed the process along (as opposed to making the fuel pump fill it up) but its not required. If you can get the engine to kick by itself by pouring some gas down the throat, then that will fill it pretty fast. It will probably take a few times.
|
||||||
|
||||||
|
Big Pappa
Senior Member
Joined: March-08-2006 Location: United States Status: Offline Points: 322 |
Post Options
Thanks(0)
Quote Reply
Posted: July-13-2012 at 2:37pm |
|||||
|
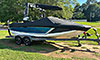
I have still been chugging away at the boat. Mainly working to get the boat running which it finally did yesterday!! Woo Hoo!!!I will back up a bit and list what has been done.
I started with replacing the battery, after doing some research I decided to go with a Dihard Platinum battery in a group 65 size. From my research this is just a rebranded Odyssey battery. I can tell you that this battery spins the motor effortlessly. I did not charge it at all and it spun the motor while I was working on getting spark all week without loosing any power. Tuesday my coil started puking oil (only 20 hours on the coil) so I went out and picked up a new MSD coil.  After going through and cleaning up all the grounds on the boat that I could find I was still not getting spark. Then on the suggestion of SNobsessed I checked the air gap between trigger wheel "teeth" (high point of trigger wheel) and the face of the sensor (pick up) of the EI. This was way off I reset it to 0.009" and she fired up. I did not have the belt on the Raw Water Pump here and only ran it for a minute then shut it down. I will hook it up to a hose this weekend and let it run for a while.Video Of Boat Starting One thing I did notice after letting the boat run for a minute was the carb was leaking from the metal plugs on top of both the front and rear bowls. I will have to figure out a way to seal these up before running any more. A few other things that I have been working on. Thanks to Tim's suggestion I cleaned up my throttle cable and shrink wrapped the place where the sheathing on the cable had been damaged. I also re routed the cable so it runs in front of the rear engine mount. I like it much better here because it is up out of the way and has no chance of rubbing on the drive shaft again. I have not changed the orientation of my water hose connection though.  Yesterday after celebrating the engine finally running I pulled the tank out and started routing the wires and speedo hoses so I can install the gas tank for good.  The only thing I have left to do back here is safety wire the rudder bolts. Do I need to wait until I have the packing adjusted before I wire these up, or can I do it now? |
||||||
|
||||||
|
storm34
Grand Poobah

Joined: November-03-2008 Location: Dexter Iowa Status: Offline Points: 4492 |
Post Options
Thanks(0)
Quote Reply
Posted: July-13-2012 at 3:01pm |
|||||
|
Nice work!
|
||||||
|
||||||
|
MI-nick
Gold Member

Joined: January-12-2009 Location: Ypsilanti, MI Status: Offline Points: 810 |
Post Options
Thanks(0)
Quote Reply
Posted: July-13-2012 at 3:34pm |
|||||
i had the same issue this summer. i rebuilt the carb over the winter and it sat dry until spring. first time i fired it up in april, it was leaking out those plugs. after sitting for a night with the bowls full, it didn't leak in the morning...and still no leaks. hopefully you have the same luck. |
||||||
|
As far as I can tell, I'm not quite sure...
|
||||||
|
||||||
|
Post Reply
|
Page <1 89101112 13> |
 Tweet
Tweet
|
| Forum Jump | Forum Permissions You cannot post new topics in this forum You cannot reply to topics in this forum You cannot delete your posts in this forum You cannot edit your posts in this forum You cannot create polls in this forum You cannot vote in polls in this forum |


 Topic Options
 63 Skier wrote: