 Boats For Sale:


1986 BFN Rebuild |
Post Reply 
|
Page 123> |
| Author | |
storm34 
Grand Poobah 

Joined: November-03-2008 Location: Dexter Iowa Status: Offline Points: 4496 |
 Post Options Post Options
") Thanks(0) Thanks(0)
 Quote Reply Quote Reply
 Topic: 1986 BFN Rebuild Topic: 1986 BFN RebuildPosted: Yesterday at 10:58pm |
What carpet?
 |
|
 |
|
|
Kristof
Grand Poobah

Joined: October-08-2007 Location: Bree, Belgium Status: Offline Points: 3412 |
Post Options
Thanks(0)
Quote Reply
Posted: Yesterday at 7:05am |
|
Hey Lenny,
Carpet looks the part on that boat. Nice! She is coming along nicely. Looking forward to water pitcures coming season
 |
|
|
|
|
LennyBoat
Groupie 
Joined: May-22-2023 Location: Belgium Status: Offline Points: 58 |
Post Options
Thanks(0)
Quote Reply
Posted: April-17-2025 at 3:24am |
|
Thank you Andrew and TRB for the explanation!
|
|
|
|
|
andrewmarani
Senior Member 
Joined: May-31-2005 Location: Baltimore, MD Status: Offline Points: 256 |
Post Options
Thanks(0)
Quote Reply
Posted: April-16-2025 at 4:02pm |
|
I expanded the original picture on my computer..., just a touch of radius, an 1/8 or less at a guess. Didn't interfere with my engine placement, would need less than an 1/8" on either side of the cradle to clear it.
|
|
|
Builder
|
|
|
|
|
TRBenj
Grand Poobah

Joined: June-29-2005 Location: NWCT Status: Offline Points: 21210 |
Post Options
Thanks(0)
Quote Reply
Posted: April-15-2025 at 4:23pm |
|
Could be deceiving but looks radiused in that pic.
|
|
|
|
|
andrewmarani
Senior Member
Joined: May-31-2005 Location: Baltimore, MD Status: Offline Points: 256 |
Post Options
Thanks(0)
Quote Reply
Posted: April-15-2025 at 1:13pm |
|
Engine mount has a sharp inside corner. That's the back mount but the front mount has the same sharp inside corner.
 |
|
|
Builder
|
|
|
|
|
TRBenj
Grand Poobah
Joined: June-29-2005 Location: NWCT Status: Offline Points: 21210 |
Post Options
Thanks(0)
Quote Reply
Posted: April-15-2025 at 12:32pm |
|
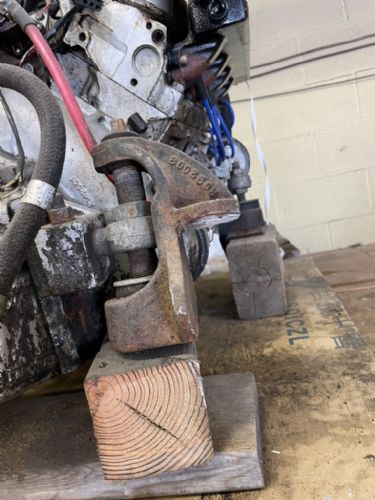
Not uncommon to see some blocks under the front mounts. Boat was designed with both Chevy and ford engines in mind. Notch in stringer below the mount is to get the nuts on the backside of the through bolts. It’s common for there to be a small gap on the vertical face, it’s not critical. Obviously the tabbed cradle boats (89+ SN) don’t require any vertical support. Can’t recall if that angle on the underside of the mount is sharp or radiused, might not be possible to get the mount all the way in on a piece of sharp angled aluminum like they could on the radiused stringers (cradle-less) boats.
|
|
|
|
|
LennyBoat
Groupie
Joined: May-22-2023 Location: Belgium Status: Offline Points: 58 |
Post Options
Thanks(0)
Quote Reply
Posted: April-15-2025 at 11:45am |
|
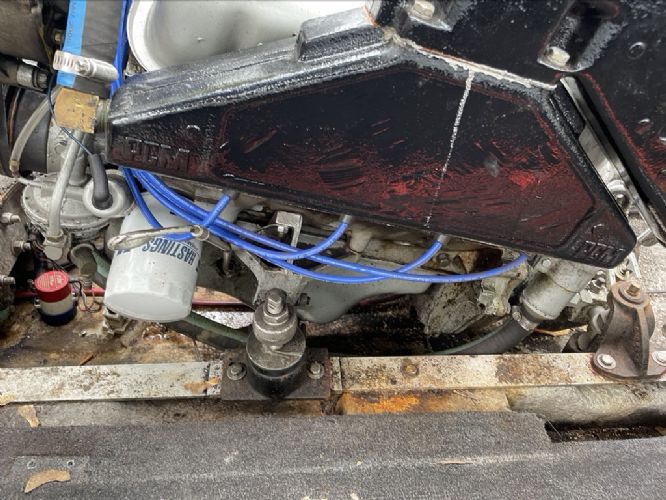
Thanks Andrew, your boat certainly is looking a lot better now! I did some digging in the photos that were made when this boat was disassembled. (2005) Found this:  First picture showing the engine mounting plates on top of each other. Can anyone confirm this is how its supodsed to be on a 1986 BFN?  Second image showing the transmission mounts, only attached on the top and no bolts on the side. there's quite the gap between the cradle and the mount. Not sure that's the way it's supposed to be... |
|
|
|
|
andrewmarani
Senior Member
Joined: May-31-2005 Location: Baltimore, MD Status: Offline Points: 256 |
Post Options
Thanks(0)
Quote Reply
Posted: April-14-2025 at 9:24am |
|
Looking at pictures of my 86 silver nautique engine, I only had two engine support blocks and they went under the front two engine mounts, on top of the aluminum cradle. Picture is BEFORE the rebuild, everything is much prettier now.
 |
|
|
Builder
|
|
|
|
|
LennyBoat
Groupie
Joined: May-22-2023 Location: Belgium Status: Offline Points: 58 |
Post Options
Thanks(0)
Quote Reply
Posted: April-14-2025 at 9:02am |
|
Update:
We found carpet with a correct price and neutral color. Originally we wanted to go with teak like carpet, but quite happy on how the grey turned out.    Last picture also gives a good look on the footrest, it's a bit narrow, but it will do fine I believe. (we could always add a piece to it, if necessary. Attached the gearbox to the engine, and dropped it into the cradle.   So now come the questions  -Attaching the belhousing to the engine. I sorted the screws in a separate bag for the belhousing, but these don't seem to match... I have 2 bolts (the longest ones) that fit nicely in the bottom hole, on each side of the housing. (marked in RED below) I'm guessing these are the 2"3/4 ones. above those holes you have the "guide holes" and on top of these you have the Holes for the studs I believe? (GREEN) For the top 2 holes (YELLOW), the blowapart states that I need 2x 1"1/4 bolt. Which are not in the bag. The reason I'm confused is because the bolts I do have in the bag are too long but one has a painted head and the other one doesn't, this would make sense because one of the bolts is installed inside of the bellhousing (under the starter), so it wouldn't be painted over during the painting process) So either I'm loosing my mind or the machine shop took the bolts out of the bags and switched them up by accident...  -Engine support blocks I have 4 Engine support blocks, is it possible that there are 2 that go under the engine mount pad and 2 that are placed on the inner side of the transmission mount? Or maybe one on top of the cradle and one beneath it? |
|
|
|
|
andrewmarani
Senior Member
Joined: May-31-2005 Location: Baltimore, MD Status: Offline Points: 256 |
Post Options
Thanks(0)
Quote Reply
Posted: March-05-2025 at 1:58pm |
|
I installed the carpet before the engine was back in. Made fitting the carpet to the boat shape much, much easier.
Link below is to the section of my rebuild where the carpet started going in. I managed to install it as one piece, turned the floor carpet right up the sides with no cutting. Only had one spot on each side that ended up with a fold and that was up just at the dash so not visible. A fiberglass mat roller or some type of roughly 6" wide hand roller is a must for getting the bubbles out of the carpet. Type and amount of carpet and glue I used is noted in one of the posts. Not sure if that going help you in the EU.
|
|
|
Builder
|
|
|
|
|
LennyBoat
Groupie
Joined: May-22-2023 Location: Belgium Status: Offline Points: 58 |
Post Options
Thanks(0)
Quote Reply
Posted: March-05-2025 at 1:23pm |
|
Quick question:
Would you install the engine & trans before or after installing the carpet? Also, if anyone from the EU has some info on shops where we can find carpet, i'm all ears. We can find some, but its either very expensive or very little choice. |
|
|
|
|
LennyBoat
Groupie
Joined: May-22-2023 Location: Belgium Status: Offline Points: 58 |
Post Options
Thanks(0)
Quote Reply
Posted: March-05-2025 at 1:14pm |
|
The workspace was supposed to become a bedroom for the newborn child of one of the co-owners, but yeah, priorities
 |
|
|
|
|
Kristof
Grand Poobah
Joined: October-08-2007 Location: Bree, Belgium Status: Offline Points: 3412 |
Post Options
Thanks(0)
Quote Reply
Posted: February-28-2025 at 5:18am |
Next up: new camshaft... A few horses right there.
|
|
|
|
|
63 Skier
Grand Poobah

Joined: October-06-2006 Location: Concord, NH Status: Offline Points: 4293 |
Post Options
Thanks(0)
Quote Reply
Posted: February-26-2025 at 9:09am |
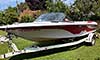
If someone can find the owner of that red boat they need to tell them to add more power to it, looks like it only is pulling a dozen people ... Nice looking work space!
|
|
|
'63 American Skier - '98 Sport Nautique
|
|
|
|
|
Kristof
Grand Poobah
Joined: October-08-2007 Location: Bree, Belgium Status: Offline Points: 3412 |
Post Options
Thanks(0)
Quote Reply
Posted: February-26-2025 at 7:37am |
|
Just curious about that red boat...
|
|
|
|
|
MrMcD
Grand Poobah

Joined: January-28-2014 Location: Folsom, CA Status: Offline Points: 3778 |
Post Options
Thanks(0)
Quote Reply
Posted: February-25-2025 at 9:30pm |
|
Big Project, keep up the good work.
|
|
|
|
|
Timr71
Groupie
Joined: March-28-2016 Location: Alabama Status: Offline Points: 82 |
Post Options
Thanks(0)
Quote Reply
Posted: February-25-2025 at 5:02pm |
|
Looking good! Can't wait to see it on the water this year!
|
|
|
|
|
LennyBoat
Groupie
Joined: May-22-2023 Location: Belgium Status: Offline Points: 58 |
Post Options
Thanks(0)
Quote Reply
Posted: February-25-2025 at 10:57am |
|
Hello all,
Time for an update. With the summer coming up last year it was difficult to find the time and motivation to continue working on the boat. After the two blower screws went through the hull, we went and enjoyed the good weather, and spent some time on the water with our I/O. Also had the chance to see a certain red boat in action, which some of you might recognize  Due to work trips and vacation, we didn't really manage to start back up. Now, a few months before summer begins we realized once again that we need to finish this boat ASAP. So over the last week we painted the engine block and put it back together, installed the steering, horn and throttle control, also finished up the floor boards. We're waiting on some parts for the engine (fuel pump and some gaskets), for the fuel tank, etc etc. I'll update soon with pictures and , probably, a ton of questions.  Cheers, Lenny |
|
|
|
|
LennyBoat
Groupie
Joined: May-22-2023 Location: Belgium Status: Offline Points: 58 |
Post Options
Thanks(0)
Quote Reply
Posted: July-15-2024 at 11:16am |
|
Had a slight setback this weekend when installing the new blower.  Oops...
|
|
|
|
|
LennyBoat
Groupie
Joined: May-22-2023 Location: Belgium Status: Offline Points: 58 |
Post Options
Thanks(0)
Quote Reply
Posted: July-12-2024 at 11:49am |
Will do!
|
|
|
|
|
LennyBoat
Groupie
Joined: May-22-2023 Location: Belgium Status: Offline Points: 58 |
Post Options
Thanks(0)
Quote Reply
Posted: July-12-2024 at 11:47am |
|
Well, well, well, Look at that, 3 replies in under 10 minutes... Looks like we're not the only ones beeing motivated by the calendar girls
|
|
|
|
|
KENO
Grand Poobah
Joined: June-06-2004 Location: United States Status: Offline Points: 11250 |
Post Options
Thanks(0)
Quote Reply
Posted: July-12-2024 at 9:36am |
|
Pylon looks good, seat has some stains on it though  
|
|
|
|
|
63 Skier
Grand Poobah
Joined: October-06-2006 Location: Concord, NH Status: Offline Points: 4293 |
Post Options
Thanks(0)
Quote Reply
Posted: July-12-2024 at 9:29am |
Lenny never noticed they had calendar dates on them before. That is looking fantastic! When you get on the water, be sure to post some pictures of the local areas. I love seeing the scenery from different parts of the world.
|
|
|
'63 American Skier - '98 Sport Nautique
|
|
|
|
|
fanofccfan
Platinum Member 

Joined: December-13-2009 Location: North Bend NE Status: Offline Points: 1797 |
Post Options
Thanks(0)
Quote Reply
Posted: July-12-2024 at 8:28am |
|
The boat looks great! You must stay busy enough to need 3 wall hanging calendars to keep track of things huh?!?!
|
|
|
2004 196 LE Ski 1969 Marauder 19 1978 Ski
|
|
|
|
|
LennyBoat
Groupie
Joined: May-22-2023 Location: Belgium Status: Offline Points: 58 |
Post Options
Thanks(0)
Quote Reply
Posted: July-12-2024 at 4:00am |
|
I think I'm due a small update: Everything coming together nicely. hoping to source carpet somewhere next week. Engine should be finished soon as well. Quite excited about the progress   |
|
|
|
|
LennyBoat
Groupie
Joined: May-22-2023 Location: Belgium Status: Offline Points: 58 |
Post Options
Thanks(0)
Quote Reply
Posted: June-21-2024 at 9:12am |
|
Are you kidding me, I have been looking on this forum for over a year now, and I never encountered (or always looked over) that thread. 30 pages of quality work, pictures and explanation about a BFN rebuild... damn Anyways, better late than never! Looks like I got some reading to do over the weekend! Thanks for the sugestion and pointing me towards this thread. I think the mount on the strut will be the solution.
|
|
|
|
|
KENO
Grand Poobah
Joined: June-06-2004 Location: United States Status: Offline Points: 11250 |
Post Options
Thanks(0)
Quote Reply
Posted: June-21-2024 at 8:18am |
|
Lenny
Here's a picture from TRB's BFN rebuild thread A hunk of angle aluminum or stainless steel bolted to the strut mounting bolts with the clamp block bolted it. Lots of boats were built with that setup. Fairly close to indestructible mounting and easy too 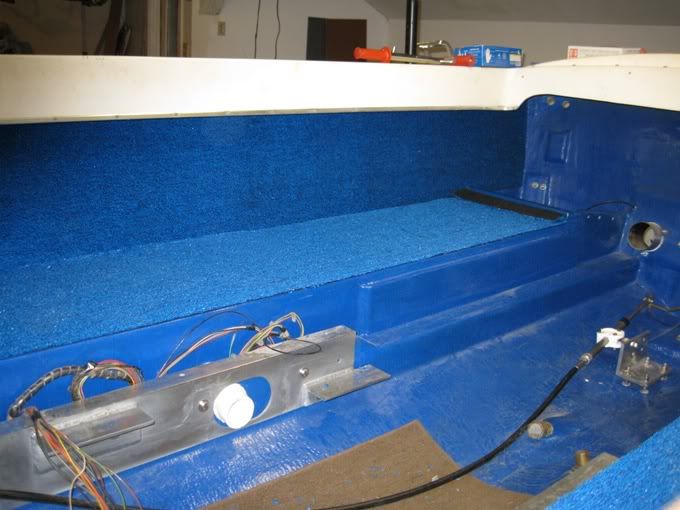 |
|
|
|
|
LennyBoat
Groupie
Joined: May-22-2023 Location: Belgium Status: Offline Points: 58 |
Post Options
Thanks(0)
Quote Reply
Posted: June-21-2024 at 4:06am |
|
Hi all,
I was thinking something alike, fabricate a stainless plate and weld a shortened bolt to it. and attach it to the stringer. I'm just curious how much force is on the rudder cable when turning under high load/speed. The original bolt size seems to suggest its quite a lot, however, i'm thinking it's a bit overkill? |
|
|
|
|
andrewmarani
Senior Member
Joined: May-31-2005 Location: Baltimore, MD Status: Offline Points: 256 |
Post Options
Thanks(0)
Quote Reply
Posted: June-20-2024 at 1:59pm |
|
Looking over your pictures, I think you're ok. What I'm calling the primary stringer, where the bracket gets fastened, is that lower stringer in your pictures. the one closest to the center of the boat. The outboard taller one is the secondary stringer. You don't fasten to the secondary.
You have to get slightly creative. Instead of bolting into the side of your low primary stringer, you would make a small stainless bracket with a hole in the vertical leg for that bolt with the ball on the end and two holes in the horizontal leg. Lag the new stainless bracket down to the top of your primary stringer through the horizontal leg and hook the "ball bolt" to the vertical leg with a nut on each side of the bracket. Should get the job done. I suppose you could fiberglass the stainless bracket down to the stringer so you don't put holes in your stringer for the lags. Or you could fiberglass in a hump into your low stringer and drill hole in it and put the bolt through as originally installed. Lots of ways to slice this melon! |
|
|
Builder
|
|
|
|
|
Post Reply
|
Page 123> |
 Tweet
Tweet
|
| Forum Jump | Forum Permissions You cannot post new topics in this forum You cannot reply to topics in this forum You cannot delete your posts in this forum You cannot edit your posts in this forum You cannot create polls in this forum You cannot vote in polls in this forum |


 Topic Options
 LennyBoat wrote: