 Boats For Sale:


Stringer Repair 1985 2001 Ski Nautique |
Post Reply 
|
Page <1234 10> |
| Author | |
TRBenj 
Grand Poobah 

Joined: June-29-2005 Location: NWCT Status: Offline Points: 21131 |
 Post Options Post Options
") Thanks(0) Thanks(0)
 Quote Reply Quote Reply
 Posted: March-28-2013 at 2:45pm Posted: March-28-2013 at 2:45pm |
|
Agree with joe but I don't like the more complicated logistics of grinding/new stringer/grinding/new stringer, as I grind outside and glass inside. If you grind and glass in the same spot and can avoid bracing the hull multiple times, you're golden. I won't grind in the garage though, so I measure everything, remove/grind outside, then bring it indoors, brace it and glass.
|
|
 |
|
|
lakedog55
Gold Member 
Joined: November-11-2010 Location: Lake Weir Fl Status: Offline Points: 835 |
Post Options
Thanks(0)
Quote Reply
Posted: March-28-2013 at 7:52pm |
|
Hi,
I did a 86 and used a piece of aluminum across the gunnels and leveled it. Then used the straight edge to measure down. And kinda drew a picture on the aluminum. Luckily the stringers came out good. But always nice to have back up. I think it is very important to measure down. Orginal stringers in my boat were off by almost 1/2 Thanks mike |
|
|
Lakedog55
|
|
|
|
|
iplan
Senior Member 

Joined: April-19-2010 Location: Lake Murry SC Status: Offline Points: 201 |
Post Options
Thanks(0)
Quote Reply
Posted: March-30-2013 at 12:12am |
|
So, I'm mostly done with the tear down process.
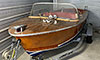
The cavity underneath the batter box was a disaster. It was soaking wet, and covered in some sort of black crud ~~~ I guess it's oil.  In addition to the spots under the battery box, nearly all of the foam was soaking wet, and water was literally standing in many places I removed foam from. I suspect that water is getting in my boat from the bottom side. I went underneath, and took some photos. In one of them, you can see a patch ~~~and a place beside the patch where fiberglass is showing.    There is another spot that is suspect also (even larger, but it was impossible to get a descent picture of. I've got a couple of questions: 1. How do I free up the secondary stringer without cutting the hull out of the back of the boat? It's a tight fit back there.  2. Does anyone have any recommendations as to the best tool to remove the floor underneath the dash (including the air intake box)? 3. I did some grinding in the starboard aft corner to get the rest of the floor up back there. Does anyone have a better idea for the port aft corner? Here's a final picture of my boat in my new boat barn. You can see that there is still some work to do on the barn. 
|
|
|
85 Ski Nautique 2001.
Stringer replacement job completed July 3 2014. Exterior painted June 2015. The Trailer is next. |
|
|
|
|
8122pbrainard
Grand Poobah

Joined: September-14-2006 Location: Three Lakes Wi. Status: Offline Points: 41040 |
Post Options
Thanks(0)
Quote Reply
Posted: March-30-2013 at 7:48am |
|
Jonathan,
You are just going to have to do more cutting, digging and grinding being careful when you see hull glass. A diamond blade in a 4' grinder and a sawsall will get you into the tight places. The stringers when free under the bow will slide forward away from the transom. I recommend removing all the blocking wood on the transom anyway. |
|
|
|
|
iplan
Senior Member
Joined: April-19-2010 Location: Lake Murry SC Status: Offline Points: 201 |
Post Options
Thanks(0)
Quote Reply
Posted: April-01-2013 at 12:04pm |
|
This has been typical for my boat so far. In a post somewhere, I read that the "correct craft employees were a bunch of untrained chimps with axes" ~~~~ I got a chuckle out of it, but now I'm seeing that the statement was closer to the truth.
Here, you'll see "zero" fiberglass protecting the main stringer leading into the the air box underneath the dash.  I was unable to preserve the air intake box. Underneath the box was solid foam, and I had to cut it into about 5 pieces to get it free. Once I get the foam cleaned out, I guess it's time to start grinding the floor and trying to free up stringers. I'm not missing a step am I? |
|
|
85 Ski Nautique 2001.
Stringer replacement job completed July 3 2014. Exterior painted June 2015. The Trailer is next. |
|
|
|
|
iplan
Senior Member
Joined: April-19-2010 Location: Lake Murry SC Status: Offline Points: 201 |
Post Options
Thanks(0)
Quote Reply
Posted: April-01-2013 at 8:22pm |
|
Now that the floor and foam is gone, the Grinding begins (tomorrow).
I've been taking some measurements, but just to be on the safe side could you list the most important (as I would hate to miss one, and something not be "right" on reassembly. 
|
|
|
85 Ski Nautique 2001.
Stringer replacement job completed July 3 2014. Exterior painted June 2015. The Trailer is next. |
|
|
|
|
TRBenj
Grand Poobah
Joined: June-29-2005 Location: NWCT Status: Offline Points: 21131 |
Post Options
Thanks(0)
Quote Reply
Posted: April-01-2013 at 8:30pm |
|
Engine mount location is the most critical. So, stringer height in the cradle area, as well as fore/aft placement is the main thing you need to be concerned with. If youre not removing the pylon cup and can use that as a locating feature when reinstalling, thats a big help.
|
|
|
|
|
8122pbrainard
Grand Poobah
Joined: September-14-2006 Location: Three Lakes Wi. Status: Offline Points: 41040 |
Post Options
Thanks(0)
Quote Reply
Posted: April-01-2013 at 9:15pm |
You've never had the pleasure of restoring one of their wood boats! They did not use axes - they used FINISHING axes! |
|
|
|
|
iplan
Senior Member
Joined: April-19-2010 Location: Lake Murry SC Status: Offline Points: 201 |
Post Options
Thanks(0)
Quote Reply
Posted: April-01-2013 at 11:22pm |
|
I went and measured. I think I'll measure again tomorrow.
While I was out there, the angle grinder started calling my name, and I found myself back in my respirator and hazmat suit. I attacked the tops of the main stringers ~ (aft the engine compartment) for no particular reason. It went fast. I took the gel coat off, and went down to the fiberglass, then stopped. Then I decided to try the bilge. The experience with the bilge didn't work so well because the safety guard was in the way. Then it occurred to me that there might be a difference between an "angle grinder" and a "regular grinder." This is what I have: Ryobi 4.5 inch Angle Grinder"  I read through the manual, and it said, "This grinder will not accept a cutting blade, and should not be used for cutting purposes." Have I bought the wrong tool? |
|
|
85 Ski Nautique 2001.
Stringer replacement job completed July 3 2014. Exterior painted June 2015. The Trailer is next. |
|
|
|
|
SNobsessed
Grand Poobah
Joined: October-21-2007 Location: IA Status: Offline Points: 7102 |
Post Options
Thanks(0)
Quote Reply
Posted: April-01-2013 at 11:29pm |
|
The manual was approved by the legal dept.
If you do use it with a reinforced abrasive blade, don't stand in the plane of rotation. Also make sure it is rated for the RPM. Not that I am suggesting using that! |
|
|
“Beer is proof that God loves us and wants us to be happy.”
Ben Franklin |
|
|
|
|
cphase
Gold Member

Joined: May-11-2010 Location: Newnan, GA Status: Offline Points: 795 |
Post Options
Thanks(0)
Quote Reply
Posted: April-01-2013 at 11:40pm |
|
The guard is to keep the manual from getting caught in it.
|
|
|
|
|
8122pbrainard
Grand Poobah
Joined: September-14-2006 Location: Three Lakes Wi. Status: Offline Points: 41040 |
Post Options
Thanks(0)
Quote Reply
Posted: April-02-2013 at 6:58am |
|
I agree that the manual was written for OSHA. Get the diamond blade in it and remove the guard.
|
|
|
|
|
Hollywood
Moderator Group

Joined: February-04-2004 Location: Twin Lakes, WI Status: Offline Points: 13512 |
Post Options
Thanks(0)
Quote Reply
Posted: April-02-2013 at 12:39pm |
|
Woah, I definitely do NOT suggest removing the guard. I cannot believe anyone here would suggest doing that, especially Pete. If its truly in the way (it shouldnt be) find different tool.
|
|
|
|
|
iplan
Senior Member
Joined: April-19-2010 Location: Lake Murry SC Status: Offline Points: 201 |
Post Options
Thanks(0)
Quote Reply
Posted: April-03-2013 at 7:32pm |
|
Okay! I'm grinding the gelcoat in the bilge ~ I found a grinding blade that fits, and did not require me to take the guard off.
Grinding IS dusty. My shop vac went on strike after just a few hours, so I had to get a replacement. The store graciously comp'd the replacement (as it was only a couple days old). Question: How deep do you go? Basically I'm removing the gelcoat, until everything is that flesh color. BTW, that color kind of reminds me of a venison tenderloin ~ I think I have located 2 repairs (at the drain plug and where the prop shaft exits the boat). There were "box" shaped patches around each of these areas. They were not covered in gelcoat, but some sort of paint. Further, when I got down to the fiberglass where the prop shaft exits, I think I found a "crack" running through the glass ~~~~~ I hope I'm mistaken, but I wasn't quite sure because of all of the dust. I'll go and vacuum and check it again. Then I'll post a picture for your inspection. Best, J |
|
|
85 Ski Nautique 2001.
Stringer replacement job completed July 3 2014. Exterior painted June 2015. The Trailer is next. |
|
|
|
|
8122pbrainard
Grand Poobah
Joined: September-14-2006 Location: Three Lakes Wi. Status: Offline Points: 41040 |
Post Options
Thanks(0)
Quote Reply
Posted: April-03-2013 at 8:59pm |
|
Grind down until you just hit some glass.
Pictures would be great of the area you think were repaired. Cheap shop vacs from the hardware or home centers are not meant to be run for long times. They do NOT have a 100% duty cycle. |
|
|
|
|
SNobsessed
Grand Poobah
Joined: October-21-2007 Location: IA Status: Offline Points: 7102 |
Post Options
Thanks(0)
Quote Reply
Posted: April-03-2013 at 9:24pm |
|
Jonathan - I ran into some very fine cracks around the strut mounting area - I found them because I was wiping the area out with mineral spirits (Paint thinner). The solvent wicked into the cracks & made them stand out.
|
|
|
“Beer is proof that God loves us and wants us to be happy.”
Ben Franklin |
|
|
|
|
Gary S
Grand Poobah

Joined: November-30-2006 Location: Illinois Status: Offline Points: 14096 |
Post Options
Thanks(0)
Quote Reply
Posted: April-03-2013 at 9:35pm |
It might not be a problem with duty cycle,it might just be eating all that glass dust that did it in. I had a cheap one years ago my wife won in a sales contest.It had a metal bottom, made alot of noise and I hated it. I even took the filters out,ran a hose out the window and used it to "pump" drywall dust outside when I was done sanding.Then when I got my blast cabinet I used it on that for awhile.I finally just thru it out.I think when Vondy did his boat he used one of these. |
|
|
|
|
8122pbrainard
Grand Poobah
Joined: September-14-2006 Location: Three Lakes Wi. Status: Offline Points: 41040 |
Post Options
Thanks(1)
Quote Reply
Posted: April-03-2013 at 10:13pm |
|
Gary,
Last month we finished epoxy painting about 100,000 sq. ft. of floor at the new plant. Part of the process involved degreasing/cleaning and an acid etch. It was all vacuumed up so we tested out a few  shop vacs. Some were lasting less than one day. One brand was Shop Vac and we finally heard direct from them that they do not have the duty cycle for continuous use. We finally ended up after I'd say 15 cheap vacs a Milwaukee for about $800.00!!! shop vacs. Some were lasting less than one day. One brand was Shop Vac and we finally heard direct from them that they do not have the duty cycle for continuous use. We finally ended up after I'd say 15 cheap vacs a Milwaukee for about $800.00!!!BTW, my old vac that sits on top of the metal bucket on wheels is still running!
|
|
|
|
|
iplan
Senior Member
Joined: April-19-2010 Location: Lake Murry SC Status: Offline Points: 201 |
Post Options
Thanks(0)
Quote Reply
Posted: April-04-2013 at 1:10am |
|
Running it too long ~~~~ That's probably what messed my vac up ~~~ it ran for about 2 hours straight. It was working fine until I turned it off to clean out the filter.....
I read the warranty information of the replacement. It seems that there is a 60 day replacement warranty. Looks like I might be going through a few of them...... Okay, I went back and tried to get a picture of the believed to be damaged & then replaced area. It was very difficult to see in the one area that was still left, so I think it would be better to "describe" it. Around the drain plug, instead of gelcoat, there was some sort of grey paint. The separating line between the gelcoat and the paint was a perfect line, and nearly the exact same color. This was also the case on the through hole for the drive shaft. The area around it was very uneven, and I had to spend a bit of time grinding around there to get the peaks and valleys out of it. Water used to sit back there all the time before. By the way, I was at Bill's Boatworks page, and saw this picture.  I'm most interested in the old stringer. It has writing on it every few inches. It looks like he was measuring something, but I'm not sure what the numbers represent? It might be the distance from the stern, but I'm not sure. As for my progress, I have sanded the bilge from the drain plug to the cross plank tie in of the main stringers. I guess I'm a little over half way done. I went to Jamestown's website with the idea of beginning to build a materials list. Is CPES really $799 for a 10 gallon kit? Holy Cow! What's in it? Rhino Horns, and gold bullion? |
|
|
85 Ski Nautique 2001.
Stringer replacement job completed July 3 2014. Exterior painted June 2015. The Trailer is next. |
|
|
|
|
8122pbrainard
Grand Poobah
Joined: September-14-2006 Location: Three Lakes Wi. Status: Offline Points: 41040 |
Post Options
Thanks(0)
Quote Reply
Posted: April-04-2013 at 9:04am |
|
Jonathan,
What you may be seeing with the "box shaped patches" is a resin bedding used around hull holes. Again, can you post some pictures? Yes, the CPES is expensive but I don't feel you will need 10 gallons. A couple coats on most wood surfaces is fine with several more on the end grain. Keep in mind that you will be using epoxy resin on top of it. Start with a gallon or 2 and I'd say that will do the job. |
|
|
|
|
gun-driver
Grand Poobah
Joined: July-18-2008 Location: Pittsburgh, Pa Status: Offline Points: 4112 |
Post Options
Thanks(0)
Quote Reply
Posted: April-04-2013 at 10:00am |
|
I bought the 2 gallon kit(1 gallon each part) and had plenty left over.
|
|
|
|
|
iplan
Senior Member
Joined: April-19-2010 Location: Lake Murry SC Status: Offline Points: 201 |
Post Options
Thanks(0)
Quote Reply
Posted: April-04-2013 at 10:46am |
Unfortunately, it's too late for pictures, as I grinded out the areas where the patches were. On the positive side, the fiberglass looks the same underneath, so I guess it's all good. As to my materials list, I am thankful I will not be needing the 10 gallon kit! |
|
|
85 Ski Nautique 2001.
Stringer replacement job completed July 3 2014. Exterior painted June 2015. The Trailer is next. |
|
|
|
|
TRBenj
Grand Poobah
Joined: June-29-2005 Location: NWCT Status: Offline Points: 21131 |
Post Options
Thanks(0)
Quote Reply
Posted: April-04-2013 at 11:45am |
|
You also have the option to make some home brew CPES. Its basically a glorified epoxy resin with some solvents in it to thin it out for better absorption. When the solvents flash off, youre left with just the epoxy. I cant see spending way more for CPES since theyre just taking epoxy resin and diluting it with cheaper, commonly available solvents. Theres a link on here somewhere on the best materials and ratios... I believe xylene was the preferred solvent.
|
|
|
|
|
iplan
Senior Member
Joined: April-19-2010 Location: Lake Murry SC Status: Offline Points: 201 |
Post Options
Thanks(0)
Quote Reply
Posted: April-04-2013 at 3:46pm |
Yes, I found that link last night, and was reading all about it. That was going to be my plan of action if I needed 10 - 12 gallons, but if I only need 2 gallons ~ it doesn't seem as quite as bad by comparison (still $174 for 2 gallons though). I'm certainly going to give it some consideration. |
|
|
85 Ski Nautique 2001.
Stringer replacement job completed July 3 2014. Exterior painted June 2015. The Trailer is next. |
|
|
|
|
iplan
Senior Member
Joined: April-19-2010 Location: Lake Murry SC Status: Offline Points: 201 |
Post Options
Thanks(0)
Quote Reply
Posted: April-04-2013 at 6:53pm |
|
Today = Massive Fail!
Home Depot ` bought a different type of grinding wheel, it was terrible. So I spent 25 on the wheel, can't take it back, and need to go back to Home Depot to get the right kind, and spend more money. As an alternative progression, I figured I would remove the cables attached to the throttle control, and the electrical harness. Fail also. I saw the cotter pin, removed it, but could not free the cable. No idea what is connecting the push/pull knob (that puts it in or takes it out of gear)..... So I put the cotter pin back in, and move on. I decided to take measurements. Went and got my notebook to discover that it got rained on..... found a dry sheet. Drew a picture, and took measurements of the starboard side. Figured I was screwing it up, so I took a nap. Two hours later, I decided I didn't really need measurements to remove a secondary stringer. The easiest one to get out is the Driver's side ~ but it is the most corroded. Also there is no floor tab on that side (because the floor was completely separated from the hull on that side ~ except for the back 18 inches or so). So I figured the port side secondary stringer was the way to go.... Of course it's "buried in deeper than an Alabama Tick" (anyone pick up on the Predator reference?), and I have no idea how to start trying to remove it ~~~~so sat in the empty hull for another hour, vacuumed (I've discovered it's my default activity when I am lost). took a few pictures and came inside to vent on the thread. The only positive I can discern for today: I did buy some plastic to keep the dust contained around the boat. I stapled it in place with my staple gun. So far, it is holding. Pictures: I was in fact able to get two shots of the suspected patch   Here is some strange fiberglass in between the secondary stringers and the sidewall. There are several places like this. You can literally pull on the fibers.  I have come to the conclusion that I have no idea how to proceed once I finish sanding the gelcoat off the bilge. Best, J |
|
|
85 Ski Nautique 2001.
Stringer replacement job completed July 3 2014. Exterior painted June 2015. The Trailer is next. |
|
|
|
|
TX Foilhead
Grand Poobah

Joined: February-01-2009 Location: Kingsland TX Status: Offline Points: 2076 |
Post Options
Thanks(0)
Quote Reply
Posted: April-05-2013 at 10:42am |
|
I hate those nights, but they happen. It's hard to figure out what your doing when you've never done it before. This place is great for advice, but this is hands on stuff and you have to do it to really understand it. Don't forget that you learn from mistakes, chalk it up as a learning experience and try again this weekend.
|
|
|
|
|
TRBenj
Grand Poobah
Joined: June-29-2005 Location: NWCT Status: Offline Points: 21131 |
Post Options
Thanks(0)
Quote Reply
Posted: April-05-2013 at 10:57am |
|
The pylon receptacle and the hull log have been covered in gray gel rather than splattered like the rest of the bilge on several boats I've torn down. I believe what you're seeing is normal.
Get the pylon out, cradle out and pull all your cables and wire harnesses before going any further. |
|
|
|
|
gun-driver
Grand Poobah
Joined: July-18-2008 Location: Pittsburgh, Pa Status: Offline Points: 4112 |
Post Options
Thanks(0)
Quote Reply
Posted: April-05-2013 at 11:29am |
|
Tim beat me to it as I was typing.
The way I would proceed if I were you and I just did an '85 a couple years ago is... First get everything out of the way, disconnect the steering cable and remove. The shift cables will flex enough to put out over the bow. Unplug the wiring harness from behind the dash and remove. Remove the ski pole and engine cradle.(keep cradle close as you will be putting it in and out 1,000 times as reference as you progress along) Now what I did is removed "ONE" side at a time that way you can use the existing stringers to level and measure from. To cut out the stringers, take your grinder with the masonry diamond blade and cut the fiberglass coating along the bottom about a 1/4" above the floor on both sides. Then cut the fiberglass off the top of stringer. I was able to then take a pry-bar to strip the glass off the wet wood leaving just the wood stringer.Now with that exposed you can work at removing the wood. Here's a pic of mine with one side removed 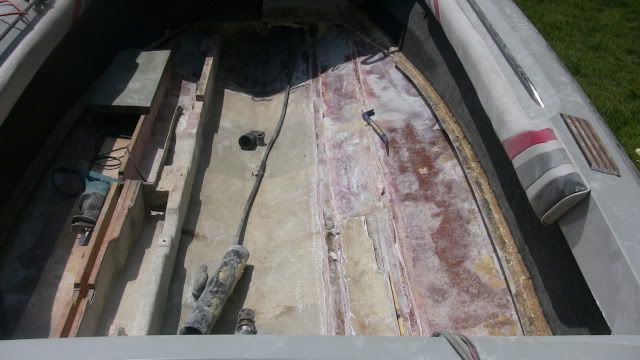 Here is one side in and I used the old the original grooves to bed in the new stringers. 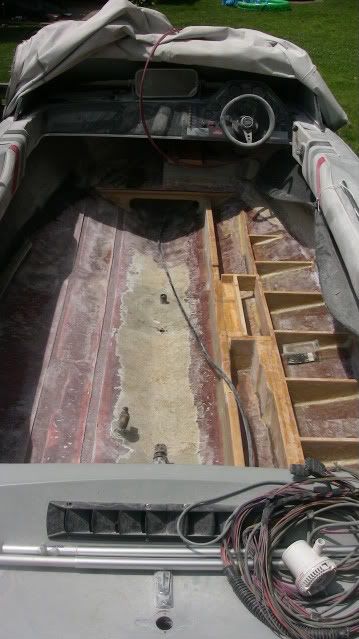 |
|
|
|
|
iplan
Senior Member
Joined: April-19-2010 Location: Lake Murry SC Status: Offline Points: 201 |
Post Options
Thanks(0)
Quote Reply
Posted: April-05-2013 at 1:40pm |
TX ~ Thanks for the encouragement. Yesterday was just a bad day all around.... it was about 50 degrees and raining to boot. Today it is sunny, so I'm more optimistic, and will press on. |
|
|
85 Ski Nautique 2001.
Stringer replacement job completed July 3 2014. Exterior painted June 2015. The Trailer is next. |
|
|
|
|
iplan
Senior Member
Joined: April-19-2010 Location: Lake Murry SC Status: Offline Points: 201 |
Post Options
Thanks(0)
Quote Reply
Posted: April-05-2013 at 1:46pm |
|
@ TRBenj & gun-driver
Now I've got a plan of attack ~ thank you! Also to gun-driver ~ Did you come back in with foam on your 85 ~~~ From the supports between the secondary and outside wall I think the answer is no. If so, this is also the route I want to go. |
|
|
85 Ski Nautique 2001.
Stringer replacement job completed July 3 2014. Exterior painted June 2015. The Trailer is next. |
|
|
|
|
Post Reply
|
Page <1234 10> |
 Tweet
Tweet
|
| Forum Jump | Forum Permissions You cannot post new topics in this forum You cannot reply to topics in this forum You cannot delete your posts in this forum You cannot edit your posts in this forum You cannot create polls in this forum You cannot vote in polls in this forum |


 Topic Options
 iplan wrote: