 Boats For Sale:


76 Ski Tique Floor/Stringer Replacement |
Post Reply 
|
Page <12 |
| Author | |||
8122pbrainard 
Grand Poobah 

Joined: September-14-2006 Location: Three Lakes Wi. Status: Offline Points: 41045 |
 Post Options Post Options
") Thanks(0) Thanks(0)
 Quote Reply Quote Reply
 Posted: January-07-2009 at 4:58pm Posted: January-07-2009 at 4:58pm |
||
There's no easy way to bond the old glass to the new wood. Thickened epoxy and lots of clamps is about the only way. I feel it would be more trouble that what it's worth to save it. |
|||
 |
|||
|
JDiggs
Groupie 
Joined: November-06-2008 Status: Offline Points: 51 |
Post Options
Thanks(0)
Quote Reply
Posted: January-07-2009 at 6:26pm |
||
|
After thinking about it, once I get the new stringer cut to fit, there is no reason to keep it. Im just going to keep it for reference until Im ready to bond the new stringer in.
|
|||
|
|||
|
critter
Platinum Member 

Joined: January-11-2008 Location: New Hill, NC Status: Offline Points: 1227 |
Post Options
Thanks(0)
Quote Reply
Posted: January-07-2009 at 7:23pm |
||
That is exactly what I did with mine. Allowed me to verify location and fit. Then I cut it out and completed the install. |
|||
|
1980 Ski Nautique
1966 Barracuda |
|||
|
|||
|
JDiggs
Groupie
Joined: November-06-2008 Status: Offline Points: 51 |
Post Options
Thanks(0)
Quote Reply
Posted: January-08-2009 at 4:07am |
||
|
Tool of choice:
4 1/2" Grinder w/ diamond blade to cut fiberglass. Worth the 60 dollars 6" hand drywall saw to cut foam 18" wide crow bar to remove foam Haven't run into a real PIA situation with these, yet.. 
Couple of questions here. Can the stringers be removed and replaced without removing any of the foam where it turns vertical? How far do the stringers extend into the vertical section? thanks |
|||
|
|||
|
8122pbrainard
Grand Poobah
Joined: September-14-2006 Location: Three Lakes Wi. Status: Offline Points: 41045 |
Post Options
Thanks(0)
Quote Reply
Posted: January-08-2009 at 7:46am |
||
Keep going past the toe board. They don't go very far past it but the key is to get all the old wood out. You don't want to take a chance of leaving any rot in the hull or leave a spot for water to get in buy scabbing in old to new. You need to keep in mind that the stringers are a complete continuous system. |
|||
|
|||
|
JDiggs
Groupie
Joined: November-06-2008 Status: Offline Points: 51 |
Post Options
Thanks(0)
Quote Reply
Posted: January-09-2009 at 1:47pm |
||
|
Thanks Pete.
Gonna remove as little as possible to get the stringers out. How do you replace it; by pouring expandable foam and shaping it? As far as the intake vents go, I've started removing the foam between the stringers in front of the battery box, the intake hoses are not coming out in one piece, they are tearing, etc. I don't want remove all that foam in the toe board section to get them all the way out. Is there a good way to replace these hoses from the toe plate to the bulkhead (right word?)at the bilge? I have seen some people use PVC pipes in this area. Would sticking the ends of the hoses into a single PVC pipe be sufficient? Much easier to make a new bulkhead with 2 holes rather than 4. Thanks for all the help |
|||
|
|||
|
TRBenj
Grand Poobah

Joined: June-29-2005 Location: NWCT Status: Offline Points: 21169 |
Post Options
Thanks(0)
Quote Reply
Posted: January-09-2009 at 2:11pm |
||
|
Jeremy, the stringers only go 3-4" past the kick plate. Dig the entire thing out. I highly suggest replacing the entire vent hoses with something more durable that wont leak- like PVC. If you dont want to replace all the foam, just take out whats necessary to get them out. I found it easier to replace the entire thing, though. I shaped the kickplate with the pourable foam- it took several small pours and some grinding afterwards for it to look right.
|
|||
|
|||
|
JDiggs
Groupie
Joined: November-06-2008 Status: Offline Points: 51 |
Post Options
Thanks(0)
Quote Reply
Posted: January-12-2009 at 3:55pm |
||
|
Got the other main stringer out this weekend. I was able to get it out by removing the top and one side of the stringer fiberglass. I pryed the stringer up out of the bed. It came out in three pieces, but 3 full pieces. Although I wanted it to come out in one whole piece for a perfect template, Im satisfied with what I have. I can also take exact measurements from the bottom of the stringer bed to the top of the existing fiberglass as well.
The stringer wood in the toe plate is a seperate piece. I will remove the bad wood in this section, but not sure what I will put back in there; if it's not connected, I don't see the structural significance of a block of wood in the toe plate. I removed the foam under the floor from the bulkhead to the toe plate. I may try to use this area for storage. Anybody got any thoughts on it? I'll include some pics soon. |
|||
|
|||
|
TRBenj
Grand Poobah
Joined: June-29-2005 Location: NWCT Status: Offline Points: 21169 |
Post Options
Thanks(0)
Quote Reply
Posted: January-12-2009 at 4:17pm |
||
I agree. I suspect that the wood in the kick plate was more for aiding the production process of adding the foam rather than being structural. I didnt add mine back in. There is a bit of space in that front compartment- but depending on how you route your vent hoses/pipes and place the battery, theres not that much room left for storage. If you figure out something good, let me know- Ive got another 16 footer to re-do this spring! 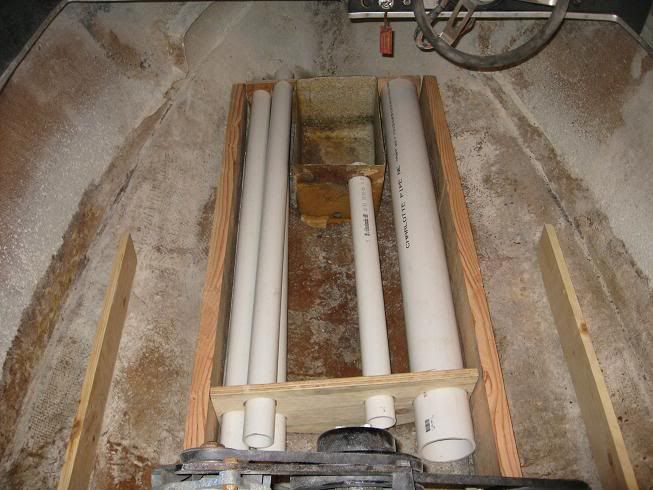
|
|||
|
|||
|
JDiggs
Groupie
Joined: November-06-2008 Status: Offline Points: 51 |
Post Options
Thanks(0)
Quote Reply
Posted: January-13-2009 at 1:27am |
||
|
Thanks Tim

Hard to see in the pic, but I don't think our front ends are laid out the same. My battery box is in the bilge in behind the bulkhead (barely see the what's left just behind battery box, note the conduit on the right is pulled back so I could remove the foam in that area). Did you move your bulkhead back? 
Plywood floor outline with battery box location shown. Bulkheaad located where plywood pieces touch. The X area denotes planned storage, I estimate it's at least 16" wide between PVC pipes, 24" front to back, and 18" deep along the keel. That's my plan for now. 
The main stringer on the left has been removed. I still have the fiberglass along the entire length, even left the engine mount pieces attached. My next step is to build the stringer system before removing anything else. I will build test pieces (cause Im not confident in my woodworking ability), get them to fit correctly and then proceed tearing out the rest before putting it back in. 
My current autocad drawing(haven't updated it recently) Im going to get this thing perfect along with elevations for all stringer pieces and plywood floor pieces also for reference here. If any of you can help, feel free to chime in. Thanks again guys |
|||
|
|||
|
critter
Platinum Member
Joined: January-11-2008 Location: New Hill, NC Status: Offline Points: 1227 |
Post Options
Thanks(0)
Quote Reply
Posted: January-13-2009 at 1:35am |
||
|
Wow.. in the drawing, it looks like someone cut the front of your boat off... It will plow like that..
Good detailed drawing. I should have done something like this instead of using the palm of my hand for my drawing. Make sure you have that hull braced from below even with removing 1 stringer at a time. |
|||
|
1980 Ski Nautique
1966 Barracuda |
|||
|
|||
|
79nautique
Grand Poobah

Joined: January-27-2004 Location: United States Status: Offline Points: 7872 |
Post Options
Thanks(0)
Quote Reply
Posted: January-13-2009 at 11:44am |
||
|
you need to rethink your layout. Where you plan your stoarage is the battery box's location as shown in Tim's, if you relocate to the postion you have shown the seats will be right on top of it and you will have no where to bolt them down to the floor unless you plan on screwing in to the battery that is.
And I won't say anything about the drawing. |
|||
|
|||
|
TRBenj
Grand Poobah
Joined: June-29-2005 Location: NWCT Status: Offline Points: 21169 |
Post Options
Thanks(0)
Quote Reply
Posted: January-13-2009 at 12:07pm |
||
Actually Chris, I think his planned location for the battery box is a little closer to where the factory put it than I did. I went with a wider observer seat rather than a bucket, so my seat mounts are wider- I pushed the battery box all the way forward to the foot panel to accomodate this. Unless Im mistaken, I believe the stock battery location on the Tique is directly between the 2 buckets. Im not 100% on this because my floor was removed when I bought the boat. With all the conduit running in that area, Im not sure that a 16"x24" storage area will be possible- but it might be. I would guess it would be closer to 12"x18" though. That would still be a meaningful amount, though- just a small compartment for a fire extinguisher, first aid kit and a few other small things would be much appreciated on these 16 footers. Let me know how yours works out. Any information you can collect and share about the height and shape of the stringers and floor would be better than what we've got now. I say post away! |
|||
|
|||
|
75 Tique
Grand Poobah

Joined: August-12-2004 Location: Seven Lakes, NC Status: Offline Points: 6121 |
Post Options
Thanks(0)
Quote Reply
Posted: January-13-2009 at 12:47pm |
||
That is correct Tim, factory box was right between the seats. A little extra storage up front would be great, especially if the seats are left in the stock configuration, both facing forward, allowing access. My floor space in front of the seats is pretty much worthless because of the the rear facing/wider observer seat. Hard to ram much of anything behind it. My battery box is still accessible with these arrangements. 
|
|||
|
_____________
“So, how was your weekend?” “Well, let me see…sun burn, stiff neck, screwed up back, assorted aches and pains….yup, my weekend was great, thanks for asking.” |
|||
|
|||
|
JDiggs
Groupie
Joined: November-06-2008 Status: Offline Points: 51 |
Post Options
Thanks(0)
Quote Reply
Posted: January-13-2009 at 1:33pm |
||
|
The battery box in my boat is directly between the seats. Im not sure it's going to work for the reasons stated by 79, we'll just have to see when we get there. I just wanted to get some opinions to make sure I wasn't missing any reasons not to do it. ANY storage on this boat is better than the NONE it currently has.
The drawing stops at the kickplate. Although you guys understand what's going on, other people, such as myself who are diving into something like this and don't have the first clue may find it helpful in the future. I read through many of the threads concerning different rebuilds and picked up some knowledge from each of them. As an engineer, I know there is always more than one way to solve a problem. Im going to leave the stock seat in for now. When I bought the boat there was a hole in the floor between the seats to access the battery, a cosole that sat over the hole. Like 75 said, I think it would be kinda difficult to get to frequently, but nice to have nonetheless. |
|||
|
|||
|
JDiggs
Groupie
Joined: November-06-2008 Status: Offline Points: 51 |
Post Options
Thanks(0)
Quote Reply
Posted: January-14-2009 at 3:03am |
||

First draft of main stringer. Bottom drawing superimposed over a 2x8x12. Dimension to the long side of the bevel. You can see from the bottom drawing why the gas tank support is a seperate piece of wood. |
|||
|
|||
|
TRBenj
Grand Poobah
Joined: June-29-2005 Location: NWCT Status: Offline Points: 21169 |
Post Options
Thanks(0)
Quote Reply
Posted: January-14-2009 at 11:16am |
||
|
Jeremy, that drawing is great. Any chance you could post a larger version? I cant read some of the dimensions. If not, email it to me: TRBenj@gmail.com
|
|||
|
|||
|
JDiggs
Groupie
Joined: November-06-2008 Status: Offline Points: 51 |
Post Options
Thanks(0)
Quote Reply
Posted: March-02-2009 at 3:52pm |
||
|
Time to work on this has been few and far between here lately, but I have made some progress.
I have one of my main stringers and one my secondary stringers cut and sanded to fit. I think this is a pretty big step because it eliminates some of the unknown parameters. My new gameplan: Finish demoing the inside of the boat. Cut out the other wood members Order supplies Clean and prep inside of boat for install I'll re-evaluate after I get all this done. Im going to update my drawings, they were a little off. Also, I'll add some pics of the stringers with dims, etc. March 2nd today, got a lot to do in 2 months |
|||
|
|||
|
JDiggs
Groupie
Joined: November-06-2008 Status: Offline Points: 51 |
Post Options
Thanks(0)
Quote Reply
Posted: March-11-2009 at 7:48pm |
||
|
Just a note on my secondary stringer I cut. It was 7.25" too short. I still don't know how the F that happened. Good thing it was just a test piece.
Got a question for you guys. Should the stringers be level in both directions? From front to back and side to side. I know you have a slope toward the bilge, your secondaries should be level and your mains should be leve, just didn't know if there was a slope from front to back. Also, I know fir is much more rot resistant naturally than pine, but what after you coat it with epoxy, Im not sure it matters because water should not be getting to the wood at that point? Is there any evidence out there? What about using a polyurethane glue such as 3M 5200 to bed the stringers? I know somebody said it takes forever to set up, so how about the 4200? Thanks guys |
|||
|
|||
|
BuffaloBFN
Grand Poobah

Joined: June-24-2007 Location: Gainesville,GA Status: Offline Points: 6094 |
Post Options
Thanks(0)
Quote Reply
Posted: March-11-2009 at 7:58pm |
||
Alan has my board stretcher...
There was a slope to the rear on my boat...'88BFN.
I don't think the additional glass you'll need will stick to that. 2 points though for thinking outside the box! 
|
|||
|
|||
|
TRBenj
Grand Poobah
Joined: June-29-2005 Location: NWCT Status: Offline Points: 21169 |
Post Options
Thanks(0)
Quote Reply
Posted: March-11-2009 at 8:04pm |
||
|
Jeremy, Im pretty sure that the secondaries stringers I put in my Tique only needed to be shaped the last foot or so in the front. Otherwise they were just a full width 6" board- they sat in the same exact place as the originals. Minimal effort required!
I traded emails with Pete about the material of choice for the stringers. DF was the best, but Hemlock and clear white pine were decent alternatives. I dont think you'll want to bed with 5200, as Im not sure it will ever fully cure and Ive been told that glass wont stick to it. I doubt 4200 would be much better. Id stick with the tried and true methods. Not sure if you noticed, but CC didnt bed them from the factory- they put them down on top of strips of foam. |
|||
|
|||
|
WakeSlayer
Grand Poobah

Joined: March-15-2006 Location: United States Status: Offline Points: 2138 |
Post Options
Thanks(0)
Quote Reply
Posted: March-11-2009 at 8:54pm |
||
|
I agree on the bedding material. Epoxy peanut butter is way easier to work with, and I would guess, by the amount i ended up using, far cheaper than 5200 would be. There is no way that stuff would cure before mid summer, if ever.
I had the Mustang level on the trailer front to back and tied the wheel crank to keep it there while working on it. I ended up finishing level front to back, but my positive going towards the bilge in the back did not happen. I am level to slightly outward. Not sure how that happened, but try to not do what I did. I don't think it is the end of the world. Mike |
|||
|
Mike N
1968 Mustang |
|||
|
|||
|
JDiggs
Groupie
Joined: November-06-2008 Status: Offline Points: 51 |
Post Options
Thanks(0)
Quote Reply
Posted: March-16-2009 at 3:47am |
||
|
Thanks guys
Thicken the epoxy up w/ 404 & put a strip of E-glass in the bottom to bed the stringer? Im going to get it close to level across the boat, but trust my measurements and the dims off the stringer I pulled out for the front to back slope. Just want to make sure it's the right height at the motor mount, otherwise it shouldn't be critical. Im going w/ SYP #2 coated in epoxy for the stringers. I know this is not the best way. So don't do as I do on this one if you can afford to, but I think Im shooting for the "most economical" (Notice I did NOT say cheapest) redo possible. So I'll be the guinea pig on this one unless you know of anyone else who has done this with bad results. |
|||
|
|||
|
JDiggs
Groupie
Joined: November-06-2008 Status: Offline Points: 51 |
Post Options
Thanks(0)
Quote Reply
Posted: December-30-2009 at 4:47am |
||
|
Back from the dead. A 16 mo and a 4 mo old and football season has kept me pretty busy for a while, but got a little money and motivation again, so Im going to try to knock it in the next few months.
Tell me somebody has come up with a magic way to replace stringers since I was here last summer. Got to finish grinding the rest of the old fiberglass stringers. I think you have to grind it down to the hull to make the stringers work. I have all the wood cut, got to fine tune the stringers when I get the fiberglass ground down. Then epoxy the stringers. Now I just need some time...... |
|||
|
|||
|
eric lavine
Grand Poobah
Joined: August-13-2006 Location: United States Status: Offline Points: 13413 |
Post Options
Thanks(0)
Quote Reply
Posted: December-30-2009 at 10:33am |
||
|
all i can add is the boat is in the same spot it was a year ago
|
|||
|
"the things you own will start to own you"
|
|||
|
|||
|
uk1979
Platinum Member
Joined: June-13-2007 Location: United Kingdom Status: Offline Points: 1422 |
Post Options
Thanks(0)
Quote Reply
Posted: December-30-2009 at 6:12pm |
||
|
Good to see you back,a young family and boat rebuild now that’s hard.
|
|||
|
Lets have a go
56 Starflite 77 SN 78 SN 80 BFN |
|||
|
|||
|
Keeganino
Grand Poobah

Joined: October-27-2009 Location: North Carolina Status: Offline Points: 2063 |
Post Options
Thanks(0)
Quote Reply
Posted: January-12-2010 at 6:10pm |
||
|
Do you have larger updated images of these measurements? You did all that hard work I would love to see the end result. Thinking of getting into a stringer job myself.
|
|||
|
|||
|
TRBenj
Grand Poobah
Joined: June-29-2005 Location: NWCT Status: Offline Points: 21169 |
Post Options
Thanks(0)
Quote Reply
Posted: January-12-2010 at 6:46pm |
||
|
Keegan, send me an email- I have the files: TRBenj@gmail.com
|
|||
|
|||
|
Air206
Grand Poobah

Joined: September-28-2008 Location: Roanoke, VA Status: Offline Points: 3000 |
Post Options
Thanks(0)
Quote Reply
Posted: January-12-2010 at 7:05pm |
||
|
Tim:
Can you count me in for the files too? I have a Tique of that era whose "shoes are a little wet" ........... Just waiting for the right time.....  Thanks! Thanks!
Steve |
|||
|
|||
|
JDiggs
Groupie
Joined: November-06-2008 Status: Offline Points: 51 |
Post Options
Thanks(0)
Quote Reply
Posted: January-13-2010 at 3:59am |
||
|
Thanks guys. Im going to revise those files very soon. I couldnt get the curve just right along the hull, so I have ground the rest of the old channels down and Im going to use the protractor? method to fine tune it. Those files should be pretty close though.
I'll post up an updated framing plan shortly. |
|||
|
|||
|
Post Reply
|
Page <12 |
 Tweet
Tweet
|
| Forum Jump | Forum Permissions You cannot post new topics in this forum You cannot reply to topics in this forum You cannot delete your posts in this forum You cannot edit your posts in this forum You cannot create polls in this forum You cannot vote in polls in this forum |


 Topic Options
 JDiggs wrote: