 Boats For Sale:


85 2001 LVL Stringer Project |
Post Reply 
|
Page <1234 13> |
| Author | |
baitkiller 
Platinum Member 

Joined: October-11-2011 Location: SW Florida Status: Offline Points: 1693 |
 Post Options Post Options
") Thanks(0) Thanks(0)
 Quote Reply Quote Reply
 Posted: July-23-2012 at 2:57pm Posted: July-23-2012 at 2:57pm |
|
Looks great Papa. One little thing that bugs me on almost every trailer is that the jack handle is mounted on the passenger side. So when you have no help and you back down to hitch up the trailer you wind up doing laps around the boat or truck or smashing you shins on the trailer frame. I have since moved all of my trailer jacks to the driver side. Nothing interferes and my shins are much happier. The boat looks fantastic though.
|
|
|
Jesus was a bare-footer.............
|
|
 |
|
|
Big Pappa
Senior Member 

Joined: March-08-2006 Location: United States Status: Offline Points: 322 |
Post Options
Thanks(0)
Quote Reply
Posted: July-23-2012 at 2:48pm |
|
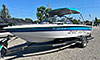
Sunday I also finished up everything on the back of the boat. I got the new Pitots installed on the boat, the tube ran to them and where the tube goes into the boat sealed and the cover put on. I put on the exhaust flaps, re installed the rudder/ prop guard and installed the boat buckle transom straps.
 I need to clean up the swim deck and install it and the back of the boat will be complete. (Minus trailer wiring) |
|
|
|
|
Big Pappa
Senior Member
Joined: March-08-2006 Location: United States Status: Offline Points: 322 |
Post Options
Thanks(0)
Quote Reply
Posted: July-23-2012 at 2:42pm |
|
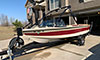
Next up I pulled the bolts for the receiver because I bought a handle to go on there to make handling the trailer a little easier. While I had the bolts out I pulled everything apart and saw some rust between the receiver and the trailer tube so I cleaned it all up and put on some rust neutralizing/ preventing paint and put it all back together with new grade 8 hardware.
 The rest of the day Saturday and then again on Sunday it was time to get to work on building a winch mount. I have looked over the web at different designs, looked at different trailers at the boat ramp and played around with different ideas on the trailer there at the house. In the end this is what I have came up with. The material is 4" square tube with 1/4" wall. I still have braces that are going to run up to the crash pad to tie everything together and a few other odds and ends to take care of. I figured I would show what I have so far though. The Center Line of the winch is about 1/2" higher than the bow eye. That makes the strap about 1 1/2" higher with the boat all the way on the trailer.  
|
|
|
|
|
Big Pappa
Senior Member
Joined: March-08-2006 Location: United States Status: Offline Points: 322 |
Post Options
Thanks(0)
Quote Reply
Posted: July-23-2012 at 2:27pm |
|
Happy Monday all.
I had a pretty productive weekend on the boat this weekend. I started out on Friday by pulling apart all of the seat bases and running my router over all the edges with a 1/4" round over bit to soften the edges and hopefully lessen the likeliness of getting splinters from the bases down the road. I then sanded down all the pieces and glued and screwed them all back together. Saturday I started off by making a 3 piece gas tank cover. I did not have this when I bought the boat so I am just going off a few pictures I have seen and then just making some templates out of cardboard for the side pieces. I wanted it to be in 3 pieces because the side pieces are what I am going to mount the side seats to. From the factory the seats are mounted to the floor and every one of my seats had rot at the bottom from sitting in wet carpet. I want to be able to easily remove the rear seats and I do not what to have any more holes in the floor than I have to. I am not sure exactly how I am going to mount them yet but they will not be screwed to the floor. Next I moved to building covers for the air box. The old ones were in good shape but they did not fit any longer because the airbox is not exactly the same as stock. So again I made cardboard templates and then cut them out of wood. Finally I cut out a new set of wood for the crash pads. I ran over all these with the router to smooth over the edges and hit them with the sander. I hit everything with a coat of CPES and let it sit to dry. 
|
|
|
|
|
Big Pappa
Senior Member
Joined: March-08-2006 Location: United States Status: Offline Points: 322 |
Post Options
Thanks(0)
Quote Reply
Posted: July-23-2012 at 2:00pm |
No problem glad to help. Yea, that whole situation in Colorado is sad!! I agree with you 100%, Madness!! |
|
|
|
|
AussieNorts
Groupie 

Joined: March-10-2007 Location: Australia Status: Offline Points: 82 |
Post Options
Thanks(0)
Quote Reply
Posted: July-20-2012 at 11:54pm |
|
Kris,
Thanks for those pics, sorry for the delayed response. That is exactly how mine were in a 1997 Sport when I pulled apart but could not remember the configuration. You do not get the same amount of washers in the new seat slide kits. I will have to use old ones as I can not source those washers here in Australia. Once again thanks Kris for clarifying this for me. A little off topic but I am watching the new this morning (Saturday morning in Oz) and there is a crazy news story about the shooting in Colorado, my thoughts go out to the victims families, the world does not need this madness. sorry just my 2 cents. |
|
|
Correct craft.....is there any other boat?
|
|
|
|
|
Big Pappa
Senior Member
Joined: March-08-2006 Location: United States Status: Offline Points: 322 |
Post Options
Thanks(0)
Quote Reply
Posted: July-19-2012 at 2:46pm |
|
Here is how the seat slides and seat are mounted now and how mine was when I took it apart with the old hardware.
 I put my seats on the frames last night and test fit them into the boat. I need to adjust the seat backs a little so they are a perfect fit when I install them for good. This was just to make sure everything fit and the frames were going to work in the boat. I think they are going to work.    I now have my new trailer jack and safety chains on the trailer. My old chain was just a 3' piece of a chain with a quick link on it. I wanted something a little bit better so this is what I came up up with. It is a 72" chain for a trailer. The box says it is rated for 5000#. I connected the ends to the trailer with a 1/2" Grade 8 bolt and washers. I am going to cut the chain so I have 2 equal lengths then have a screw quick link on each so there is no way it can fall off. Does this look OK to you guys? 
|
|
|
|
|
Big Pappa
Senior Member
Joined: March-08-2006 Location: United States Status: Offline Points: 322 |
Post Options
Thanks(0)
Quote Reply
Posted: July-18-2012 at 4:39pm |
I am just under 6' and look through the windshield most of the time. When docking or putting the boat on the trailer I do like to get up a little higher and look over the windshield though. A flip up bolster would be awesome!! I drove a SN 211 4th of July and the bolster was nice to have. Exactly I am not sure, but it is pretty close to stock height. I would guess to say it is + or - 1/4" from stock. I am going to test fit all the seats tonight and make sure everything fits before I go through and glue the parts together and paint. Just in case I need to make any adjustments. |
|
|
|
|
TRBenj
Grand Poobah 

Joined: June-29-2005 Location: NWCT Status: Offline Points: 21123 |
Post Options
Thanks(0)
Quote Reply
Posted: July-18-2012 at 2:43pm |
|
Arent you a pretty big guy? Dont tell me youre trying to look over the windshield!
The driver's seat does sit a bit low in the 2001's compared to the 2nd gen SN... but Ive never had a problem seeing through the windshield. Does your new floor height match the old height exactly? Or did you end up a touch taller with the rebuild? Something to think about. |
|
|
|
|
Big Pappa
Senior Member
Joined: March-08-2006 Location: United States Status: Offline Points: 322 |
Post Options
Thanks(0)
Quote Reply
Posted: July-18-2012 at 2:40pm |
I do not know they all look to be around the same age and the seat did not seem to be too high. Actually there are quite a few times when I wish it was a little higher. |
|
|
|
|
TRBenj
Grand Poobah
Joined: June-29-2005 Location: NWCT Status: Offline Points: 21123 |
Post Options
Thanks(0)
Quote Reply
Posted: July-18-2012 at 2:29pm |
That is strange- Ive only taken a few apart but have never seen them stacked so high. I wonder if a previous owner raised the seat up at some point? The new seat track kits only come with 4 washers. |
|
|
|
|
Big Pappa
Senior Member
Joined: March-08-2006 Location: United States Status: Offline Points: 322 |
Post Options
Thanks(0)
Quote Reply
Posted: July-18-2012 at 2:25pm |
This is how my drivers seat was, I am assuming, from the factory. There are 2 domed washers with the bowl side facing each other and a washer between them. Then there are 2 of those stacked on top of each other. Thanks!! The seat bases are a pretty simple design. I will see if I can work something up after I finish the boat for others to go off of in the future. |
|
|
|
|
TRBenj
Grand Poobah
Joined: June-29-2005 Location: NWCT Status: Offline Points: 21123 |
Post Options
Thanks(0)
Quote Reply
Posted: July-18-2012 at 2:19pm |
|
How many washers do you have stacked up on that seat base, and why? All of my boats only have one domed washer per corner (set wide part down).
Those wood seat bases look good! I bet all the people looking to make delux 2001 interiors would kill to have a set of those plans made available so they didnt have to bank of finding the (unobtainable) plastic bases used 86-89. |
|
|
|
|
Big Pappa
Senior Member
Joined: March-08-2006 Location: United States Status: Offline Points: 322 |
Post Options
Thanks(0)
Quote Reply
Posted: July-18-2012 at 1:59pm |
|
Yesterday I got to work putting the seat bases that I cut out on Sunday together. I still have a few small pieces to put together on the bottoms of the side pieces. These were the pieces that the seats were mounted to the floor with from the factory. But seeing as the bottoms of almost all of the old seat bases are rotten I do not want to mount the new ones that way. This way I can pull them out to let both the seats and the carpet dry if need be.
Has anyone else mounted the seats in a different way? I was thinking of maybe making a bracket and mounting the rear side seats to the 3 piece gas tank cover that I am going to build and put in. Here are the seats as they are now. I am going to run a sander over them this afternoon then mount the seats and test fit them in the boat. If everything is good then I will be blowing them all apart, running a router over the exposed edges to hopefully keep any snags from happening on any vinyl pieces. Plus it will be nicer not having sharp edges when getting things in and out of storage under the seats. Once the edges are routed I will then put them back together using some liquid nails and the SS screws that they are held together with now. After that a few coats of CPES and a few coats of the Perfection Paint that I used in the bilge to make them purdy. Then a little carpet on the outside and they are ready to go back in the boat!! 
|
|
|
|
|
Big Pappa
Senior Member
Joined: March-08-2006 Location: United States Status: Offline Points: 322 |
Post Options
Thanks(0)
Quote Reply
Posted: July-18-2012 at 1:47pm |
|
Here is a picture of the slides mounted to the base if that helps you out Steve.

|
|
|
|
|
Big Pappa
Senior Member
Joined: March-08-2006 Location: United States Status: Offline Points: 322 |
Post Options
Thanks(0)
Quote Reply
Posted: July-17-2012 at 9:18pm |
The dome sits upside down like a bowl. There is a screw that comes up through the slide going through the bowl then through the base of the seat and a washer and nut goes on top. I do not have a picture yet because I have not done it yet but I know that is how mine was to begin with. That is the slides to the seat are you also wanting to know about the base to the slides? |
|
|
|
|
AussieNorts
Groupie
Joined: March-10-2007 Location: Australia Status: Offline Points: 82 |
Post Options
Thanks(0)
Quote Reply
Posted: July-17-2012 at 8:46pm |
|
Kris,
Do you mind posting a picture of how you are mounting the seat slides to the seat base and boat. I am abou tto do this on my 1994 sport and I can not remember how they were mounted using the big domed washers. Thanks alot it would help me out. Steve |
|
|
Correct craft.....is there any other boat?
|
|
|
|
|
Dreaming
Platinum Member

Joined: May-21-2010 Location: Tacoma, WA Status: Offline Points: 1870 |
Post Options
Thanks(0)
Quote Reply
Posted: July-17-2012 at 6:35pm |
|
ouch... I got loaded hubs last year from my local trailer store... about 55 bucks a side. - I had to take in my old hub to have them match up the size, but it was inexpensive and pretty easy. Both times I went in, the trailer store had them on the shelf, so it can't be that uncommon of a hub.
this is where I got mine, but i am not sure if this is just a local shop or national...Six Roblees |
|
|
|
|
Jllogan
Platinum Member

Joined: May-18-2011 Location: canton, OH Status: Offline Points: 1728 |
Post Options
Thanks(0)
Quote Reply
Posted: July-17-2012 at 6:21pm |
|
ya, I think thats about what timkens cost me, this year I did nationals and it was more reasonable, like 60-70 bucks.
|
|
|
|
|
Big Pappa
Senior Member
Joined: March-08-2006 Location: United States Status: Offline Points: 322 |
Post Options
Thanks(0)
Quote Reply
Posted: July-17-2012 at 6:16pm |
Yea I know all about that I just dropped a little under $150 for bearing and seals for mine. Good call on re-greasing with winterizing. I think I will add that to my process as well. |
|
|
|
|
Jllogan
Platinum Member
Joined: May-18-2011 Location: canton, OH Status: Offline Points: 1728 |
Post Options
Thanks(0)
Quote Reply
Posted: July-17-2012 at 6:12pm |
|
ya not sure, I will tell you this I paid through the nose last year for timken bearings and they burnt up the second time I took them out this year, so Im not sure you are really getting anything that much better. New rule at my house is the bearings are coming out and getting repacked every year as a part of the winterizing activities.
|
|
|
|
|
Big Pappa
Senior Member
Joined: March-08-2006 Location: United States Status: Offline Points: 322 |
Post Options
Thanks(0)
Quote Reply
Posted: July-17-2012 at 6:09pm |
|
Thanks!! I wonder about the quality of the bearings though being that cheap! It is a good place to get started looking though.
|
|
|
|
|
Jllogan
Platinum Member
Joined: May-18-2011 Location: canton, OH Status: Offline Points: 1728 |
Post Options
Thanks(0)
Quote Reply
Posted: July-17-2012 at 6:03pm |
|
|
|
Jllogan
Platinum Member
Joined: May-18-2011 Location: canton, OH Status: Offline Points: 1728 |
Post Options
Thanks(0)
Quote Reply
Posted: July-17-2012 at 6:00pm |
|
This is the bearing kit.Im sure etrailer has the loaded hub too.
|
|
|
|
|
TRBenj
Grand Poobah
Joined: June-29-2005 Location: NWCT Status: Offline Points: 21123 |
Post Options
Thanks(0)
Quote Reply
Posted: July-17-2012 at 5:07pm |
|
Good question on the hubs... I dont have an answer for you as I dont have a 2001 trailer. But I would imagine that if you knew your inner and outer bearing sizes, you should be able to find an aftermarket hub that bolted up.
Pat, I just sent you an email with a wiring diagram for your boat. Feel free to call/email if you need some help. |
|
|
|
|
PicturePat
Groupie

Joined: June-13-2011 Location: Des Moines, IA Status: Offline Points: 59 |
Post Options
Thanks(0)
Quote Reply
Posted: July-17-2012 at 5:05pm |
|
That would be great! Mostly distributor wiring and around the main circuit in the back of the engine. Thanks man!
|
|
|
|
|
Big Pappa
Senior Member
Joined: March-08-2006 Location: United States Status: Offline Points: 322 |
Post Options
Thanks(0)
Quote Reply
Posted: July-17-2012 at 5:02pm |
Thanks!! I did not think about hitting the wall when I opened the latch. I will switch the handle around when I put the seat on. Where would I purchase whole new hubs? I am thinking of getting one to have as a spare and to mount a spare tire to on the trailer. I will make sure to keep a close eye on the bearing tightness! 
|
|
|
|
|
Big Pappa
Senior Member
Joined: March-08-2006 Location: United States Status: Offline Points: 322 |
Post Options
Thanks(0)
Quote Reply
Posted: July-17-2012 at 4:57pm |
Thanks!! I probably do what part do you have a question about? |
|
|
|
|
PicturePat
Groupie
Joined: June-13-2011 Location: Des Moines, IA Status: Offline Points: 59 |
Post Options
Thanks(0)
Quote Reply
Posted: July-17-2012 at 4:51pm |
|
Hi Kris - great post - cool to see the progress. I'm working on the 84 ski tique now. We put new heads, cam and intake in it and are in the final stages now. Trying to get my hands on a few photos of the wiring of the motor - have a couple spots were unsure of and right now am having problems getting a spark to the distributor. Didn't know if you had any photos from your motor or rebuild that could help. Thanks a ton man, appreciate it!
|
|
|
|
|
MI-nick
Gold Member

Joined: January-12-2009 Location: Ypsilanti, MI Status: Offline Points: 809 |
Post Options
Thanks(0)
Quote Reply
Posted: July-17-2012 at 12:06pm |
|
there is some sealant in there and i think swelling is exactly what happens. 
|
|
|
As far as I can tell, I'm not quite sure...
|
|
|
|
|
Post Reply
|
Page <1234 13> |
 Tweet
Tweet
|
| Forum Jump | Forum Permissions You cannot post new topics in this forum You cannot reply to topics in this forum You cannot delete your posts in this forum You cannot edit your posts in this forum You cannot create polls in this forum You cannot vote in polls in this forum |


 Topic Options
 AussieNorts wrote: