 Boats For Sale:


85 2001 LVL Stringer Project |
Post Reply 
|
Page <1 34567 13> |
| Author | |||
8122pbrainard 
Grand Poobah 

Joined: September-14-2006 Location: Three Lakes Wi. Status: Offline Points: 41040 |
 Post Options Post Options
") Thanks(0) Thanks(0)
 Quote Reply Quote Reply
 Posted: June-01-2011 at 5:51pm Posted: June-01-2011 at 5:51pm |
||
 |
|||
|
TRBenj
Grand Poobah

Joined: June-29-2005 Location: NWCT Status: Offline Points: 21124 |
Post Options
Thanks(0)
Quote Reply
Posted: June-01-2011 at 5:54pm |
||
Yes, but the end pieces that attach to the deck are 3". I got all of my 2.5" PVC from Mcmaster though. |
|||
|
|||
|
8122pbrainard
Grand Poobah
Joined: September-14-2006 Location: Three Lakes Wi. Status: Offline Points: 41040 |
Post Options
Thanks(0)
Quote Reply
Posted: June-01-2011 at 6:08pm |
||
Then pop rivet short lengths of 3" (3.042" ID) pvc pipe to the deck flanges as "bushings"? |
|||
|
|||
|
gun-driver
Grand Poobah
Joined: July-18-2008 Location: Pittsburgh, Pa Status: Offline Points: 4112 |
Post Options
Thanks(0)
Quote Reply
Posted: June-01-2011 at 6:12pm |
||
|
I used 3" thin wall drain pipe. I only ran the wire chase to the top of the bow. The air vents I ran thye flex hose down past the battery box where the pvc went through.
Tims right it gets real tight in there, thats probably why all my vents were crushed from the factory. 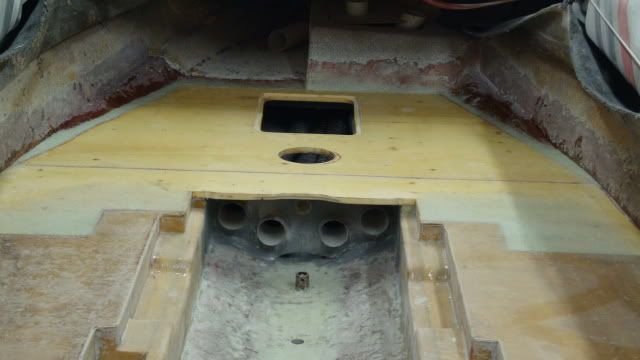
|
|||
|
|||
|
TRBenj
Grand Poobah
Joined: June-29-2005 Location: NWCT Status: Offline Points: 21124 |
Post Options
Thanks(0)
Quote Reply
Posted: June-01-2011 at 6:43pm |
||
You could... but those plastic deck flanges are pretty light weight. Pop riveting PVC to them up under the deck wouldnt be much fun- and it would make them pretty hard to remove without ruining them. |
|||
|
|||
|
Big Pappa
Senior Member 

Joined: March-08-2006 Location: United States Status: Offline Points: 322 |
Post Options
Thanks(0)
Quote Reply
Posted: June-06-2011 at 7:28pm |
||
Here is what I am planning on the Battery Box Drain. I have a Thru hull that will mount in the battery box with 5200 sealing it. I will then place the tube over the through hull with 5200 again and clamp that on with a SS band clamp. That will run to a Brass one way with a plug that has been sealed to the bulkhead with 5200 as well. The tube will mount on the back sealed with 5200 and a SS band clamp. The plug should keep any water from the bilge from flowing up into the battery box. If I happen to forget the plug one day the ball inside should prevent too much from running back up the tube. Then I should only have water coming from the battery box coming out when I pull the plug in the boat and the battery box after a day of fun. Tube mocked up, The tube is long it will be much shorter in the boat. 
With Plug 
Without Plug (You can see the Check Ball) 
Thru Hull with ring trimmed to fit inside Battery Box Drain. 
|
|||
|
|||
|
TRBenj
Grand Poobah
Joined: June-29-2005 Location: NWCT Status: Offline Points: 21124 |
Post Options
Thanks(0)
Quote Reply
Posted: June-06-2011 at 7:50pm |
||
|
I like that ball valve and the bulkhead fitting- those should seal nicely. We couldnt find anything with a long enough fitting on the bilge side, since our bulkead was 3/4" thick. I also wasnt crazy about leaving a hose clamp under the floor where it couldnt be inspected, tightened or replaced. A more positive connection (like glued PVC) might be better, but then again, it will probably work fine for a looong time.
|
|||
|
|||
|
Big Pappa
Senior Member
Joined: March-08-2006 Location: United States Status: Offline Points: 322 |
Post Options
Thanks(0)
Quote Reply
Posted: June-07-2011 at 3:05pm |
||
My Bulkhead is 3/4" as well but I still have a good 1/2" - 3/4" to clamp onto with it in the bulkhead though. |
|||
|
|||
|
BuffaloBFN
Grand Poobah

Joined: June-24-2007 Location: Gainesville,GA Status: Offline Points: 6094 |
Post Options
Thanks(0)
Quote Reply
Posted: June-07-2011 at 9:50pm |
||
|
Pretty slick!
Tim, you have decaff in your future if you're gonna stress over a hose clamp under the floor. 
|
|||
|
|||
|
Big Pappa
Senior Member
Joined: March-08-2006 Location: United States Status: Offline Points: 322 |
Post Options
Thanks(0)
Quote Reply
Posted: June-13-2011 at 4:01pm |
||
|
So I made some pretty good progress this weekend.
First I installed the rear blocking with a layer of mat and some thickened Epoxy. Then covered them with a layer of mat. I am going to go back over them all with a layer of mat once I get the center lift ring block installed, but I still have some work to do to get that one finished up and ready to install. 
Next I installed the bulkhead (I think that is what it is called) between the main and secondary stringers by the engine. Bedded with 2 layers of mat, Filleted, a layer or 2" Cloth then a layer or 4 " Cloth on both sides. How much glass do people usually install here? 
Now the thing that took the most time was the front bulkhead. I went back and changed my design up to use a thin walled PVC for my tubes. This allows me to fit 3 3" ID tubes for my vents then a 4" ID for my cables. Thanks to TRBenj for that suggestion!! The thin walled 3" has an OD of just over 3" so I think I will be able to get the vent tube over it. Here is everything mocked into place. 
I did not really like the way the battery box Drain and cables were done from the factory so I am going a little different route. I have already posted my Drain plans so I will not cover that again but here is my though for the cable opening. I found some PVC couplings with the same threads as the Through Hull that was on the battery box. SO I found another one and bought it then Mocked it all together to be as short as possible. 
This does cause the bulkhead to be at a slight angle but I am OK with that seeing as it is a much better connection than was there from the factory and once I 5200 everything there is no way it will leak. 

Finally I installed the bulkhead with 2 layers of mat then once it Kicked I filleted the joint. I will go back over this with some layers of cloth and probably some mat and biax as well to make it good and strong, not to mention water proof!! 

|
|||
|
|||
|
8122pbrainard
Grand Poobah
Joined: September-14-2006 Location: Three Lakes Wi. Status: Offline Points: 41040 |
Post Options
Thanks(0)
Quote Reply
Posted: June-13-2011 at 4:27pm |
||
|
Kris,
Looking good! Maybe it will see some water soon? 
BTW, did you forget the CPES on that bulkhead? Maybe it's just the picture?
|
|||
|
|||
|
Big Pappa
Senior Member
Joined: March-08-2006 Location: United States Status: Offline Points: 322 |
Post Options
Thanks(0)
Quote Reply
Posted: June-13-2011 at 4:35pm |
||
I am hoping so, it has only been in the works for about 3 years.  We are supposed to be renting a house on the lake in Augest so I need to have the boat finished by then. I Think it should be doable. We are supposed to be renting a house on the lake in Augest so I need to have the boat finished by then. I Think it should be doable.
Yes I did forget the CPES, I remembered about an hour after I filleted it.  This is the second one I built, the first I cut to use 4 3" SCH40 PVC tubes. I did CPES it but after evaluating options I decided to change things up while I could. I will go back and give it 4 or 5 coats with it in there and then cover it all up with some fiberglass. That should work. This is the second one I built, the first I cut to use 4 3" SCH40 PVC tubes. I did CPES it but after evaluating options I decided to change things up while I could. I will go back and give it 4 or 5 coats with it in there and then cover it all up with some fiberglass. That should work. 
|
|||
|
|||
|
Big Pappa
Senior Member
Joined: March-08-2006 Location: United States Status: Offline Points: 322 |
Post Options
Thanks(0)
Quote Reply
Posted: June-29-2011 at 1:15pm |
||
|
Hey everyone, well I have been busy and have gotten quite a bit done on the boat over the past couple of weeks.
I have the front bulkhead completely installed covered with CPES and sealed up with several layers of glass. I also laid a few layers of glass in the hull to level up the bottom of the bilge from the battery box drain to the pylon mount. I did not like the way water could get trapped forward of the pylon so I brought it up as much as I could to hopefully allow the water to flow back to the bilge pump and drain. I also have all of my vents, cable tube and batter box installed glued up and sealed into the bulkhead, all with 5200 on both sides. 

I have about 90% of my foam poured. I still have to fill in some low spots and form up the Air Box and pour it. I am thinking I am just going to form the front and sides with some left over 3/4" Ply that I have seal it up with CPES and just leave it in the boat and glass over it. That way I will have blocking there for mounting anything I would like to in the future. 
Lastly I have all of my floor bracing cut, CPESed and the rear pieces laminated together with a piece of mat. I have started getting the floor in the back of the boat all leveled up and the foam cut out for the braces. I am cutting the foam a little big so I have some wiggle room for the wood and I am going to pour epoxy all the way around the braces. That way they have a nice 1/16" - 1/8" coating of epoxy all the way around and no water will be able to get to them. ** Note: If you are doing this I found that a router makes quick work of this job. It makes a huge mess but I cut out the foam for a 5'6" 2X4 in the same time it took me to chisel out a space for a 3" X 12" X 3/4" brace by hand.** 

My boat did not have the 2X4 running parallel to the stringers from the factory. But after looking at other boat builds I thought I would add it for extra support for the floor. The 2X4 is 1 piece and I routed out the areas where the braces cross it so the front 2 floor brace and the 2X4 will all be connected. I am shooting to be laying glass on the floor this weekend so lots of work will be done this week trying to get all this foam poured and shaped. |
|||
|
|||
|
Big Pappa
Senior Member
Joined: March-08-2006 Location: United States Status: Offline Points: 322 |
Post Options
Thanks(0)
Quote Reply
Posted: July-05-2011 at 2:10pm |
||
|
Hey everyone, I hope you all had a nice 4th. I spent most of my weekend in the boat trying to get things done so I can be out on the water. :-)
Where I am now I have about 99% of my foam poured. Then only thing I have left is a few small places where the foam did not get high enough and that is only in the Bow area. Both sides from the engine back are finished and ready for glass. So this weekend I finished up shaping the wood that I am using for the air box and got that installed. I put a few SS wood screws that were counter sunk in the corner and one attaching it to the front support to hold things in place when I poured the foam. 
I covered the under side of the wood that the front seats mount too in a layer of mat and I put 2 more layers in the area between the stringers to give that a little more strength. So that is ready to be permanently installed now. I am going to smooth up the bilge in that area first to make it a little easier to sand.
I also got out the grinder and ground down both sides of the boat so I am ready to lay glass and install the carpet when the time comes. **Note to self... If you ever do this again make it easy on yourself and grind the sides before you pour the foam!! It is all done now though!!


I still have to finish shaping the foam a little in the bow area then shape around the engine mounting bolts and I should be ready to lay glass on the floor. Woo Hoo!! Progress is being made. It has only taken me a little over 3 years to get to this point.
If you ever take on a project like this do not try and do it in your spare time. Take it from me Commit to it and get it done as fast as possible. I finally have gotten tired of not having a boat and I am working on it ever second that I can and I have gotten more done in the past month than I have in the past year. It finally feels like am getting things done. I can not wait to get it back on the water!! |
|||
|
|||
|
Jllogan
Platinum Member 

Joined: May-18-2011 Location: canton, OH Status: Offline Points: 1728 |
Post Options
Thanks(0)
Quote Reply
Posted: July-05-2011 at 2:53pm |
||
|
wow, looking good. I am probably going to be tackling this same project this fall/winter. I am dreading it.
|
|||
|
|||
|
Big Pappa
Senior Member
Joined: March-08-2006 Location: United States Status: Offline Points: 322 |
Post Options
Thanks(0)
Quote Reply
Posted: July-19-2011 at 4:32pm |
||
|
Hey all, I have been slowly continuing along. I have been having to travel some for work so I have missed some time working on the boat but I am finally back at it. I have the foam all finished up. I need to do just a little filler work with some thickened epoxy and I will be all set to lay glass on the floor. Woo Hoo!!!

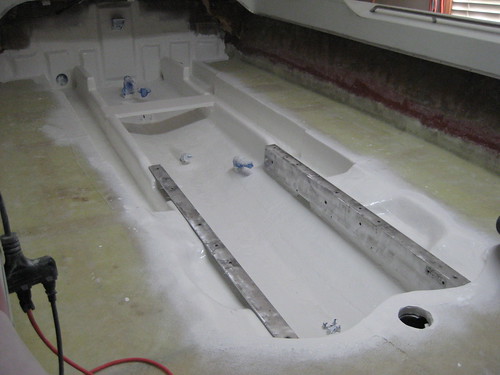
Here is a shot of the Airbox 
3/4" Plywood installed with thickened epoxy and mat then screwed down with 2" SS wood screws. 
Drivers side Ready to go. Bracing installed with thickened epoxy then screwed down with 2" SS wood screws. Rear Brace uses 3" SS Screws since it is thicker. 
Passenger side 
I went ahead and smoothed out the bilge area in front of the Pylon mount before I installed the 3/4" plywood. I will still have a little work to do once I fillet the wood to the stringers and add a layer of mat, but a majority of the work is done already so that should lessen the work there later. 
One last note, I have completely wore the Velcro off of my random orbit sander during this project so far. So a replacement pad or a new sander is a must now. So chalk up a Dead 4" grinder and random orbit sanding pad to this project so far.
|
|||
|
|||
|
Big Pappa
Senior Member
Joined: March-08-2006 Location: United States Status: Offline Points: 322 |
Post Options
Thanks(0)
Quote Reply
Posted: July-19-2011 at 4:39pm |
||
|
Oh and one more thing, if you use SS wood screws on your project get extras because they are soft!!! Even with pre drilled holes I still broke 3 screws and stripped 2 more. That is out of 22 screws used in the boat total. That was with me drilling a pilot and counter sinking. Running the screw down to check fitment. Pulling the screw out filling the hole with epoxy laying the thickened epoxy to the joint and screw it all back together.
|
|||
|
|||
|
C-Bass
Platinum Member

Joined: November-18-2008 Location: Columbus, IN Status: Offline Points: 1248 |
Post Options
Thanks(0)
Quote Reply
Posted: July-19-2011 at 4:50pm |
||
|
Looking good. Thanks for taking the time to post the pictures.
|
|||
|
|||
|
Big Pappa
Senior Member
Joined: March-08-2006 Location: United States Status: Offline Points: 322 |
Post Options
Thanks(0)
Quote Reply
Posted: August-15-2011 at 1:20pm |
||
|
Woo Hoo, The Floor is finally in and complete!! Let me tell you, I am so glad to have made it to this point and to finally start seeing some light at the end of the tunnel!!
I was in the boat working yesterday and the wind blew just right and I caught the smell of the vinyl seats and I was picturing myself getting the boat ready for a day on the lake. I am so looking forward to having this project finished and taking it out for a day of fun! Back to the floor. This is the layup I used on the floor. Mat (Top Finished layer) Biax (Mat side up) Mat Cloth Mat (Bottom, On top of foam) This layup sucked up a ton of epoxy and under the bow was such a pain!! It is done now though. Woo Hoo!! All the Glass for the back sides of the boat. 
All the Glass for the front and under the bow. 
The Front floor all finished. 
The back floor all finished 
Next on the agenda finishing up the rear lift block and getting it installed then smoothing out the bilge area and getting ready for bilge koat. |
|||
|
|||
|
Big Pappa
Senior Member
Joined: March-08-2006 Location: United States Status: Offline Points: 322 |
Post Options
Thanks(0)
Quote Reply
Posted: August-22-2011 at 1:07pm |
||
|
So I made some more progress on the boat this weekend. I bedded in the rear lift ring block and the rudder blocking as well. Well first I have to build these 2 blocks.
For the Rudder block I did not want the rudder to be touching wood so I decided to over drill that area and fill it with thickened epoxy. I thought about doing the bolt holes as well but with them being so small I was worried about them pulling loose or something so I decided to just leave the holes the right size and just coat it a lot with epoxy which I did. Looking at it now over drilling and filling with epoxy is probably a little overkill but oh well, better safe than sorry!! 
On the rear lift ring block I did not like the way the bolts were just in the wood from the factory so I took a piece of 1/4" Aluminum plate and made a backing plate for the bolts to mount into. I then took and routed out the back of the block and then bedded the block onto the wood with thickened epoxy. The aluminum was mounted deep enough to get a full nut on the bolt once the angle bracket was installed on the front of the block. This left me with about 1/8" gap below the rear surface of the wood so I just filled that with thickened epoxy as well. 

Here they are all nestled and bedded into their place in the boat, ready to be covered in glass and left to be for the next 20+ years of fun in the water. Hopefully they never get to feel the water though!! I used the lift ring bolt and the rudder bolts to locate and pull the blocks tight so they are bedded well and have plenty of bonding strength.

I left the center hole to be drilled in the boat that way I get it in the perfect spot and do not have to mess around with it any. I probably could have drilled it out of the boat and been fine, I decided to drill it in the boat so I know I would not have any problems! |
|||
|
|||
|
Big Pappa
Senior Member
Joined: March-08-2006 Location: United States Status: Offline Points: 322 |
Post Options
Thanks(0)
Quote Reply
Posted: August-30-2011 at 2:05pm |
||
|
So this weekend I went through and sanded down all the wood and fiberglass on the Transom and the block for the rudder. Then put on a few layers of various types of glass over them to seal it all up from that bad water.

I also test fit my engine cradle in the front to make sure everything was going to fit right. I had to do a little sanding up front on the sides of the stringers to get everything to fit. Which makes me feel good because I allowed for 3/16" to 1/4" of glass on each side of the cradle when I was setting my stringers. So I know I have a good amount of glass that is going to keep the new stringers dry!! So since I knew the cradle fit I wanted to seal up the exposed edges of the front ply that went over the bilge area. So I filleted the area where the ply connected with the stringer then laid strips of cloth over it. I also covered the exposed edges with a layer of cloth as well. 
So now with the exception of the rear cross member that goes between the mains all the glass work on the boat is complete. I am working on flattening out the bilge area, cleaning up all the epoxy runs and getting it ready for paint. Here I am using a Belt sander, an inline sander and a random orbit palm sander. It is coming along but it is a slow process!! Once I get the bilge area cleaned up I will go back and put in the brace, clean that up and paint everything. On another note what do your guys recommend for the bilge? I have read about bilgekoat and awlgrip and a few others but I am still undecided. Any suggestions? |
|||
|
|||
|
akabulla
Gold Member

Joined: November-15-2008 Location: United States Status: Offline Points: 649 |
Post Options
Thanks(0)
Quote Reply
Posted: August-30-2011 at 9:27pm |
||
|
Looking really good! I liked the bilgekoat. I tried to spray it on at first but you could see EVERY imperfection in the glass work so then I went back and painted it on with a brush and it came out looking much smoother!
|
|||
|
|||
|
Big Pappa
Senior Member
Joined: March-08-2006 Location: United States Status: Offline Points: 322 |
Post Options
Thanks(0)
Quote Reply
Posted: August-30-2011 at 10:22pm |
||
How has it stood up for you so far? Have you seen any yellowing or discoloration? Does it hold up well to small oil, or other fluid spills? |
|||
|
|||
|
akabulla
Gold Member
Joined: November-15-2008 Location: United States Status: Offline Points: 649 |
Post Options
Thanks(0)
Quote Reply
Posted: August-30-2011 at 11:19pm |
||
|
I sold the boat but had it for two years and it didn't yellow at all. It is strong stuff and you don't mix it so you don't have to worry about the amine blush effect since it isn't epoxy based (at least I don't think it is since you don't mix it). I would clean it with some soap and water and all the stains would come right up.
There are some good comments about it over here: http://www.jamestowndistributors.com/userportal/show_product.do?pid=119 |
|||
|
|||
|
BuffaloBFN
Grand Poobah
Joined: June-24-2007 Location: Gainesville,GA Status: Offline Points: 6094 |
Post Options
Thanks(0)
Quote Reply
Posted: August-31-2011 at 7:16am |
||
|
I used white bilgekote and am basically happy with it. It has worn off in a few places, and I might not choose white again.
Joey, check general discussion; trying to get in touch with you. |
|||
|
|||
|
akabulla
Gold Member
Joined: November-15-2008 Location: United States Status: Offline Points: 649 |
Post Options
Thanks(0)
Quote Reply
Posted: August-31-2011 at 12:16pm |
||
|
I emailed you from the site.
|
|||
|
|||
|
TRBenj
Grand Poobah
Joined: June-29-2005 Location: NWCT Status: Offline Points: 21124 |
Post Options
Thanks(0)
Quote Reply
Posted: August-31-2011 at 1:01pm |
||
|
I used gray bilgekote in my Tique, which turned out great. I tried white bilgekote on our BFN and it was a disaster... it never set up. When I called Interlux, they told me it was incompatible with epoxy (the note is buried in the datasheet) and it needs a primer over it first for it to stick. With that much work, I doubt Ill ever use it again. We ended up using tinted epoxy resin in the bilge, which worked alright- but next time I think Ill gelcoat it instead.
|
|||
|
|||
|
Big Pappa
Senior Member
Joined: March-08-2006 Location: United States Status: Offline Points: 322 |
Post Options
Thanks(0)
Quote Reply
Posted: August-31-2011 at 2:50pm |
||
I have thought about gelcoat as well. Do you have to sand it down and polish it to get a smooth finish though? |
|||
|
|||
|
TRBenj
Grand Poobah
Joined: June-29-2005 Location: NWCT Status: Offline Points: 21124 |
Post Options
Thanks(0)
Quote Reply
Posted: August-31-2011 at 3:10pm |
||
For a mirror finish, yes... for a matte finish (like from the factory), no. |
|||
|
|||
|
Big Pappa
Senior Member
Joined: March-08-2006 Location: United States Status: Offline Points: 322 |
Post Options
Thanks(0)
Quote Reply
Posted: September-13-2011 at 5:30pm |
||
|
Hey everyone it has been a couple of weeks I thought I would give an update on where I am with things. I am currently still working on smoothing things out in the bilge area. I have only had an hour here and an hour there to work on it so it has not taken as long as it sounds. I am trying to get it as smooth as possible but not really trying to get it exactly perfect glass smooth. I have all the roughness knocked down and I am just going through and fairing it a little with some Epoxy and glass bubbles.
I am still going back and forth a little on what to use as my coating. I had decided on gel coating it but when I called us Composites and told them what I was doing they told me that they do not recommend gel coat over epoxy resin so back to the drawing board. I have been looking at Awlgrip, Awlcraft 2000, Imron, Bilgekote, Perfection, Brightside. All of them have their plus and minus, I really like the awlcraft 2000 and imron but they are a little intimidated with their toxicity levels, especially with little ones running around!! Oh and I just noticed that the images on the front page of this post were all missing and I realized that I had them hosted on my old site that I did not renew this year. So I went back through and uploaded all of those pictures so the thread could be seen from the start. :-) That is all for now, back to work. Talk with you all soon!! Kris |
|||
|
|||
|
Post Reply
|
Page <1 34567 13> |
 Tweet
Tweet
|
| Forum Jump | Forum Permissions You cannot post new topics in this forum You cannot reply to topics in this forum You cannot delete your posts in this forum You cannot edit your posts in this forum You cannot create polls in this forum You cannot vote in polls in this forum |


 Topic Options
 8122pbrainard wrote: