 Boats For Sale:


SS Mini Update |
Post Reply 
|
Page <1234 5> |
| Author | |
JEFF KOSTIS 
Gold Member 
Joined: April-19-2005 Location: United States Status: Offline Points: 817 |
 Post Options Post Options
") Thanks(0) Thanks(0)
 Quote Reply Quote Reply
 Posted: June-15-2006 at 8:50am Posted: June-15-2006 at 8:50am |
|
I had to get a quick post in this morning, as when I woke up, I realized I forgot to mention that the line going from the ammeter to the batt terminal on the ign switch should go thorugh the ign dash fuseholder to protect the line. Also, the wire going from the ammeter to the batt + point on the engine should be hooked inline through the 60 amp breaker to the battery, instead of the hot battery side of the starter solenoid(if it is).
Jeff... |
|
 |
|
|
JEFF KOSTIS
Gold Member
Joined: April-19-2005 Location: United States Status: Offline Points: 817 |
Post Options
Thanks(0)
Quote Reply
Posted: June-14-2006 at 11:57pm |
|
Dave, I wont be around till tomorrow night. Will see you ya made out then so you can can the "iron pipe pylon" out to get a ski in.

Jeff... |
|
|
|
|
JEFF KOSTIS
Gold Member
Joined: April-19-2005 Location: United States Status: Offline Points: 817 |
Post Options
Thanks(0)
Quote Reply
Posted: June-14-2006 at 11:46pm |
|
Dave, make sure the wires to the ammeter come from the alternator output stud(this line feeds the ammeter), then the output of the ammeter returns to the battery +(or the hot side of the starter solenoid). You should then have a wire going from the BATT terminal on the ign switch to the ammeter(the side connected to the alternator output). All the +12v to feed the gauges hook to the ign terminal on the ign switch. Also, on the ammeter, if the gauge reads backwards, flip the wires on the posts. It will still work and not hurt anything if hooked up backwards. See how this compares to your connections. I also messed up in my previous post as I meant to say that no wires from the ammeter should be connected to the ign terminal on the ign switch, as your battery will go flat in no time, and your engine wont shut off.
I was looking at the PCM schematic in the reference section and they have a error in the way they show to wire the ammeter in place of a voltmeter. They have it wired to show the actual output of the alternator feeding everything instead of just showing battery charging current. I have never seen that. Best of luck!!!
Jeff... |
|
|
|
|
dchris17
Gold Member

Joined: May-28-2005 Location: Weatherford, TX Status: Offline Points: 573 |
Post Options
Thanks(0)
Quote Reply
Posted: June-14-2006 at 10:28pm |
|
I'm using an ammeter. I just figured out that everything seems to work if the ammeter is not connected. If I'm using an ammeter, do I connect all the "I" posts on my gauges to its "I" post?
Should I just switch to a voltmeter? This is really pissing me off. |
|
|
|
|
JEFF KOSTIS
Gold Member
Joined: April-19-2005 Location: United States Status: Offline Points: 817 |
Post Options
Thanks(0)
Quote Reply
Posted: June-14-2006 at 8:17pm |
|
Dave, a quick thought....are you still using the ammeter, or are you using a new voltmeter?? If using an ammeter, make sure NO wires connect to the ign switch. If a voltmeter, that doesnt apply.
Jeff.. |
|
|
|
|
dchris17
Gold Member
Joined: May-28-2005 Location: Weatherford, TX Status: Offline Points: 573 |
Post Options
Thanks(0)
Quote Reply
Posted: June-14-2006 at 5:52pm |
|
So, why won't my boat turn off when I connect the red wires from my gauges to my ignition switch? Aargh... I think I've wired it per the picture. Man, this is frustrating.
|
|
|
|
|
77stang
Senior Member 
Joined: May-19-2004 Location: United States Status: Offline Points: 342 |
Post Options
Thanks(0)
Quote Reply
Posted: June-14-2006 at 5:10pm |
|
see this, it should clear everthing up
http://www.skiboathelp.com/tech/colorcode.html |
|
|
|
|
dchris17
Gold Member
Joined: May-28-2005 Location: Weatherford, TX Status: Offline Points: 573 |
Post Options
Thanks(0)
Quote Reply
Posted: June-14-2006 at 4:53pm |
|
I need some help with the dash wiring. I'm doing something fairly stupid, and I'm not sure what it is. What do I connect the ignition posts on my gauges to? If I connect them to the ignition post on my ignition switch, the boat won't turn off (and I already blew up one ignition coil this way). Should they be connected to the alternator output instead?
I feel freaking clueless. Please help. |
|
|
|
|
dchris17
Gold Member
Joined: May-28-2005 Location: Weatherford, TX Status: Offline Points: 573 |
Post Options
Thanks(0)
Quote Reply
Posted: June-14-2006 at 8:20am |
|
Thanks Joe. Will do.
|
|
|
|
|
JoeinNY
Grand Poobah 

Joined: October-19-2005 Location: United States Status: Offline Points: 5698 |
Post Options
Thanks(0)
Quote Reply
Posted: June-14-2006 at 8:14am |
|
Have a good time, but be very careful with the bubble gum and scotch tape pylon, I have seen pylons let go before and its not pretty.
|
|
|
|
|
dchris17
Gold Member
Joined: May-28-2005 Location: Weatherford, TX Status: Offline Points: 573 |
Post Options
Thanks(0)
Quote Reply
Posted: June-14-2006 at 7:52am |
|
I can't make the schedule work this year for the reunion. My wife had a surgery recently that used up a lot of my time off.
Jeff, I think I have got the ignition and the output mixed up. I'll look at that tonight. I'm going wakeboarding on Friday. This will be the first skiing trip of the SS Mini. I'll take some pics and post them. Unfortunately, it's going to be with a bubble-gum-and-scotch-tape pylon because I don't have a good pylon yet. |
|
|
|
|
JEFF KOSTIS
Gold Member
Joined: April-19-2005 Location: United States Status: Offline Points: 817 |
Post Options
Thanks(0)
Quote Reply
Posted: June-13-2006 at 10:51am |
Dave, buy the "SS unknown" and let that be the wifes with the flames. A nice CC classic original like yours speaks its own words. The ign problem is weird. Sounds like when youre shutting it down, you are getting a backfeed from somewhere to the "ign on" post. See if a testlight lights up when the key is off position to the "ign" terminal. Shouldnt be a difficult fix. Might even be the Ign feed and output wires on the switch are backwards or something. Why dont you bring her to the reunion this year??? Its not like your trailer is in bad shape!!!
Jeff... |
|
|
|
|
dchris17
Gold Member
Joined: May-28-2005 Location: Weatherford, TX Status: Offline Points: 573 |
Post Options
Thanks(0)
Quote Reply
Posted: June-12-2006 at 10:03pm |
|
I'm about five minutes shy of having finished the whole wiring job, plus some clean up. I used heat shrink connectors everywhere - I think it's a quality job.
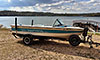
I think next winter I'll build a wiring harness board for the 302 and build a quality engine harness. The wiring harness I build only runs from the dash to the engine connector. My brother and I are going to research a better connector than the 8 wire bullet type used for towing. I hooked the steering back up, so the dash is looking almost normal. The hour-meter is broken, so I'm going to put a depth sounder there once I've got some extra cash. I'll live with the hole for now. So, now all I have left is replacing the fuel hose (rotten), the bilge pump hose (too short), arranging some sort of pylon (might end up being a piece of iron pipe until I get my custom one finished), installing the horn, and cleaning up the whole big mess. Oh yeah, I have to figure out why the motor doesn't turn off when I turn off the key. That's wierding me out a little bit. It's a new ignition switch, but maybe it's gone bad already. Jeff, and anybody else, for that matter, who has contributed to this project of mine by giving me advice and/or encouragement, you're always welcome for a ride on the SS Mini. I hope to be able to bring her out to a reunion next summer. Incidentally, my wife has gone crazy. Next winter when I replace the floor, upholstery, and fix the gel coat, she says I should paint the thing red and airbrush in some flames. Another retro-rod boat. |
|
|
|
|
jbear
Grand Poobah

Joined: January-21-2005 Location: Lake Wales FL. Status: Offline Points: 8193 |
Post Options
Thanks(0)
Quote Reply
Posted: June-12-2006 at 9:14pm |
|
Dave; Wire job looks SWEET! Keep them pics coming!
john |
|
|
"Loud pipes save lives"
AdamT sez "I'm Canadian and a beaver lover myself"... |
|
|
|
|
JEFF KOSTIS
Gold Member
Joined: April-19-2005 Location: United States Status: Offline Points: 817 |
Post Options
Thanks(0)
Quote Reply
Posted: June-12-2006 at 8:41pm |
|
Sorry Dave but the 74 is still buried in the back of the shop. I have managed to get the 76 on its feet, but its still at NECC checking on why the new engine hesitates. I am way behind schedule this year. I sure would like to see your 74 in person someday. Not many of that model year around.
Jeff... Again, GREAT PROGRESS!!!! |
|
|
|
|
dchris17
Gold Member
Joined: May-28-2005 Location: Weatherford, TX Status: Offline Points: 573 |
Post Options
Thanks(0)
Quote Reply
Posted: June-12-2006 at 8:31pm |
|
Hey Jeff, when are you going to post some pictures of your 74 with the cover off? I'd like to see what yours is like, since we've got sibling boats.
|
|
|
|
|
JEFF KOSTIS
Gold Member
Joined: April-19-2005 Location: United States Status: Offline Points: 817 |
Post Options
Thanks(0)
Quote Reply
Posted: June-12-2006 at 8:21pm |
|
Dave, I am totally amazed on the progress!!! Nice, clean and better than original. I recall and laugh at a post you made asking for a kick in the butt or something like that.
Great JOB as always!!
Jeff.... |
|
|
|
|
dchris17
Gold Member
Joined: May-28-2005 Location: Weatherford, TX Status: Offline Points: 573 |
Post Options
Thanks(0)
Quote Reply
Posted: June-11-2006 at 9:15am |
|
I've got the dash back in, hooked up the new wire harness, and repaired the rotten wood in the seats. I simplified things by using wiring blocks for ignition, ground, and lights. That way, I don't have to stack six wires on one post. I'll crawl under there with a camera and take a picture when I've got things organized.
Yesterday morning I started the motor for the first time since I took everything apart. It started great! I wish I had the time and money to replace all the pitted chrome this summer and fix the small gel coat problems. I'm going to drag the SS Mini down to Possum Kingdom Lake in Texas for a couple days of skiing on one of the best lakes in the world. I can't wait! I haven't made any progress on the pylon project. I need to get serious about that soon. |
|
|
|
|
dchris17
Gold Member
Joined: May-28-2005 Location: Weatherford, TX Status: Offline Points: 573 |
Post Options
Thanks(0)
Quote Reply
Posted: May-05-2006 at 2:16pm |
|
Sadly, my brother's company doesn't make those. I'm on my own!
Here's a picture of the dash wiring. I've only done the gauges - I'll do the switches next. Turned out a lot cleaner than the original setup. 
|
|
|
|
|
JEFF KOSTIS
Gold Member
Joined: April-19-2005 Location: United States Status: Offline Points: 817 |
Post Options
Thanks(0)
Quote Reply
Posted: May-04-2006 at 10:54pm |
|
Dave, after seeing the military spec wiring, why not see if you can get some of the mil-spec cable clamps. They are aluminum and rubber so no rust and salt isnt a issue. Ask your brother.
Jeff... |
|
|
|
|
dchris17
Gold Member
Joined: May-28-2005 Location: Weatherford, TX Status: Offline Points: 573 |
Post Options
Thanks(0)
Quote Reply
Posted: May-04-2006 at 2:36pm |
|
Got the wire harness built today. It took about an hour for me to get the wires pulled through the abrasion protection and shrink-wrapped. The hardest part (if there was one) was just getting all eight wires bundled together properly to pull through.
Any suggestions about mounting this in the bilge? I've noticed on both boats I've had that the pull-ties get brittle and break off over time. I was thinking of using 3/4" PVC pipe, screwed into a stringer to put the wires through. Overkill? |
|
|
|
|
dchris17
Gold Member
Joined: May-28-2005 Location: Weatherford, TX Status: Offline Points: 573 |
Post Options
Thanks(0)
Quote Reply
Posted: April-22-2006 at 12:07pm |
|
Just talked to Nate - he says he will ship you a wire harness kit like mine for $250. If anyone's interested, post a reply and I'll put contact info for my brother up here.
|
|
|
|
|
dchris17
Gold Member
Joined: May-28-2005 Location: Weatherford, TX Status: Offline Points: 573 |
Post Options
Thanks(0)
Quote Reply
Posted: April-22-2006 at 8:09am |
|
Jeff: There are two layers of insulation, one cloth and one plastic.
John: These wires would have cost $400-500 if I'd had to pay for them, but fortunately my bro was able to use "scraps". One of the reasons these are so expensive is because of the fact that they are for military aircraft and the quality control procedures are so rigorous. To tell you the truth, it's probably not going to make my boat run any better to have such a fancy harness in it, but darned if it doesn't make my boat that much cooler! |
|
|
|
|
jbear
Grand Poobah
Joined: January-21-2005 Location: Lake Wales FL. Status: Offline Points: 8193 |
Post Options
Thanks(0)
Quote Reply
Posted: April-21-2006 at 10:41pm |
|
dchris: will you hire out your bro so we can all get a cool set-up like that?
john |
|
|
"Loud pipes save lives"
AdamT sez "I'm Canadian and a beaver lover myself"... |
|
|
|
|
JEFF KOSTIS
Gold Member
Joined: April-19-2005 Location: United States Status: Offline Points: 817 |
Post Options
Thanks(0)
Quote Reply
Posted: April-21-2006 at 9:35pm |
|
Nice harness, even a heatshrink end. Are the wires the cloth woven type with a plastic coating??
Jeff.. |
|
|
|
|
dchris17
Gold Member
Joined: May-28-2005 Location: Weatherford, TX Status: Offline Points: 573 |
Post Options
Thanks(0)
Quote Reply
Posted: April-21-2006 at 5:56pm |
|
Good news! Got the wire harness my brother made. Here's a picture of a sample he sent me. You can't see it, but the wires all have their function printed on them.

I'm going to finish removing everything from the boat this weekend, fix the seats, and I might even install the new gauges in the dash. |
|
|
|
|
dchris17
Gold Member
Joined: May-28-2005 Location: Weatherford, TX Status: Offline Points: 573 |
Post Options
Thanks(0)
Quote Reply
Posted: April-13-2006 at 9:08pm |
|
I'll post some photos of the wires when they get here. My brothers also sending the wrap/etc to keep the wires together - all military aircraft grade stuff.
|
|
|
|
|
JEFF KOSTIS
Gold Member
Joined: April-19-2005 Location: United States Status: Offline Points: 817 |
Post Options
Thanks(0)
Quote Reply
Posted: April-13-2006 at 1:28am |
|
Dave, WOW!! you do have that stripped!! Gonna look nice when done and you in it thinking of how much time it took... As far a a connector, if you were to do that it would have to be done with water-resistant terminals of proper size for the current of a paricular circuit. I have used "weateherpac" connectors on other things and they work well. Now that I think of it, I might have a few ground wires on one gauge... Keep up the good work! I like the labeled wire scheme...
Jeff.... |
|
|
|
|
dchris17
Gold Member
Joined: May-28-2005 Location: Weatherford, TX Status: Offline Points: 573 |
Post Options
Thanks(0)
Quote Reply
Posted: April-12-2006 at 10:01am |
|
It's not a very good picture, but here you can see the dash stripped down.

Thanks Jeff. My problem is the previous owner had apparently done some things with the wiring. Some of the gauges had 5+ grounds coming out of them. It was a total mess. Has anyone ever used a connector at the dash side of the wiring harness to make it easier to remove the dash? I'd like to be able to remove the dash without unwiring all my gauges. My new wiring harness will arrive this week too. My little brother manages a production line that makes wiring harnesses for military aircraft and he has printed the wires for me. I hope I'll have better pictures to post soon. |
|
|
|
|
jbear
Grand Poobah
Joined: January-21-2005 Location: Lake Wales FL. Status: Offline Points: 8193 |
Post Options
Thanks(0)
Quote Reply
Posted: April-12-2006 at 2:32am |
|
Dave: Glad to see ya back on. Haven't heard from ya in awhile. Also glad to see you are plugging away on the boat. Progress pics?
john |
|
|
"Loud pipes save lives"
AdamT sez "I'm Canadian and a beaver lover myself"... |
|
|
|
|
Post Reply
|
Page <1234 5> |
 Tweet
Tweet
|
| Forum Jump | Forum Permissions You cannot post new topics in this forum You cannot reply to topics in this forum You cannot delete your posts in this forum You cannot edit your posts in this forum You cannot create polls in this forum You cannot vote in polls in this forum |


 Topic Options
 dchris17 wrote: